Data Paths
Overview
The Data Paths menu allows you to assign and manage tags for tables and columns. These tags are then utilized for data classification and applying access control policies.
Key Features
Tagging Scope: Tags can be applied at the table and column levels.
Application Limits: Tagging is not supported at the database or schema levels.
Table Access Control: Permissions can be granted in a whitelist manner, allowing access only to tables that have specific tags assigned.
Data Classification: Tags enable you to classify data according to its purpose and characteristics.
Integration with Access Control: Access control policies can be configured based on the assigned tags.
Assigning Tags to Tables
Table tagging is managed within the Data Paths menu, enabling systematic classification and management of tables through tags.
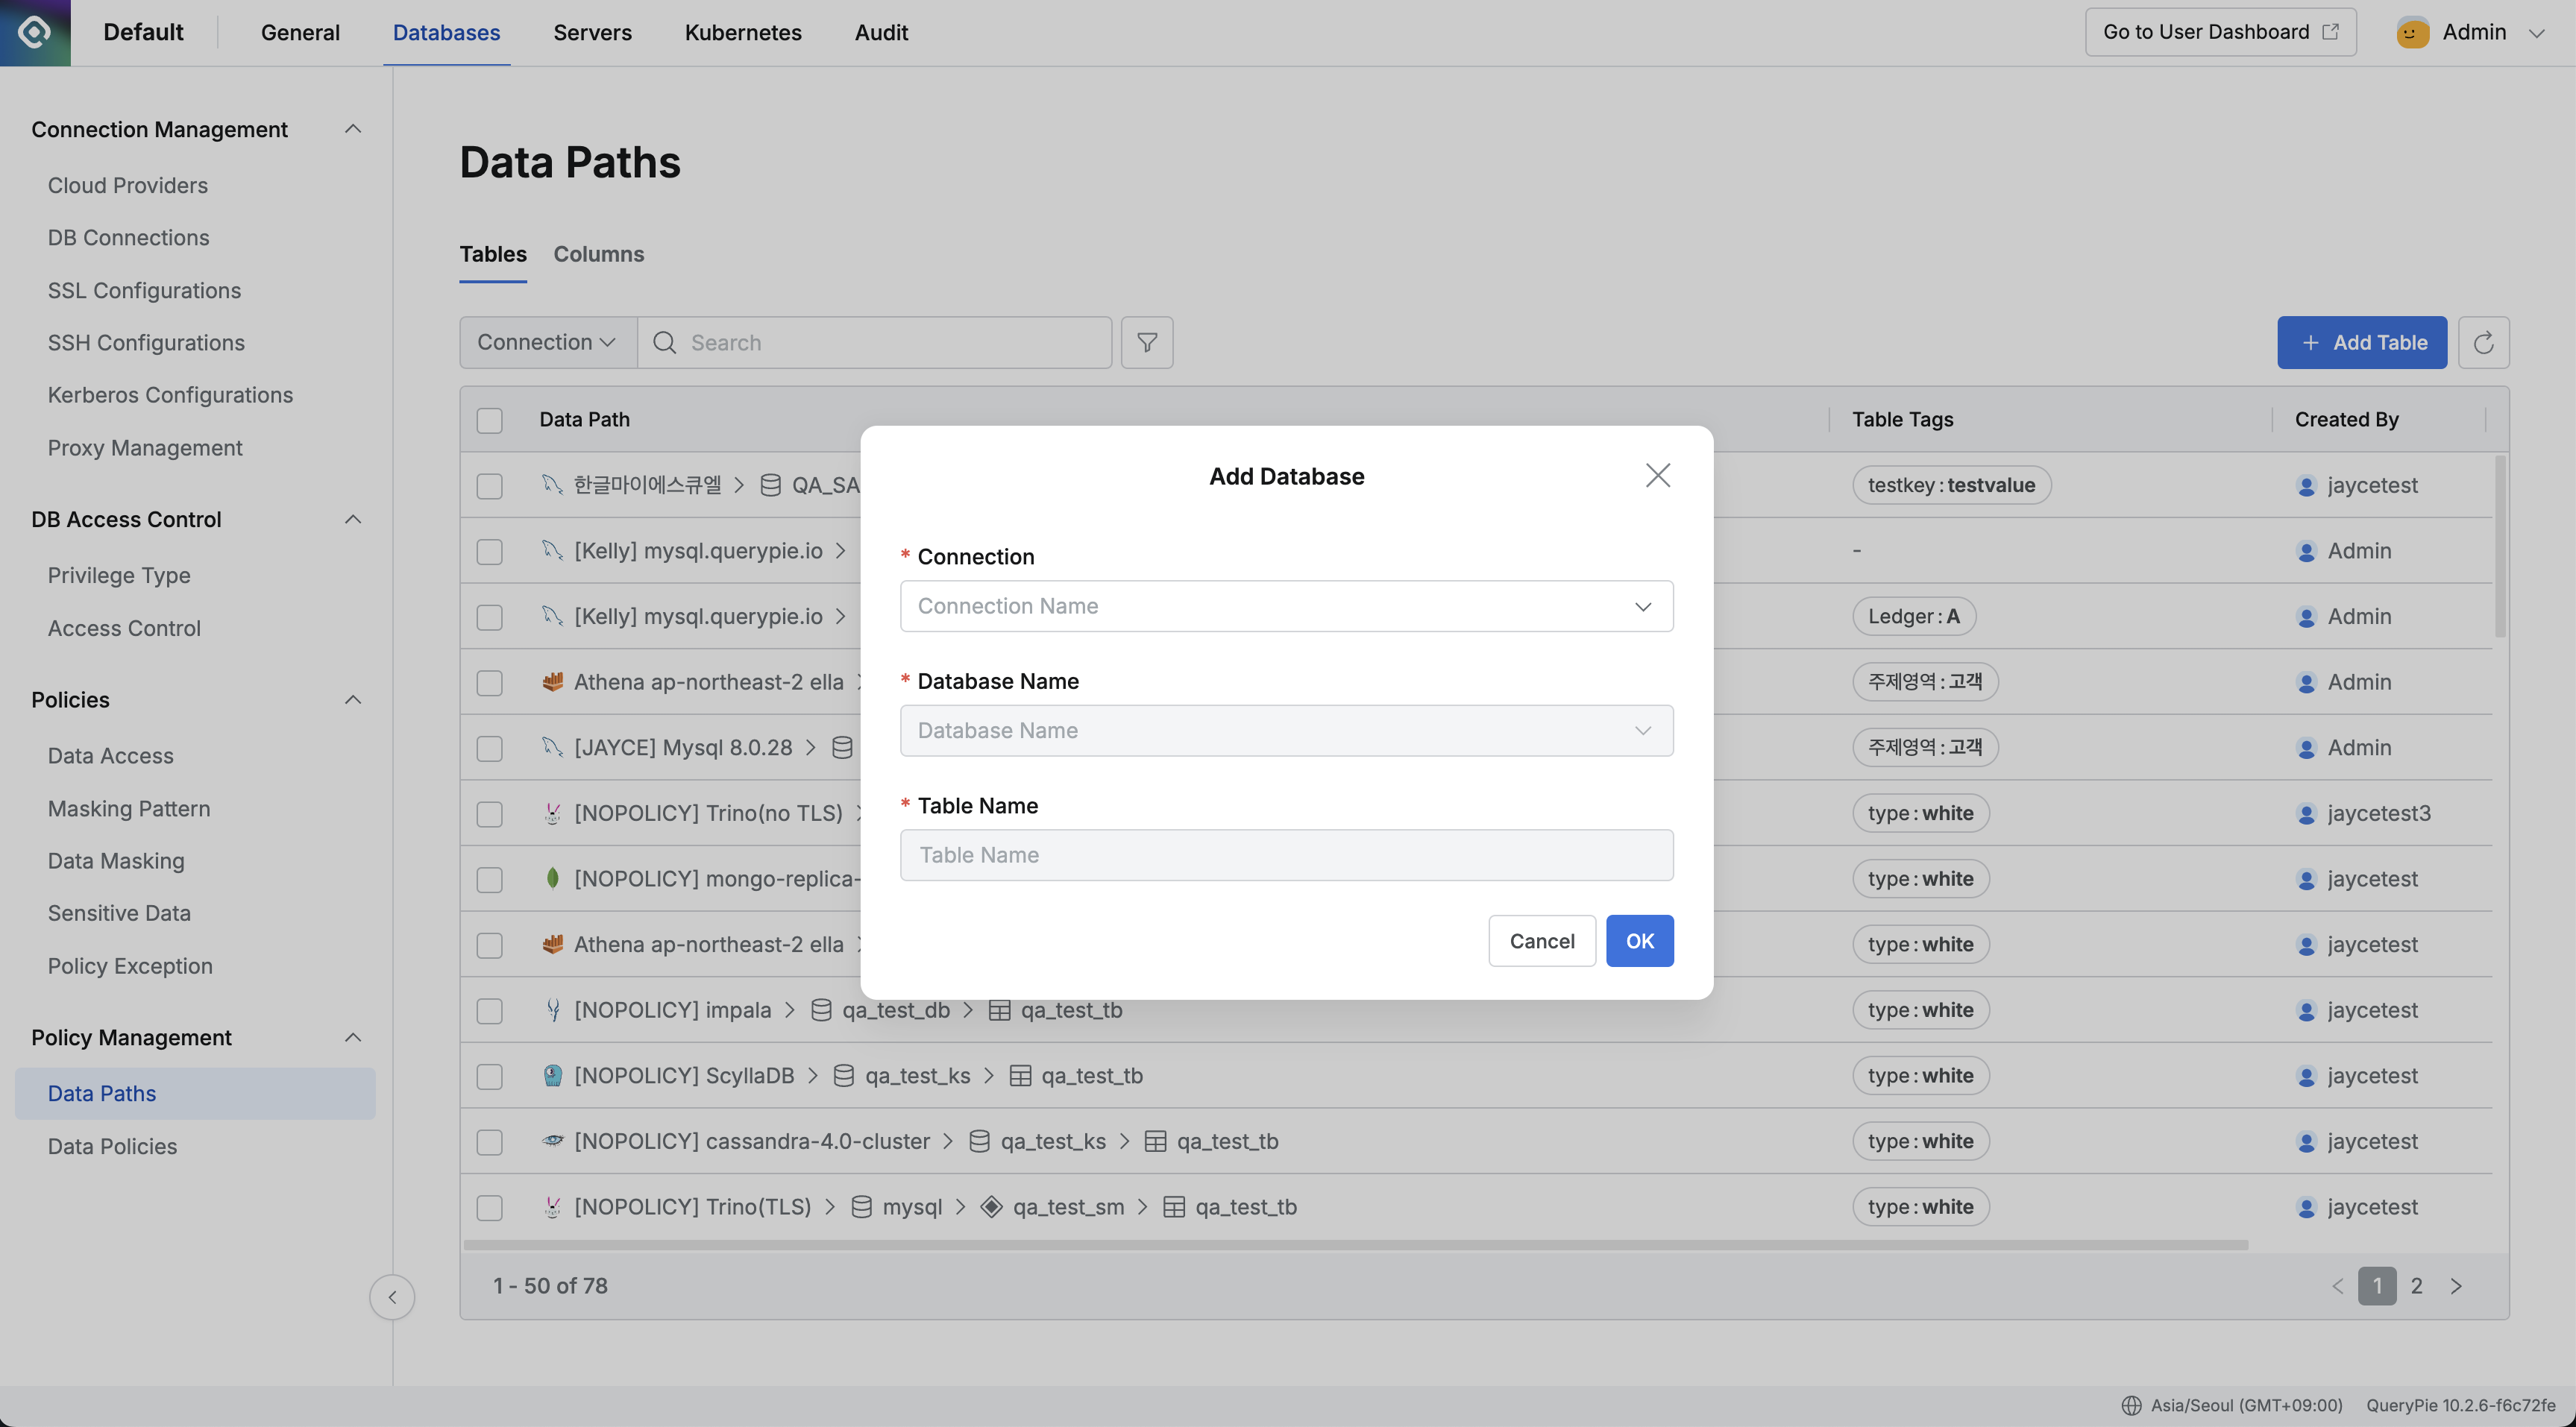
In the left sidebar, under the Policy Management section, click Data Paths.
By default, the Tables tab is selected.
Click the
Add Tablebutton in the top-right corner.In the pop-up window, enter the following information
Connection: Select a database connection from the dropdown.
Database Name: Select a database name from the dropdown.
Table Name: Select the table to which you want to assign tags.
After entering all information, click the
OKbutton to add the table.
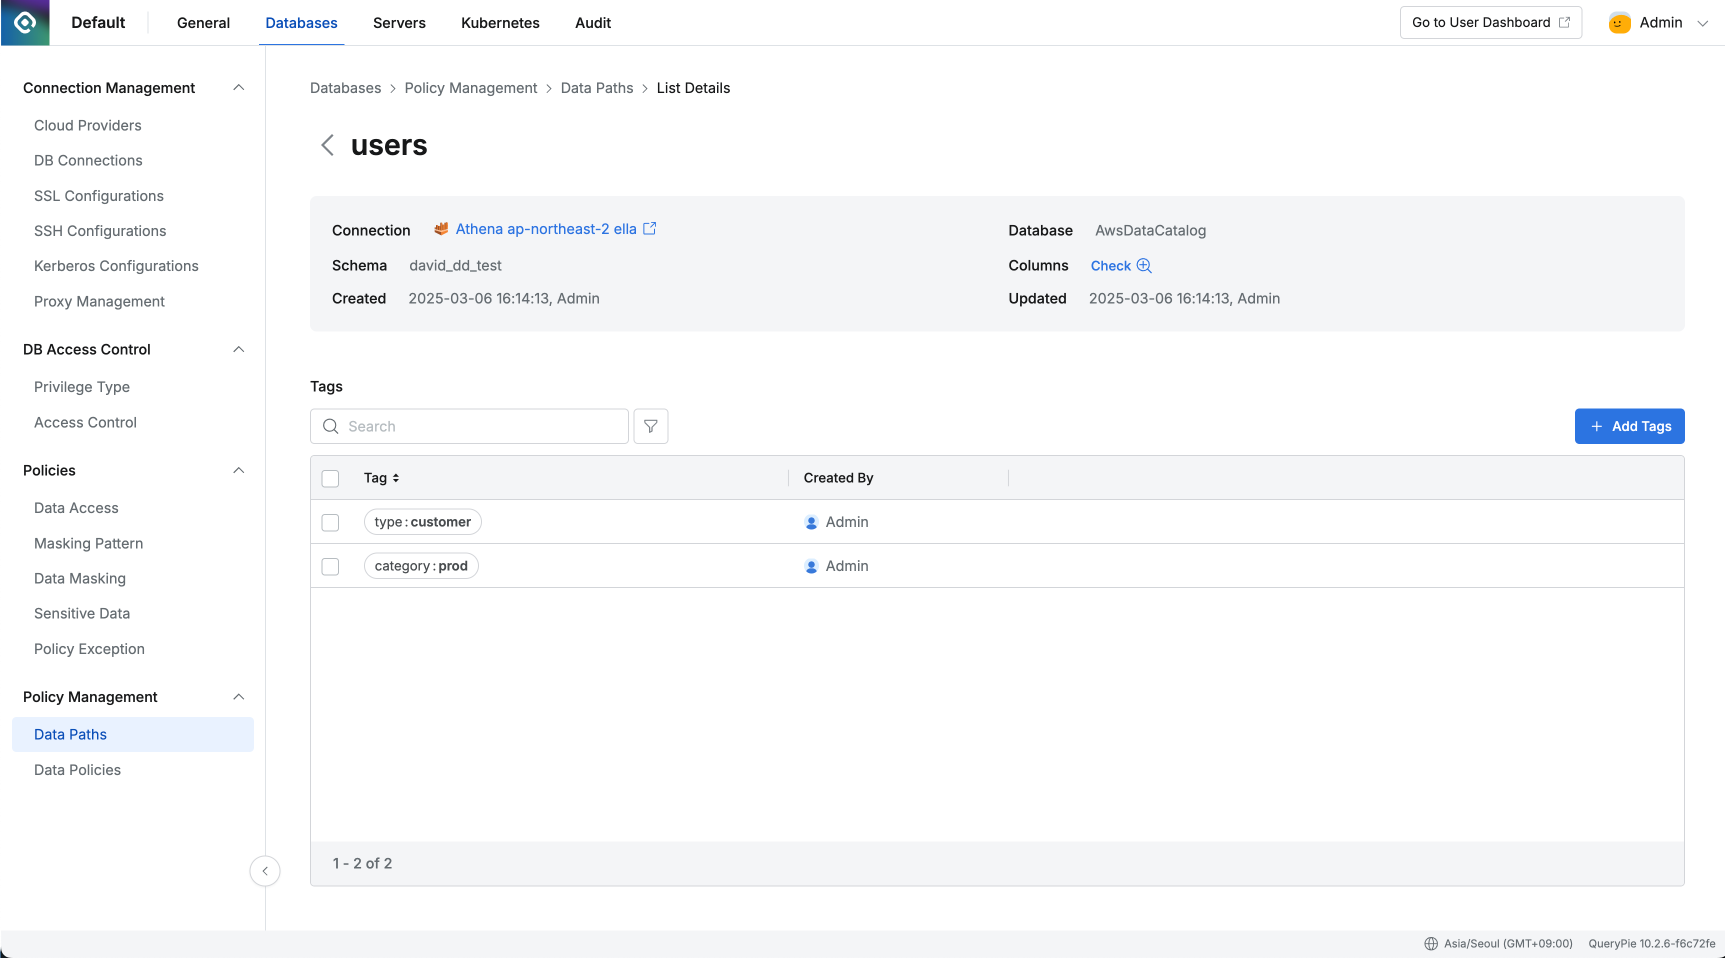
Once the table is added, it will appear in the list. You can then click on the table in the list to go to its detail page, where you can click the
Add Tagsbutton to add new tags.Tags are added in a Key:Value format.
The top of the table's detail page displays basic information about the selected table.
Clicking the Connection name will navigate you to the detail page of that connection.
Clicking Column Check will display a list of the table's columns, typically on the right side of the page.
The table detail screen is for managing tags assigned directly to the table. Tags for individual columns are managed on the respective column's detail screen.
Assigning Tags to Columns
Column tagging is also managed within the Data Paths menu. Tags help in systematically classifying columns, which allows for effective bulk application of policies such as data masking.
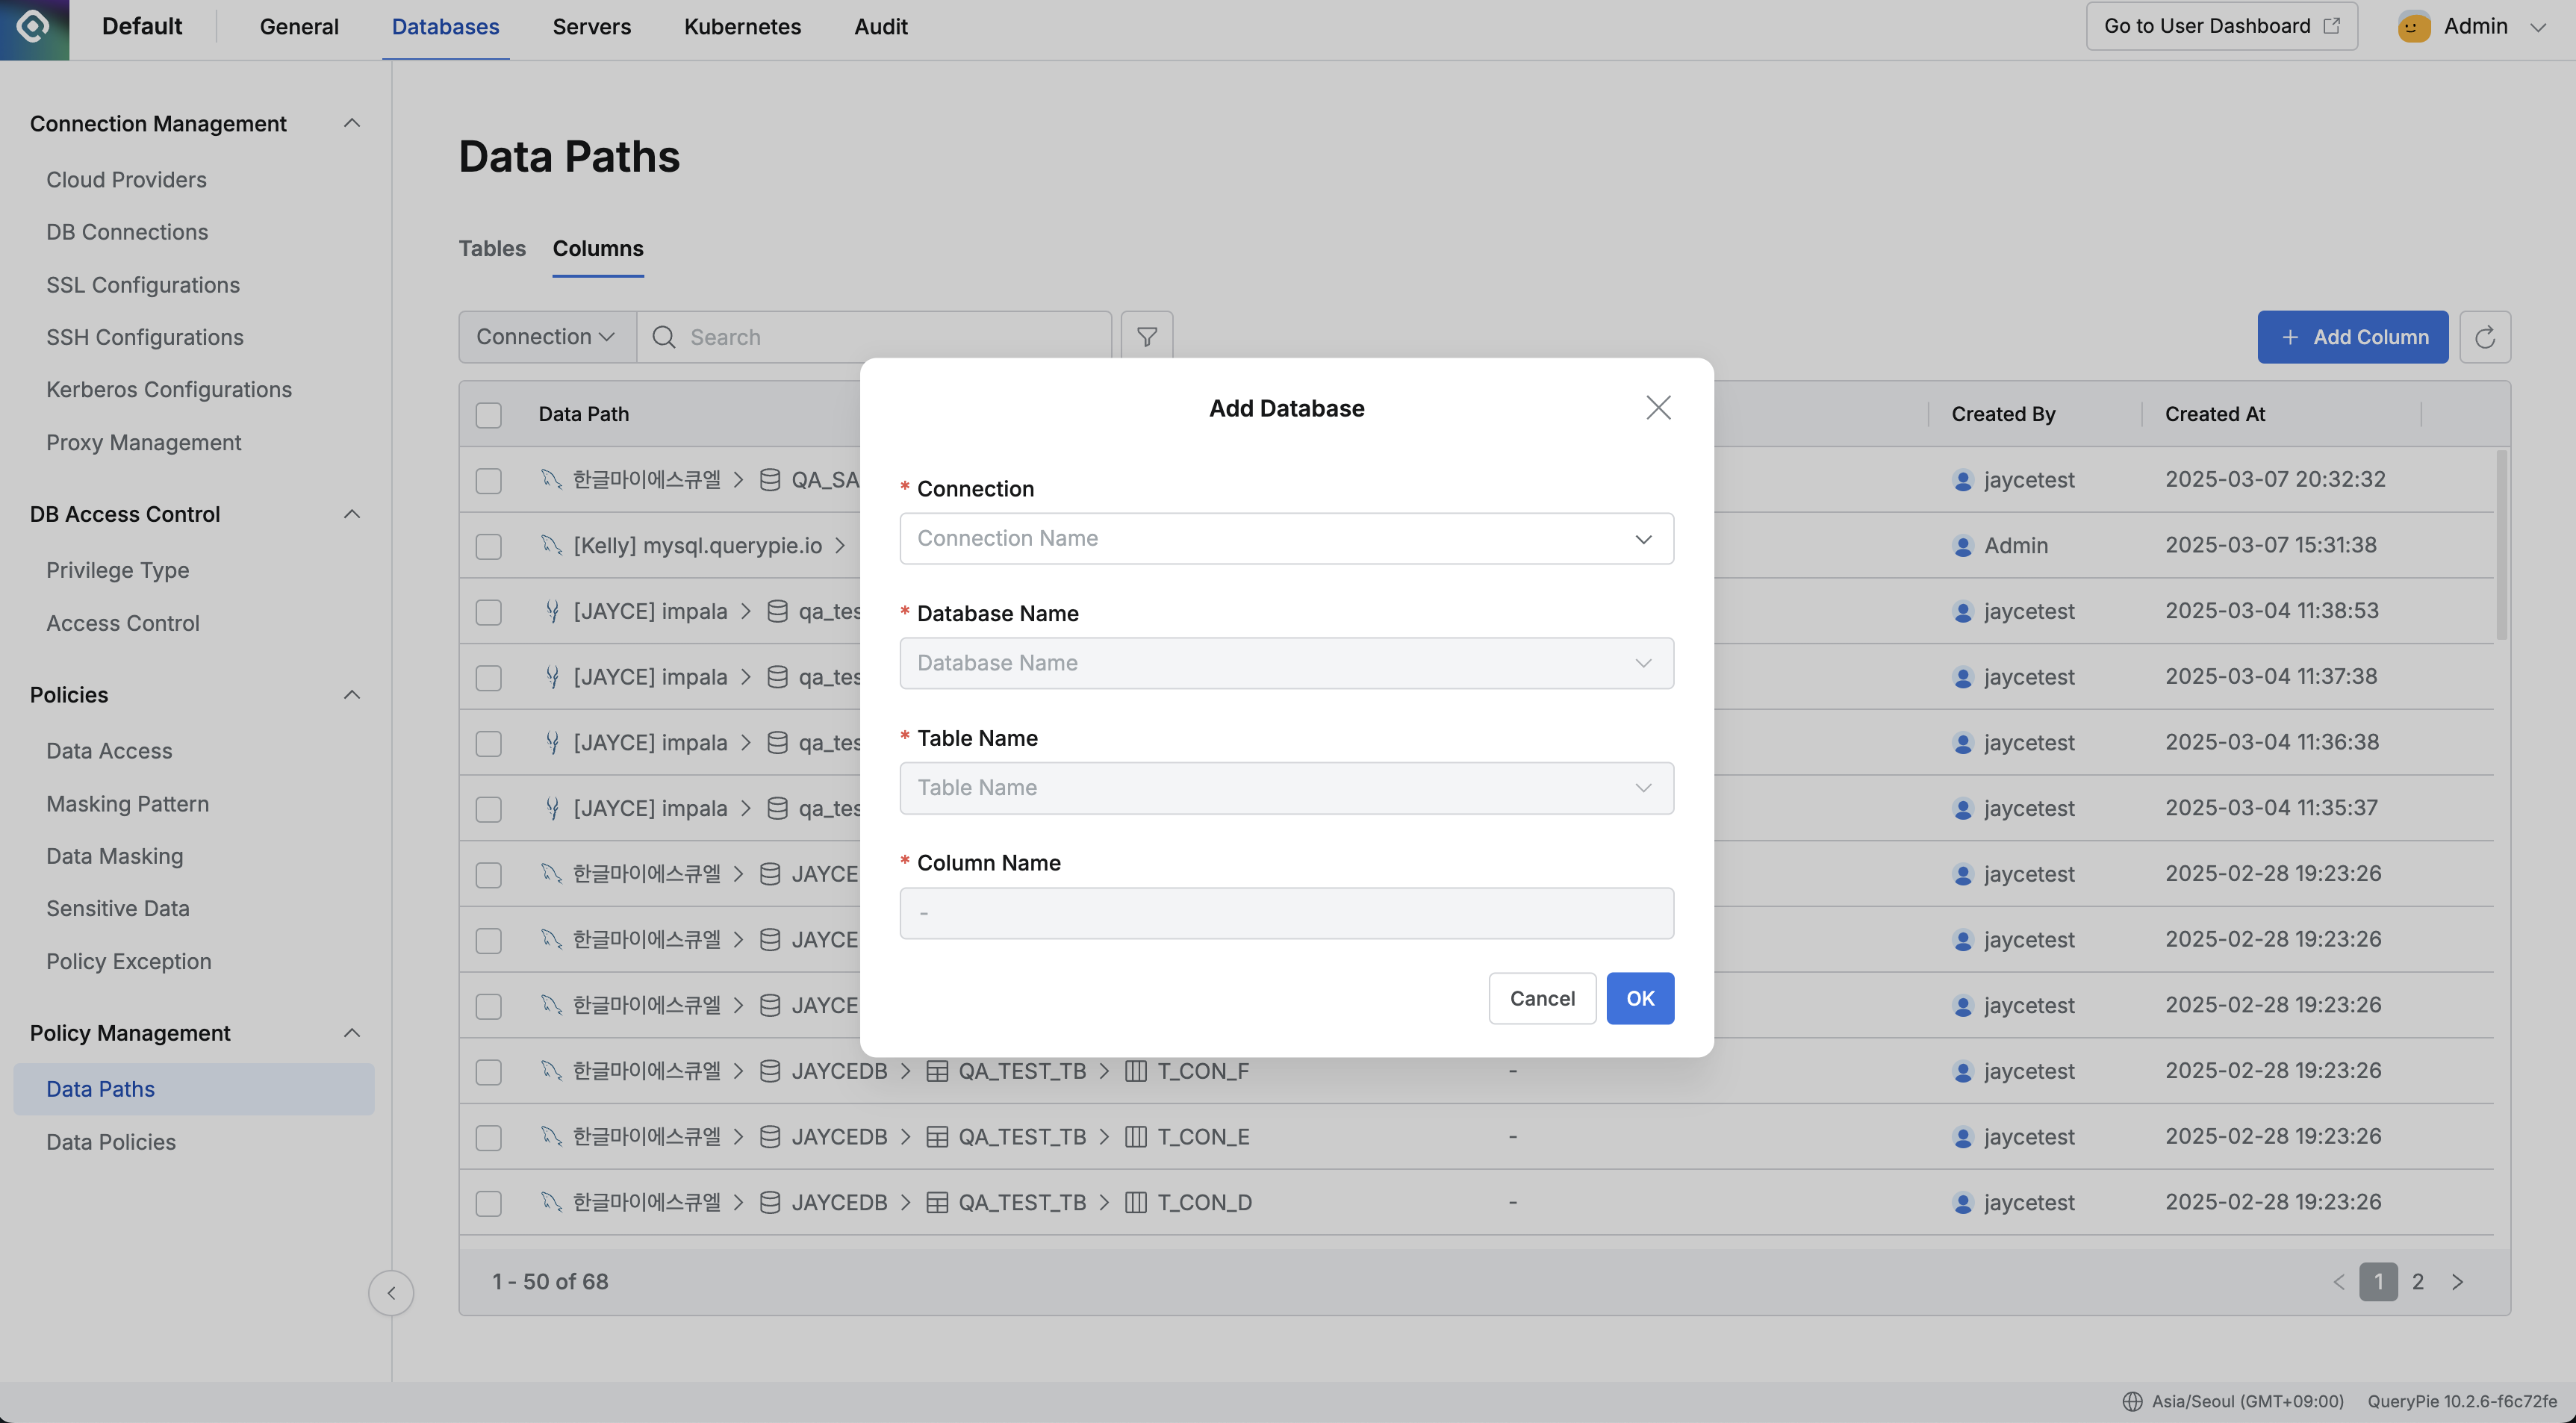
In the Data Paths menu, select the Columns tab at the top.
Click the
Add Columnbutton in the top-right corner.In the pop-up window, enter the following information:
Connection: Select a database connection from the dropdown.
Database Name: Select a database name from the dropdown.
Table Name: Select the table containing the column you want to tag.
Column Name: Select the name of the column to which you want to assign tags.
After entering all information, click the
OKbutton to add the column.
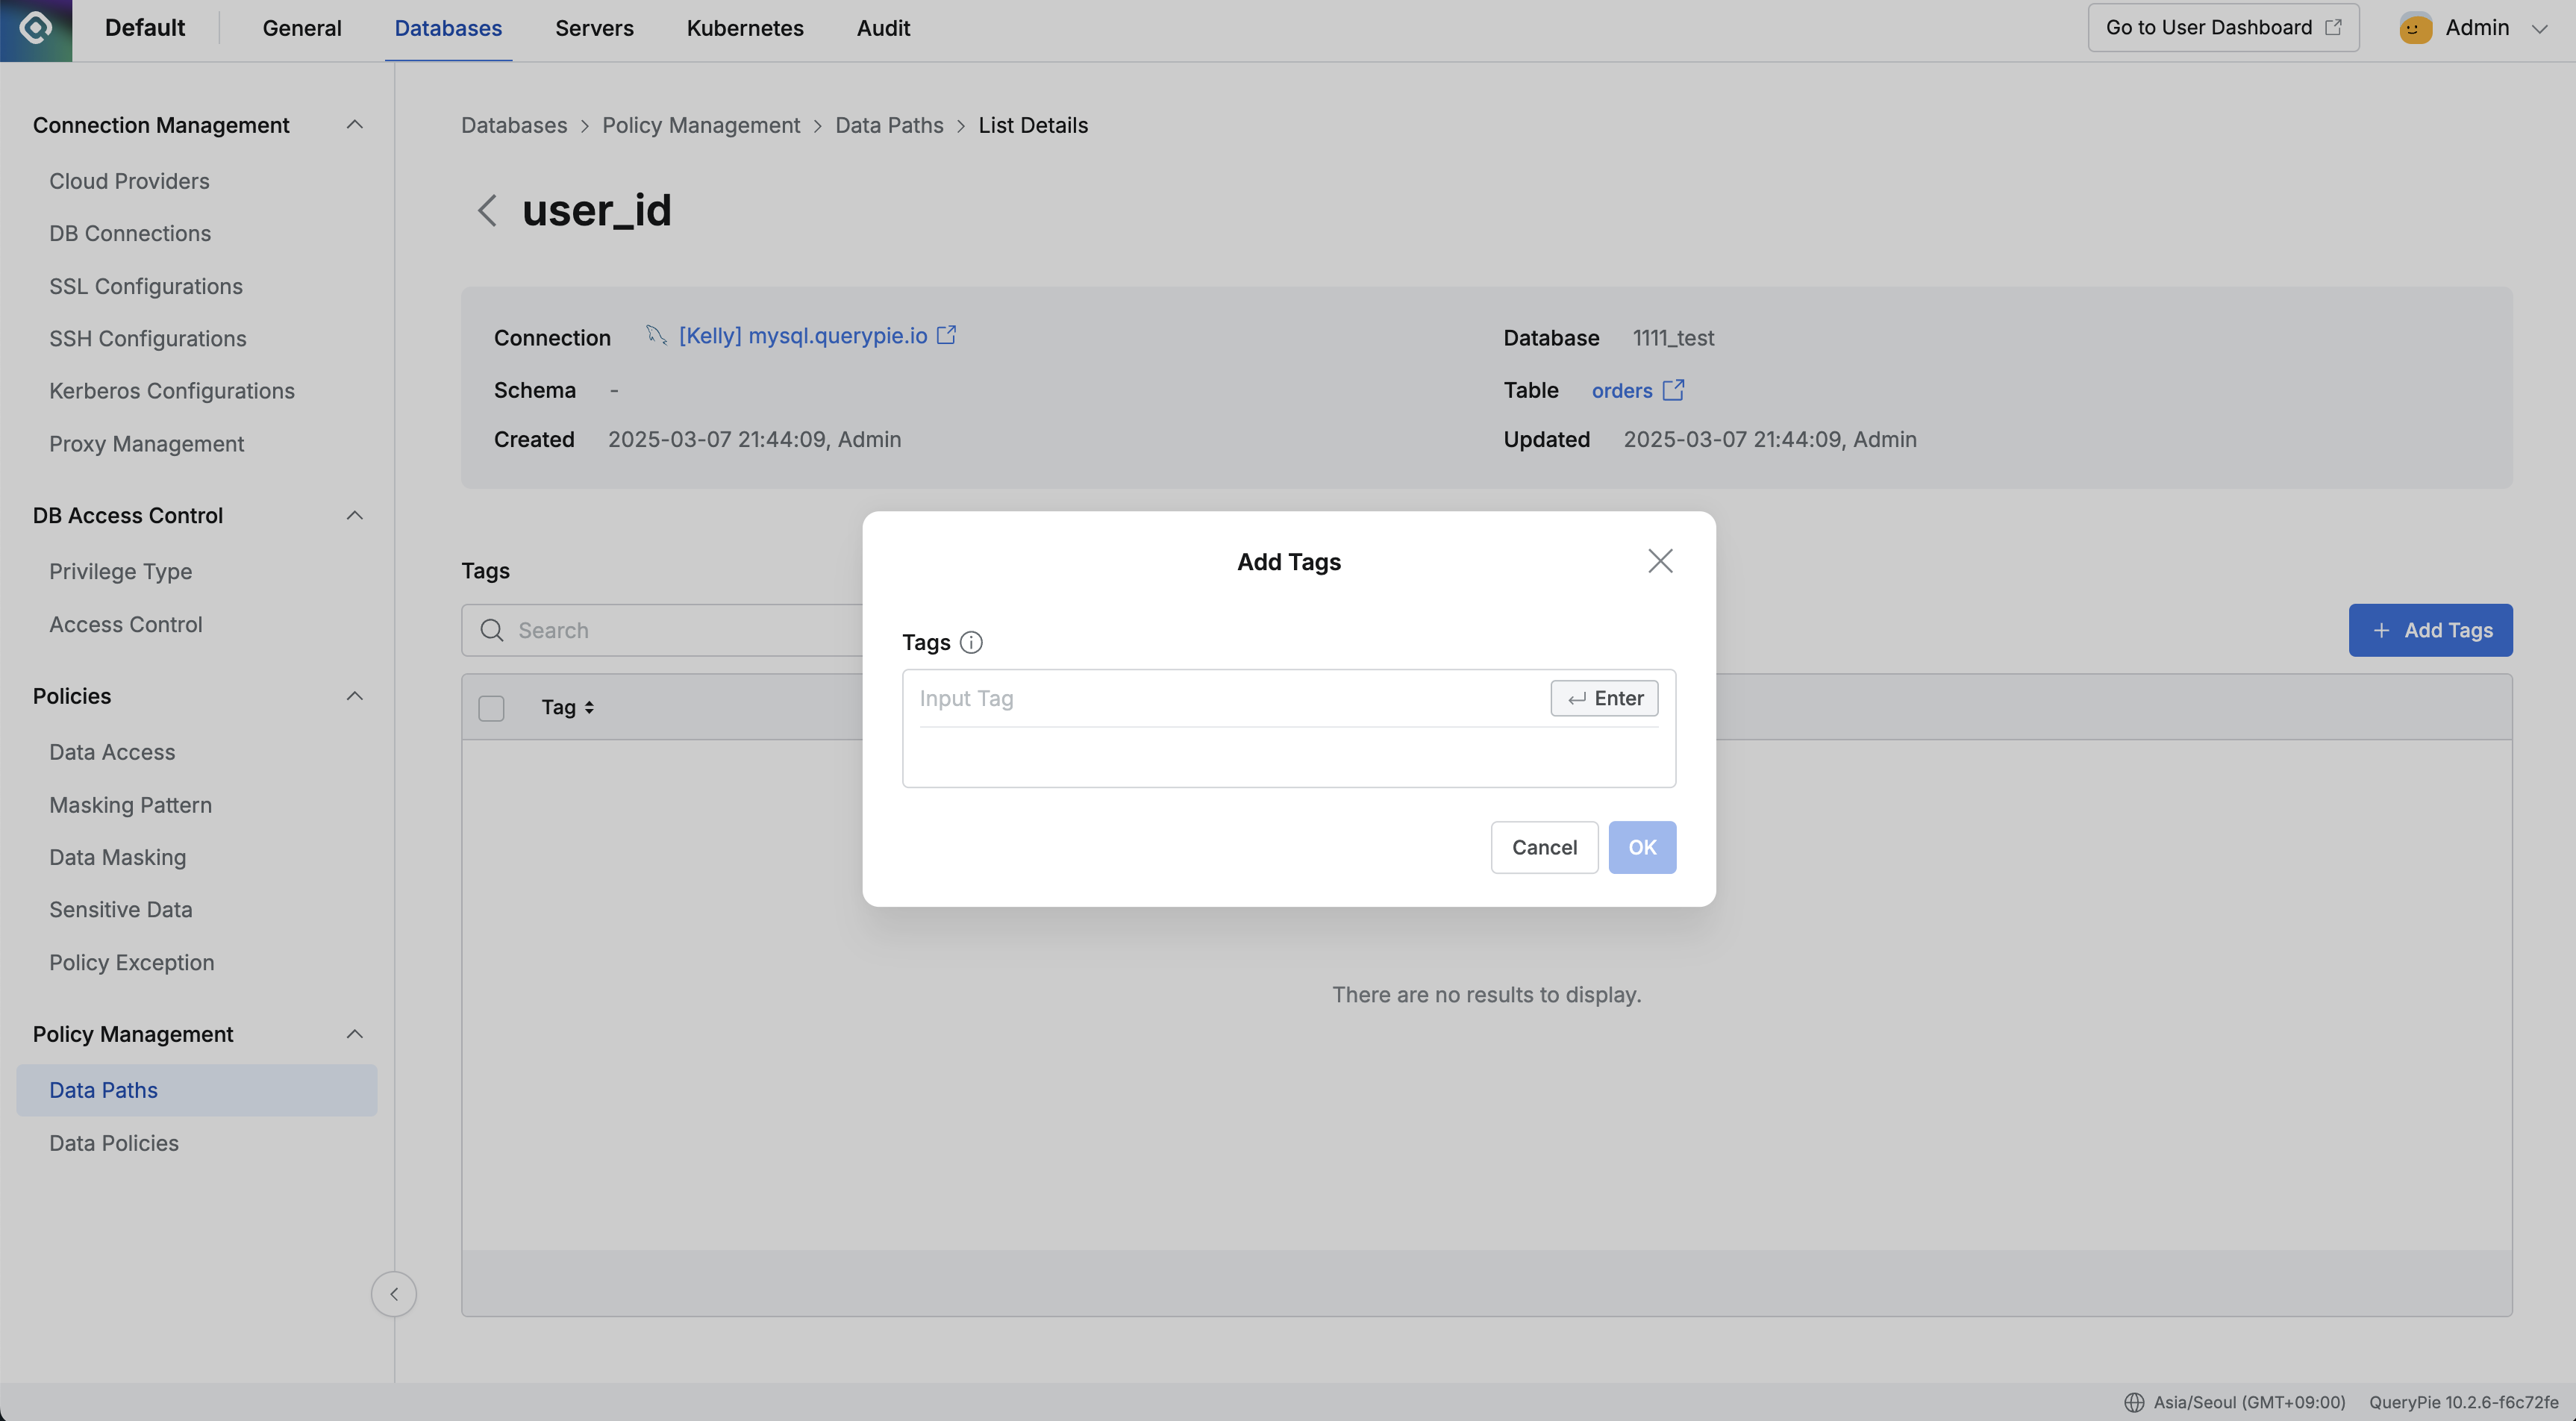
Once the column is added, it will appear in the list. You can then click on the column in the list to go to its detail page, where you can click the
Add Tagsbutton to add new tags.Tags are added in a
Key:Valueformat.The top of the column's detail page displays basic information about the selected column.
Clicking the Connection name will navigate you to the detail page of that connection.
Clicking the Column name itself (or a link to its parent table) will navigate you to the detail page of the table it belongs to.
Important: If you add a column whose parent table has not yet been added to Data Paths, the table will be automatically added to Data Paths along with the column. Therefore, you do not need to add the table separately first; the necessary table will be automatically registered during the column addition process.
Table and Column Relationship - Automatic Table Creation Feature
To enhance user convenience when adding columns, QueryPie provides the following automation:
Automatic Table Creation: When adding a column, if its parent table is not already registered in Data Paths, the table is automatically added to Data Paths.
Single Process: This feature allows users to perform both table and column registration in a single step during the column addition process, rather than requiring separate steps for adding the table first and then the column.
Consistency Maintained: The relationship between the automatically created table and the added column is established automatically, ensuring data structure consistency.
Granting Table Access Rights Based on Tags
You can grant table access permissions based on the tags configured in the Data Paths menu. This system operates on a whitelist basis: access is permitted only to tables with specific assigned tags, while access to all other tables is restricted. This feature enables fine-grained data access control.
The permission granting process generally involves two main steps:
Granting database access permission to the user (Grant Privilege/Permission).
Configuring tag-based access control within the granted permission (via Access Type).
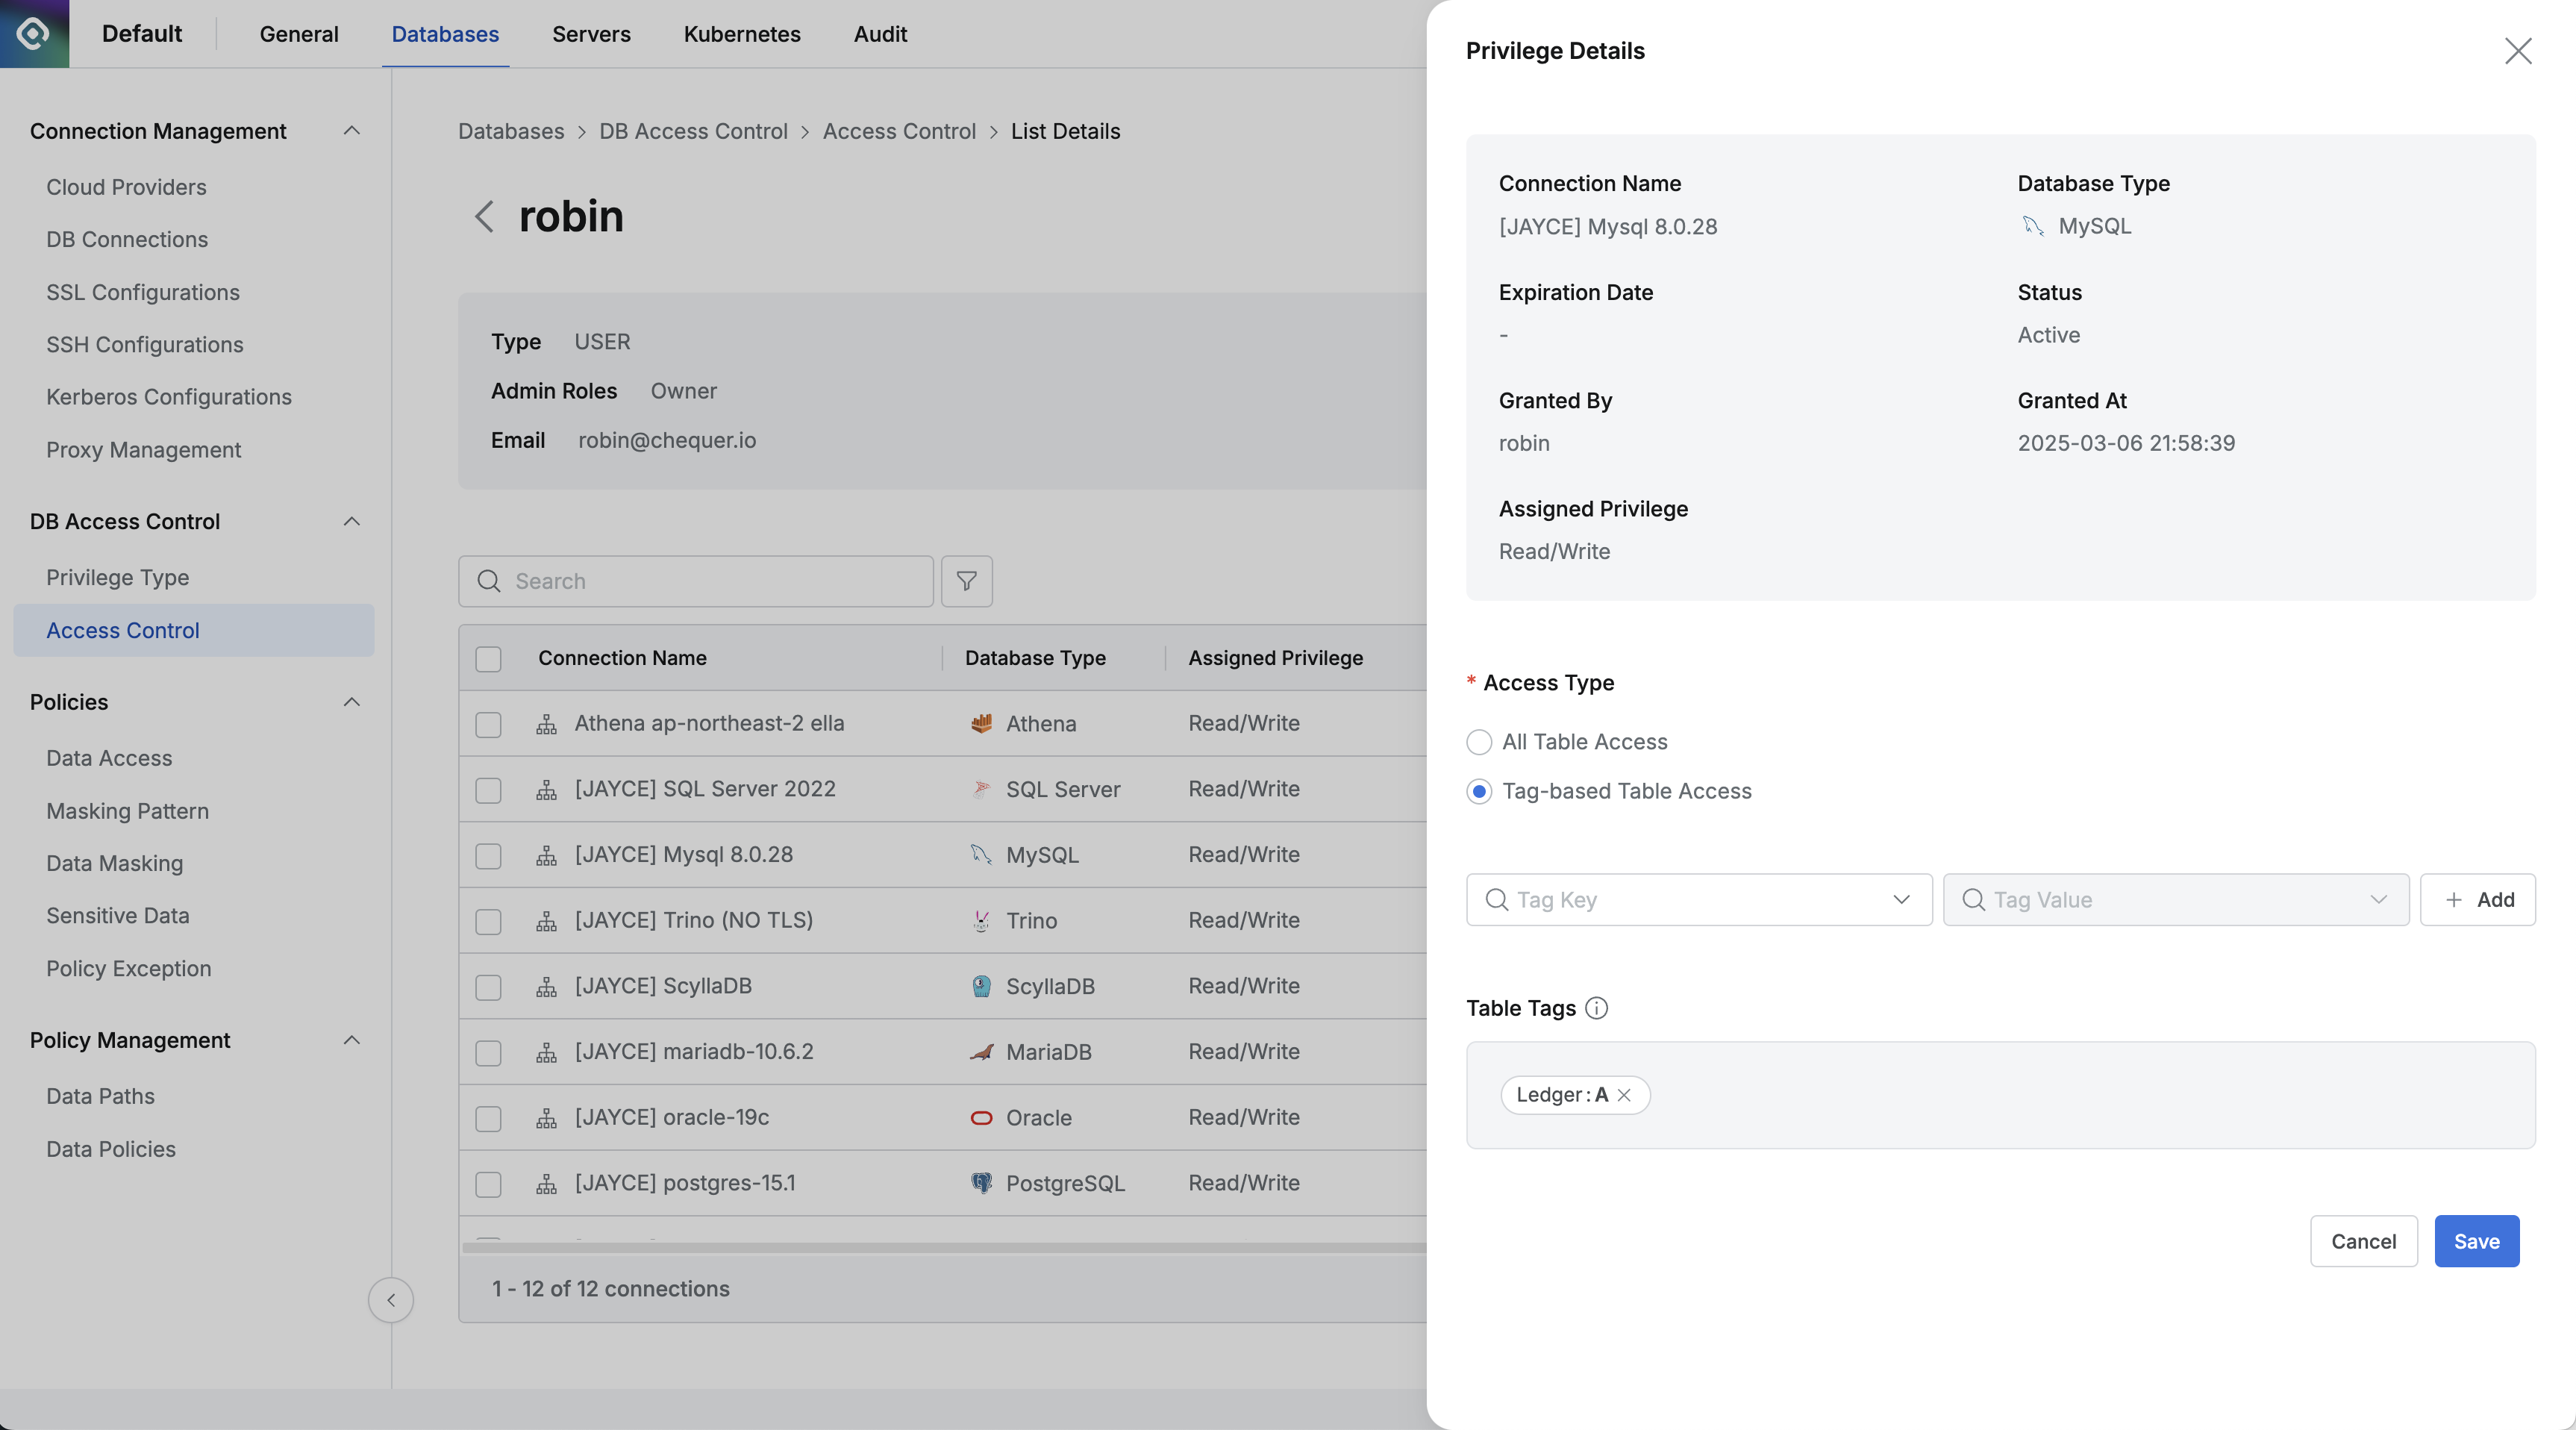
In the Access Control menu, select the user to whom you want to configure permissions and proceed to grant or edit their permissions.
Click on an existing granted privilege/permission in the user's list to view its Privilege Details screen.
In the Access Type section, select the Tag-based Table Access option.
The default setting is usually the All Table Access option, which grants access to all tables within the scope of the connection privilege.
Selecting Tag-based Table Access changes the mode to a whitelist system, allowing access only to tables that have specific, configured tags.
Result of Applying Permissions
Once tag-based table access is configured:
The user can only access tables that have at least one of the specified authorizing tags assigned to them.
Access to tables that do not have any of the specified authorizing tags will be restricted.
Use Cases
Tag-based table access is useful in various scenarios, including:
Department-Specific Data Access Management: Assign specific tags to tables relevant to each department and configure permissions so that users in a department can only access tables with their department's tag.
Project-Based Access Control: Assign project-specific tags to tables related to a project and grant access only to project members for tables with those tags.
Data Sensitivity-Based Access Control: Assign tags to tables based on data sensitivity levels and grant access only to users with appropriate authorization for those sensitivity levels.
Warning
Tag-based access control operates as a whitelist. If a table does not have any of the tags configured to grant access, it will be inaccessible to the user under this permission.
If you configure multiple tags to grant access, a user will be able to access any table that possesses at least one of those specified tags (OR logic).
Tags must be properly assigned to tables in the Data Paths menu before configuring tag-based access control that relies on them.
Changes to access permissions are typically applied immediately after saving.
%201.png)