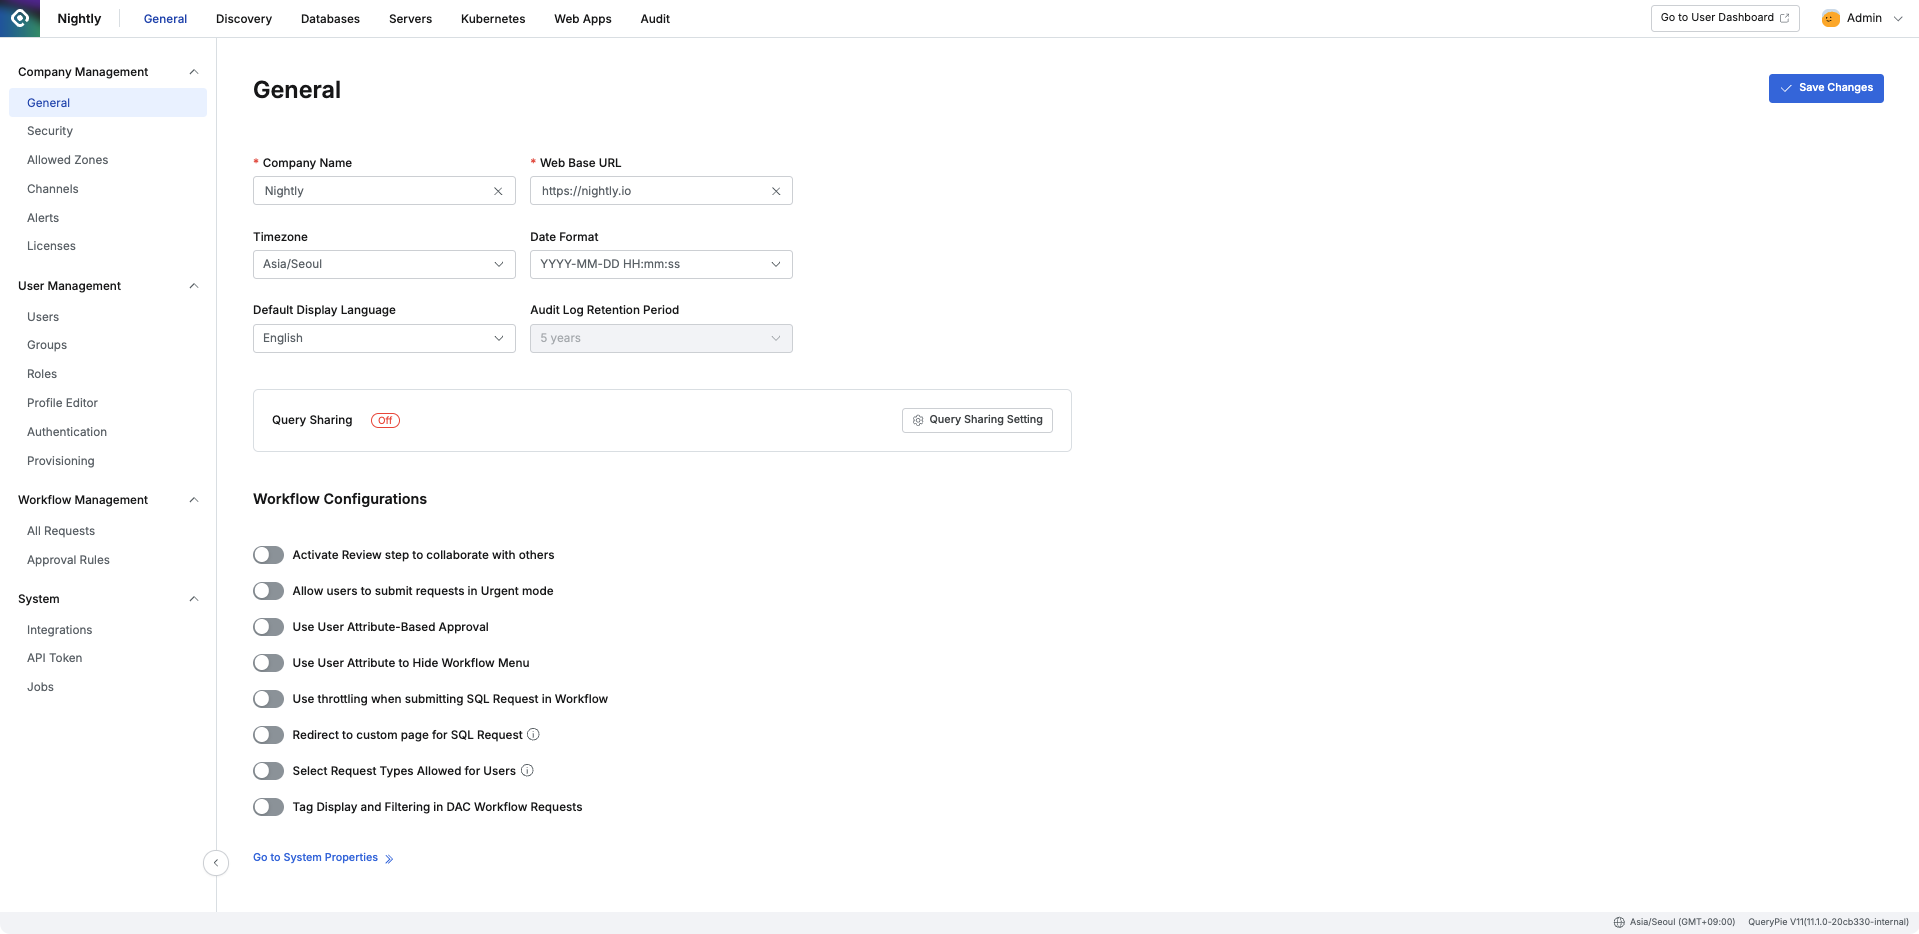
General
Overview
The General page serves as the entry point to the admin console, where you can manage general settings across QueryPie. This includes security settings, user and group management, workflow approval line management, and the management of integrations and API tokens.
Administrator > General > Company Management > General
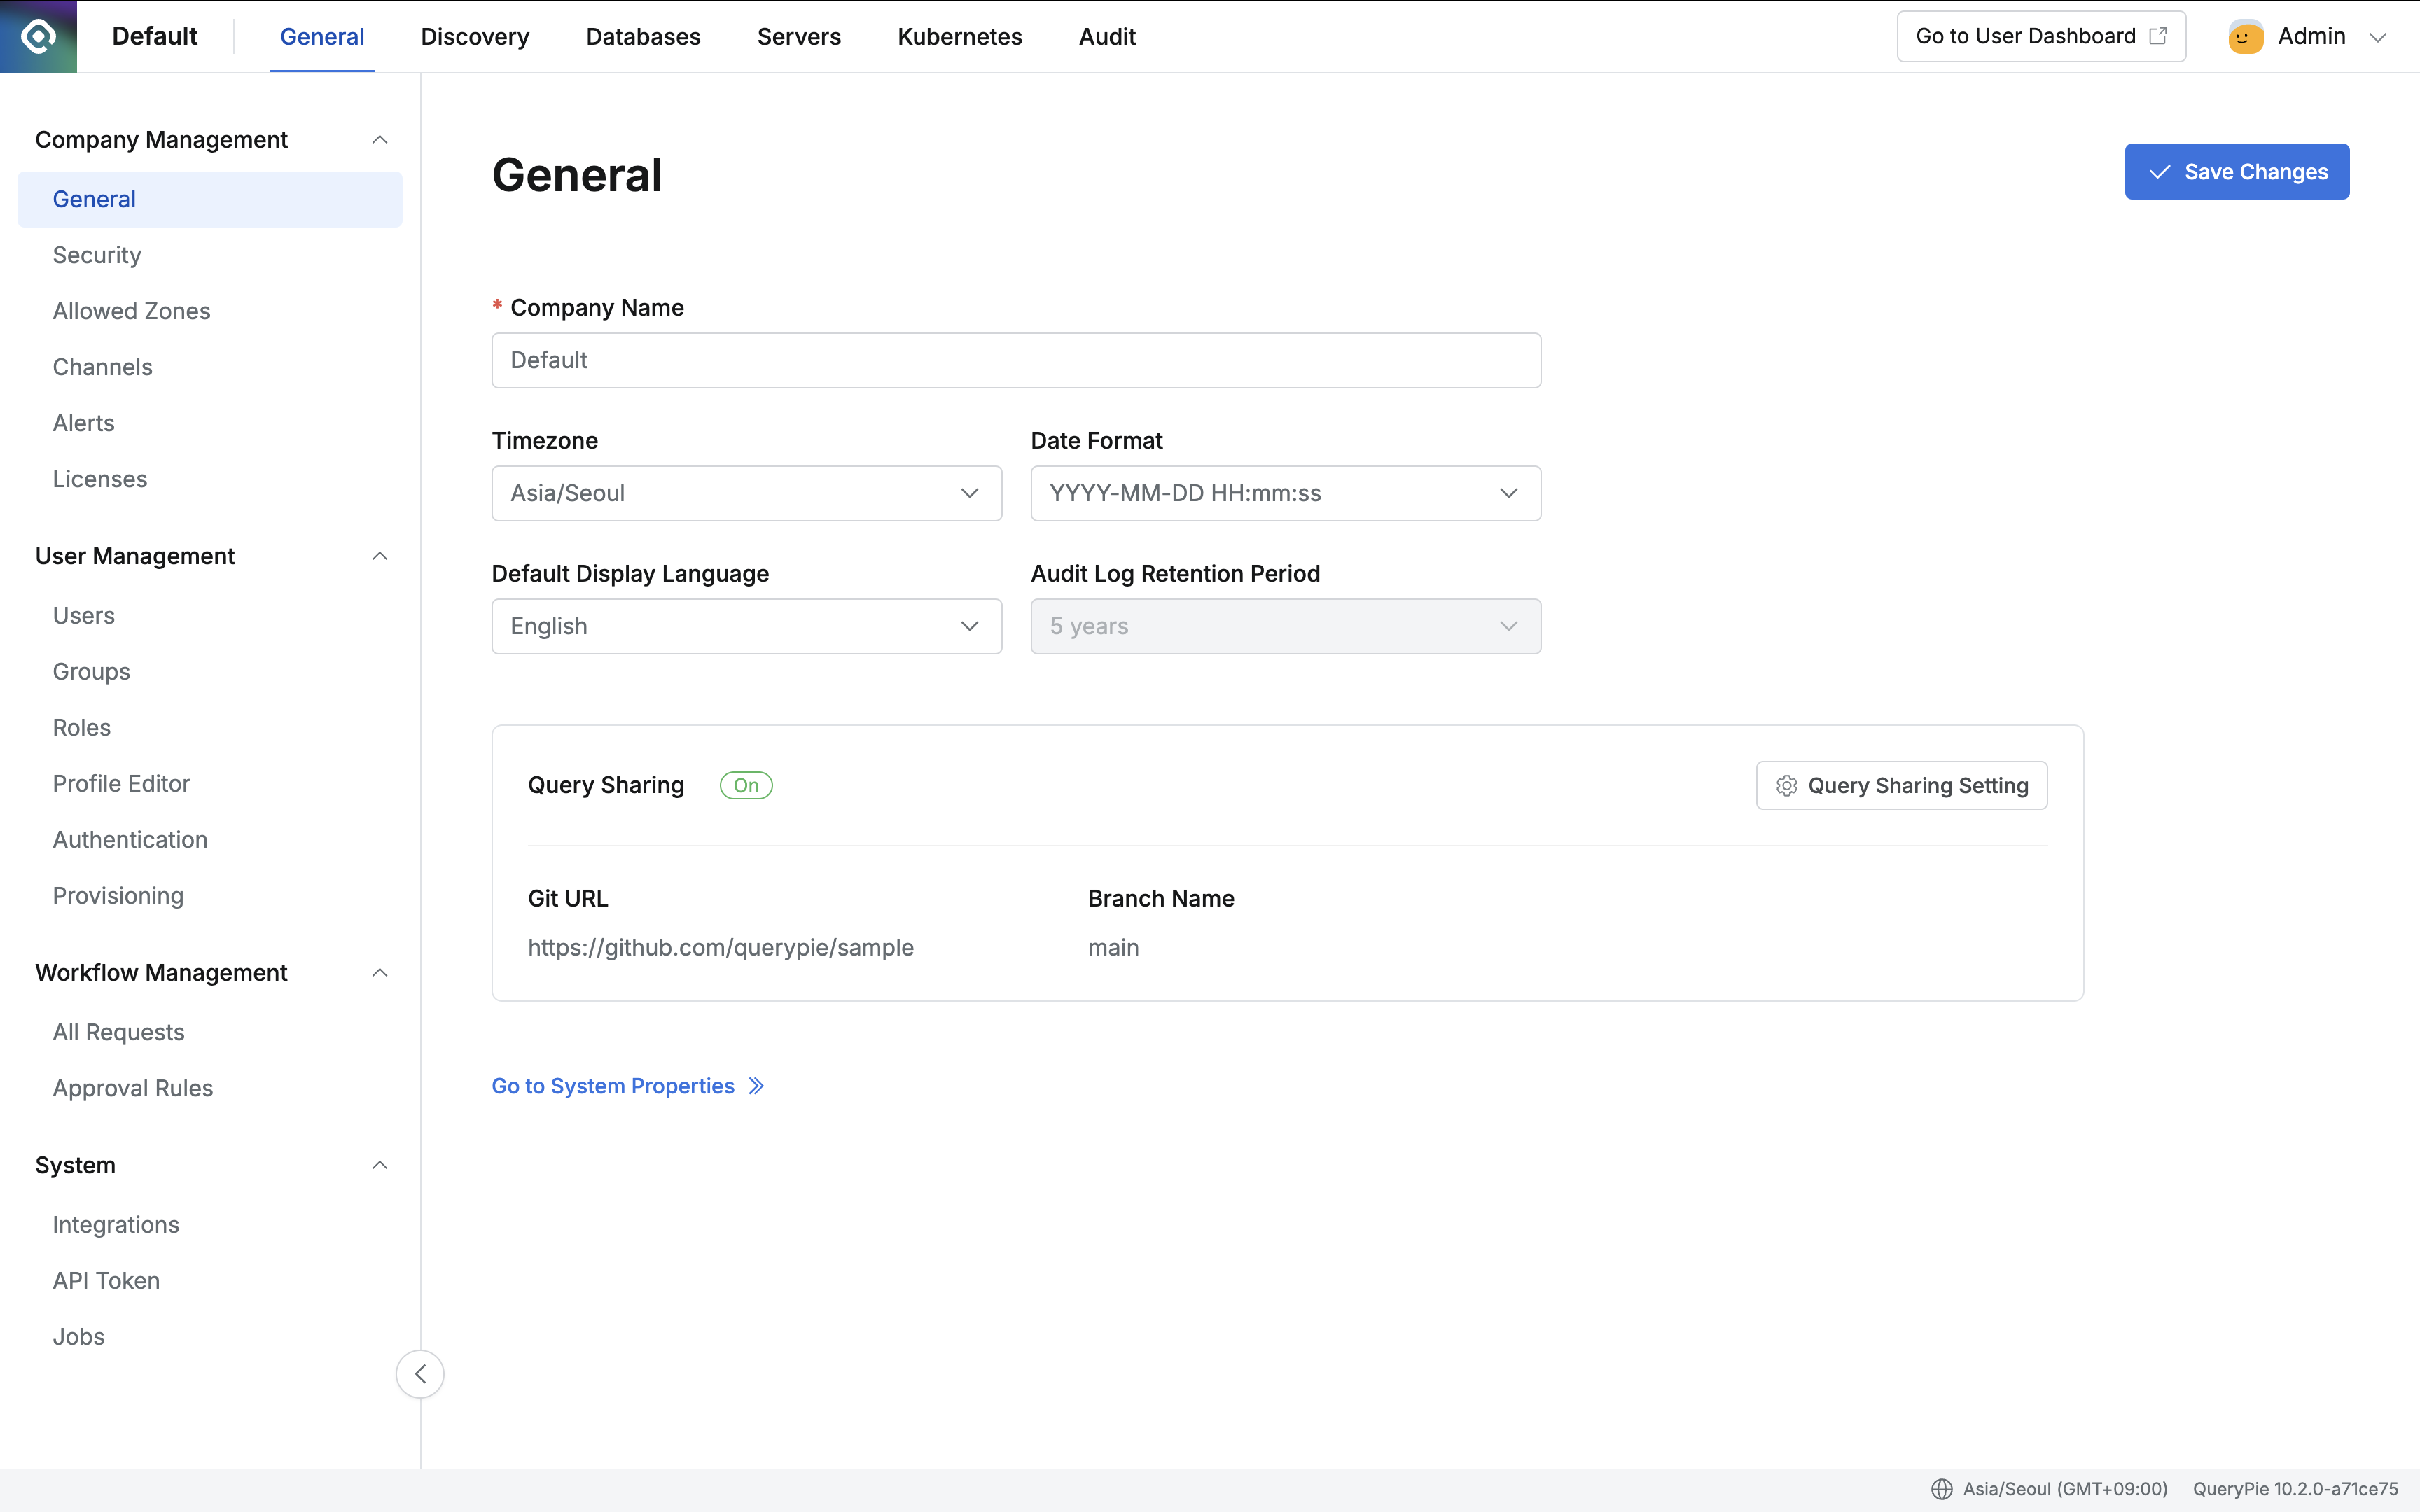
Default Settings
Company Name: Enter the company name to be displayed in profile sections and other areas.
Web Base URL: The default domain used to access the QueryPie service.
Timezone: Set the timezone that will be applied to all date and time information across QueryPie.
Date Format: Specify the preferred date display format.
Default Display Language: Set the default language for QueryPie. (Default: English)
Audit Log Retention Period: Define the retention period for audit logs. (Currently fixed at 5 years.)
Go to System Properties: Click to view system property details.
System Properties
On the System Properties page, you can view and export the configuration values of QueryPie system components as a file.
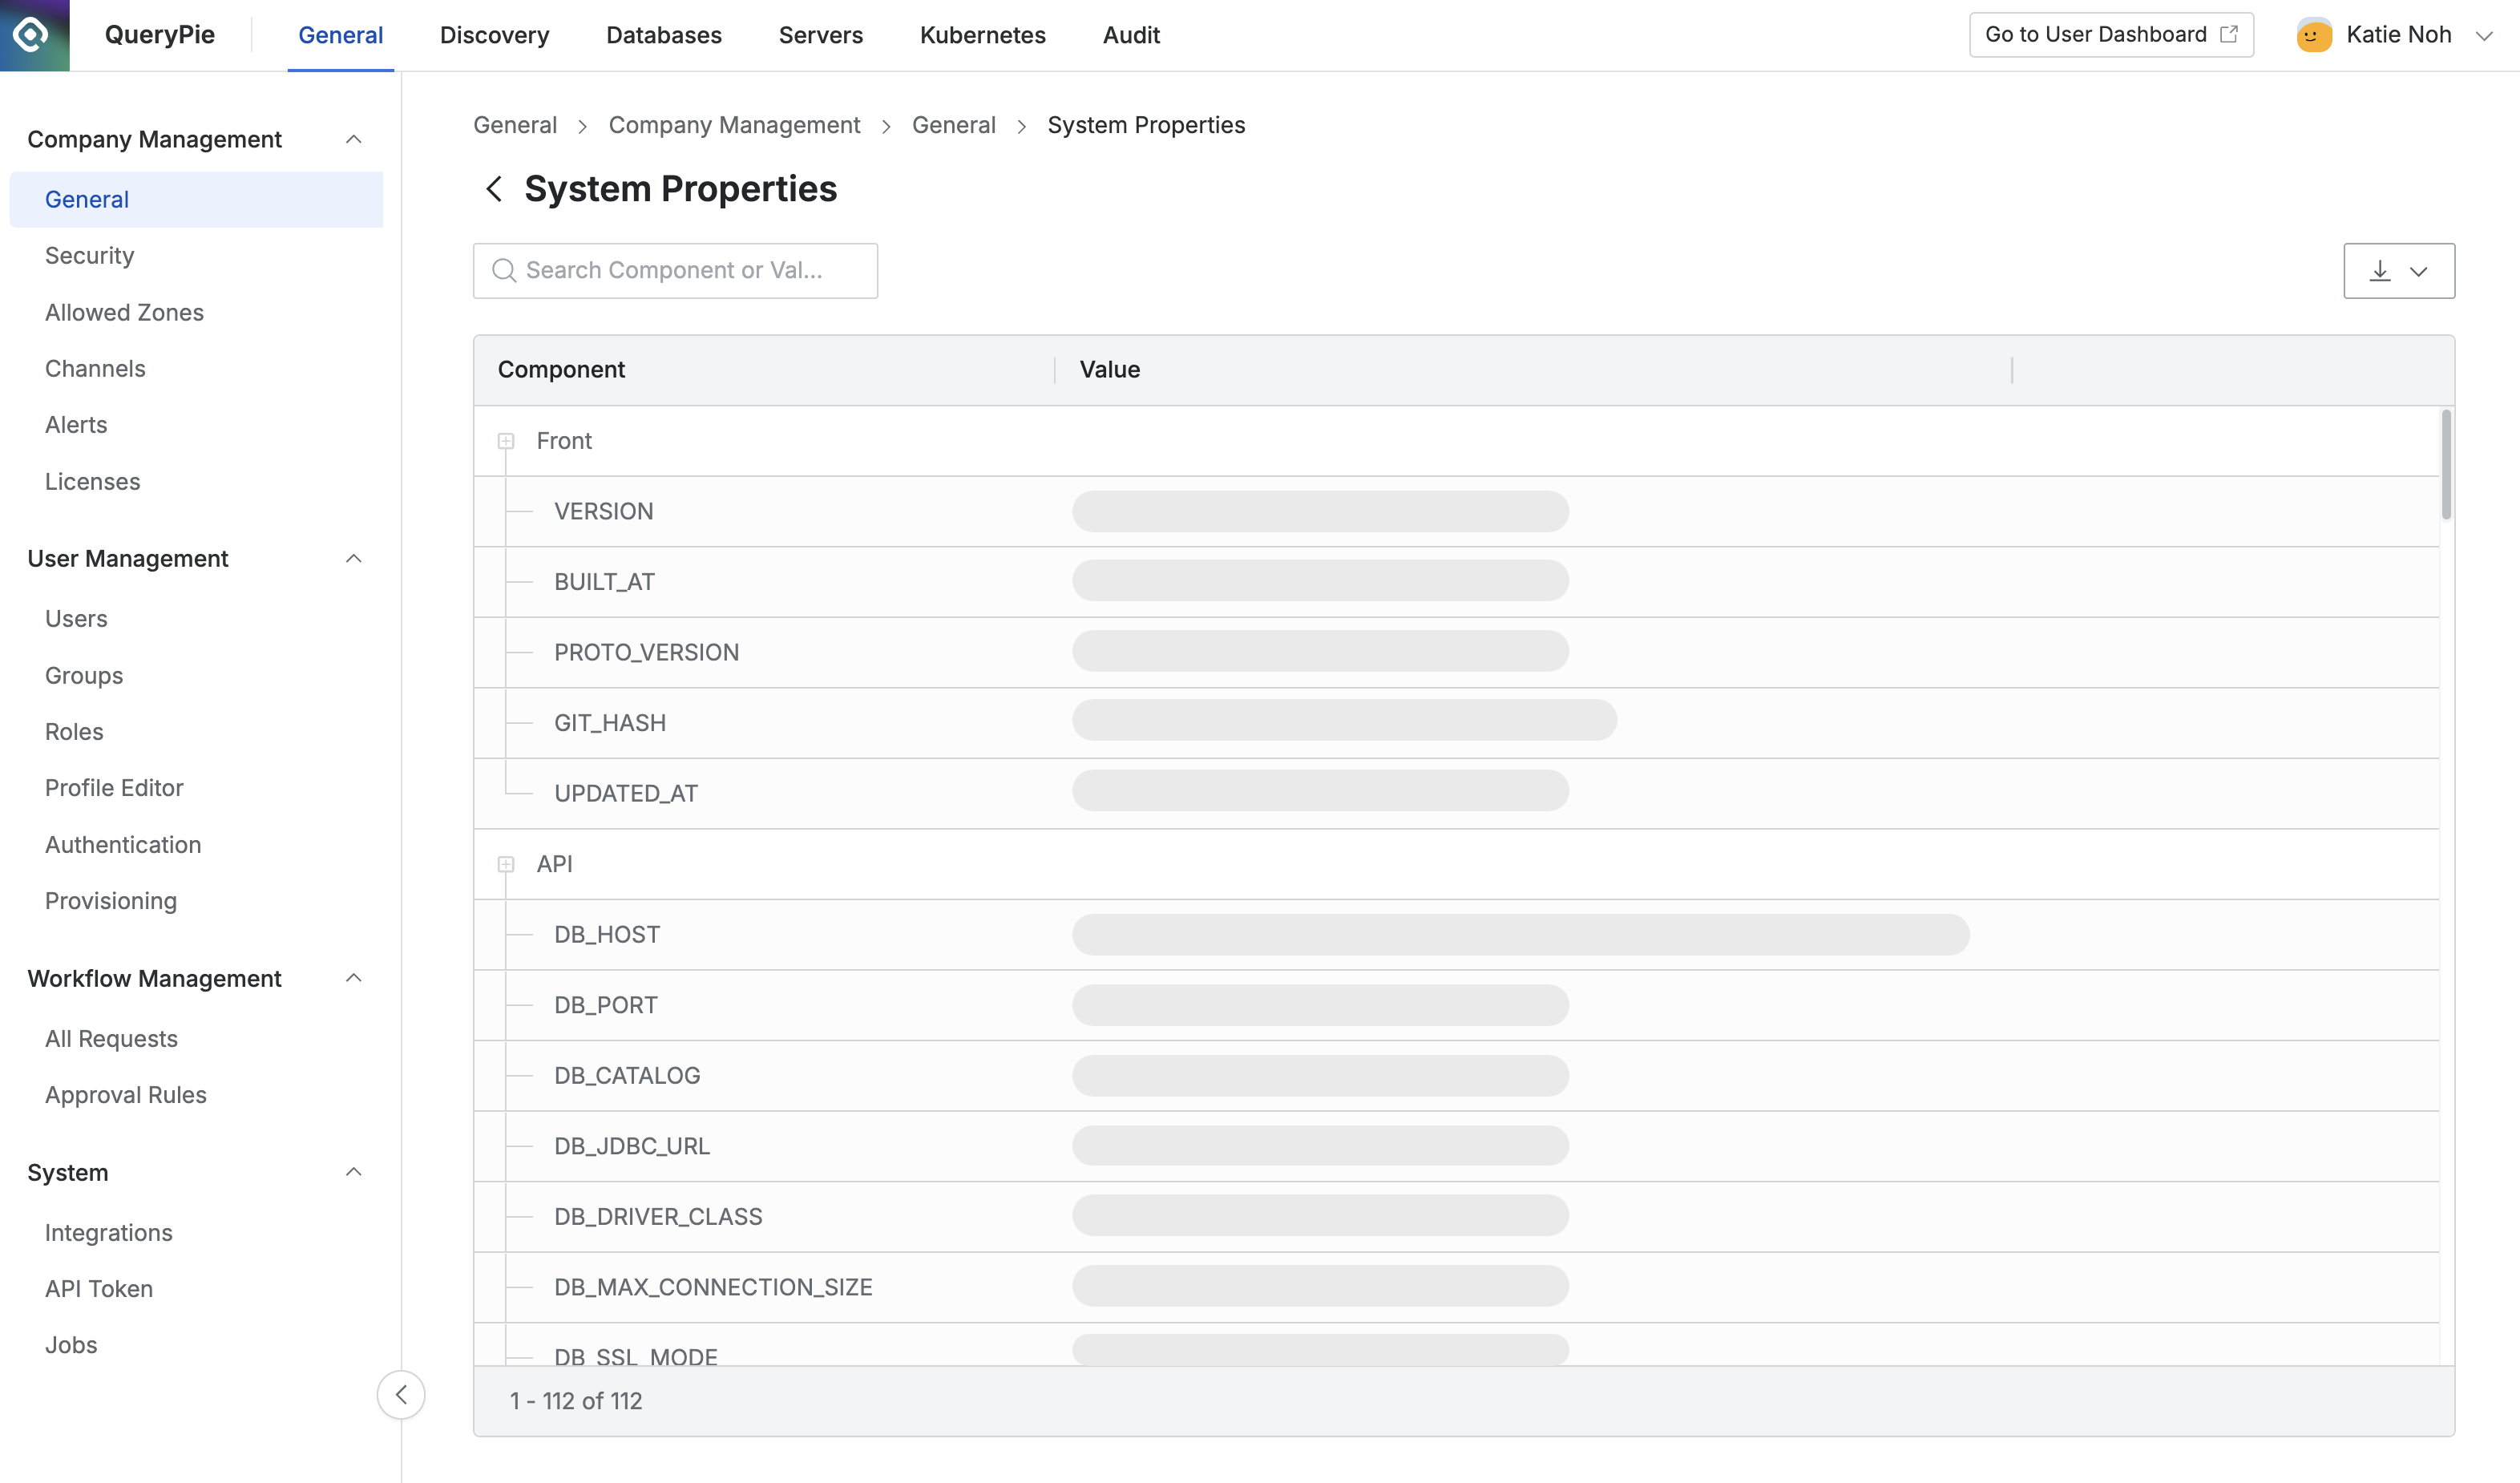
Administrator > General > Company Management > General > System Properties
Query Sharing Settings
The Query Sharing feature allows you to share queries created in the QueryPie SQL Editor by pushing them to a Git repository for collaboration with other users.
By default, Query Sharing is turned off. Click the Query Sharing Setting button to open the configuration modal. When you toggle the Query Sharing option On, additional input fields will appear.
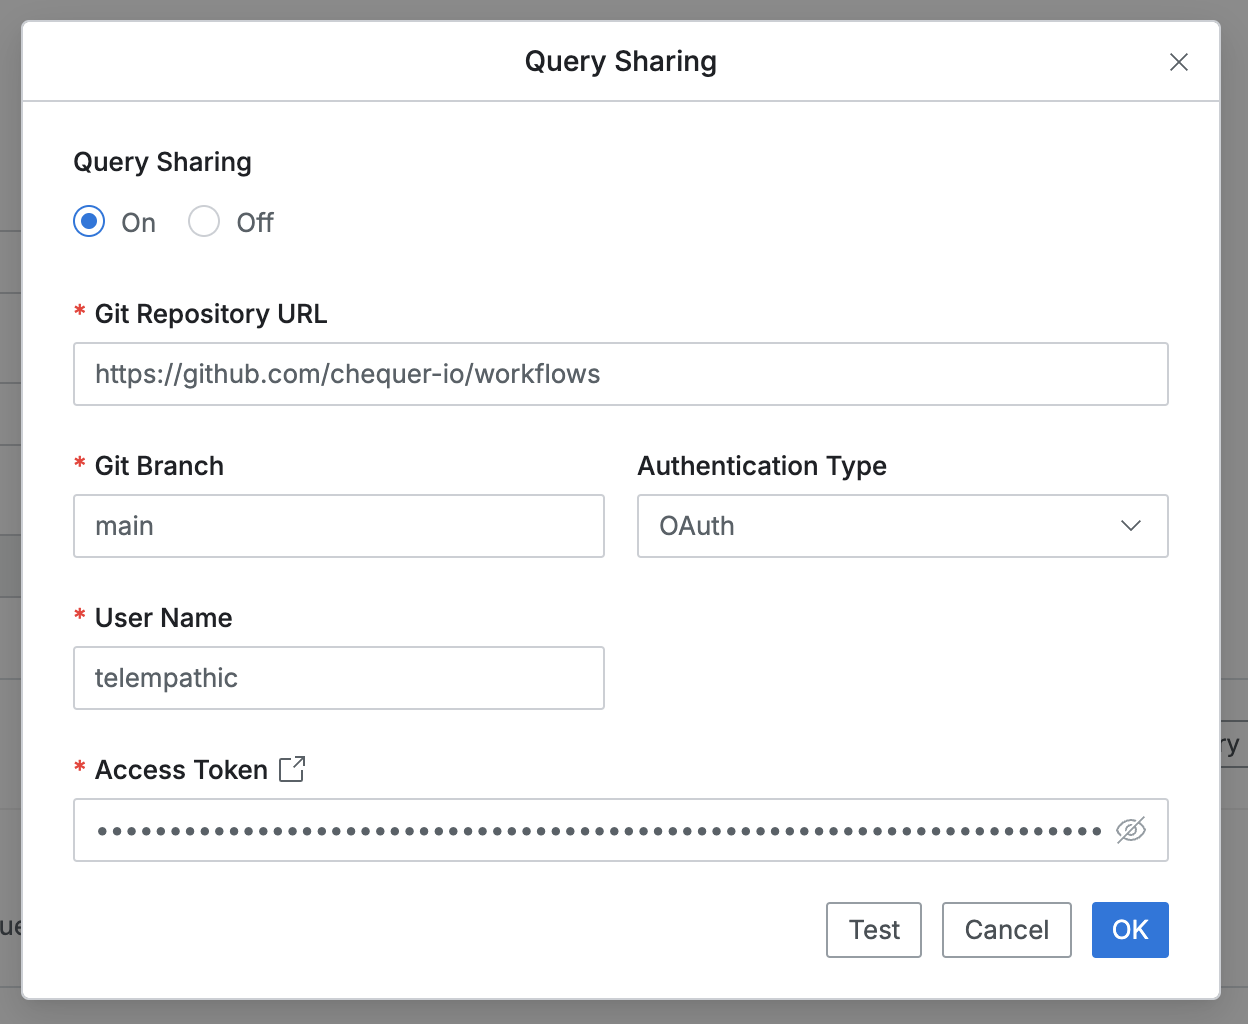
Query Sharing Modal - OAuth

Query Sharing Modal - SSH
Git Repository URL: URL of the Git repository where queries will be pushed.
Git Branch: Name of the branch in the repository where query files will be uploaded.
Authentication Type: Choose the authentication method for query submissions (OAuth or SSH).
If OAuth is selected:
User Name: The username for your Git repository (e.g., GitHub username).
Access Token: Access token generated from your Git service.
If SSH is selected:
Public Key: SSH public key registered on the Git server.
Private Key: The private key paired with the SSH public key.
Passphrase: Enter if the private key is passphrase-protected.
After entering all required fields, click Test to verify authentication, then click OK to save the settings.
For details on using OAuth or SSH authentication with GitHub, refer to the following documents:
Issuing Access Tokens: Managing personal access tokens
SSH Connections: Connecting to GitHub with SSH
Administrator > General > Company Management > General
Once enabled, Query Sharing will display as On, and you can use the sharing feature directly in the SQL Editor. Saved queries are pushed to the connected repository and can be accessed from:
Queries Panel > QueryPie Git Sharing Folder
For more details, see Accessing the Web SQL Editor.
Workflow Configuration
In Workflow Configurations, you can adjust settings related to request submission and approval processes.
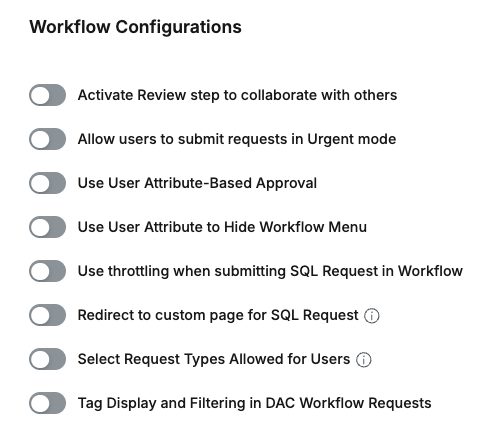
Activate Review Step to Collaborate with Others
Toggle Activate Review Step to collaborate with others to allow specifying reference users during workflow requests. When enabled, the Assignee for Review will appear in the approval rules section of the request creation screen.
Allow Users to Submit Requests in Urgent Mode
Toggle Allow users to submit requests in Urgent mode to allow post-approval workflows. When enabled, urgent mode toggles will appear in:
Approval Rules: While creating or editing approval rules.
Submit Request: On the request creation screen.
If disabled, these toggles will no longer appear, but previously submitted urgent requests will remain unaffected.
Use User Attribute-Based Approver

Admin > General > Company Management > General > Workflow Configurations
Toggle Use User Attribute-Based Approval to enable automatic approver assignment based on specific user attributes (e.g., team leader, department head).
Key Notes:
The selected attribute must contain the approver’s QueryPie Login ID.
Only one approver can be assigned per attribute.

Admin > General > Users > Detail page > Profile Tab
Only one approver can be assigned per attribute (i.e., only one approver ID can be specified for a single attribute).
When the toggle is enabled
A dropdown menu appears allowing you to select an attribute with a DataType of identifier to serve as the basis for automatic approver assignment. Administrators must select the attribute (e.g., teamLeader) to be used for assigning approvers.
Restriction on deleting selected attributes: If an attribute is selected as the basis for automatic approver assignment, the system prevents it from being deleted under Administrator > General > Profile Editor (e.g., the delete checkbox is disabled).
On the Administrator > General > Workflow Management > Approval Rules page, when adding a new approval rule or editing an existing one, the “Assignee for Approval” field displays the Allow Assignee selection (Attribute-Based) option, which can be selected.
Once selected, the attribute configured in Workflow Configurations (e.g., teamLeader) is displayed directly below, indicating that the approver will be dynamically determined based on the value of the selected attribute.
Interaction with Self-Approval Disabled: If the Self Approval option is disabled in Approval Rules, and the approver determined by the attribute is the same as the requestor, the system will not automatically assign the requestor as the approver. In this case, approver assignment may fail or follow an alternative process depending on workflow configurations or system policies.
In the User > Workflow Submission page, approval rules created with Allow Assignee selection (Attribute-Based) will be displayed.
When the toggle is disabled
The attribute selection dropdown in Administrator > General > Workflow Configurations is disabled.
On the Administrator > General > Workflow Management > Approval Rules page, the Allow Assignee selection (Attribute-Based) option in the Assignee for Approval field will no longer be displayed or selectable when creating or editing approval rules.
Approval rules previously created with the Allow Assignee selection (Attribute-Based) option will be excluded from the approval rule selection list when users submit new workflows.
Note: This does not affect approval processes for workflows that are already in progress using those rules.
When an administrator attempts to edit such rules, settings related to attribute-based approver assignment may be disabled or reset. If required input values are missing, the system will prevent saving and display a red border around the problematic fields.
In the User > Workflow Submission page, approval rules created with Allow Assignee selection (Attribute-Based) will not be displayed.
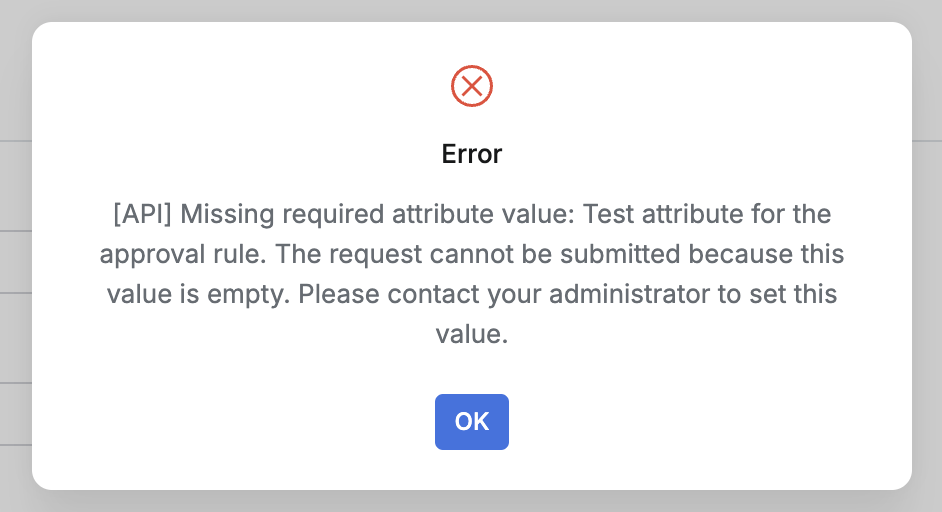
Notifications for Missing Attribute Values
If the requestor’s user profile does not contain a value for the selected attribute (i.e., the approver’s login ID is not specified), a notification modal will appear during workflow submission, and the request will be blocked. The requestor must contact an administrator to have the attribute value configured in their profile.
Example of error message:
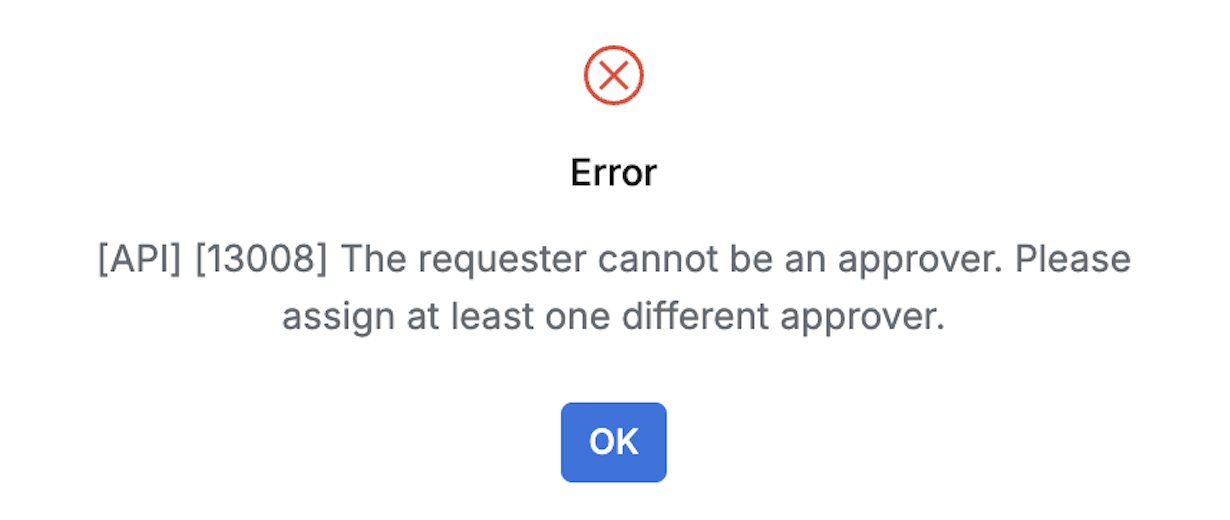
Notifications for Disabled Approvers
If the approver specified in the requestor’s user profile via the selected attribute is disabled, the approver will not appear in the Approver field during workflow submission. Instead, a notification modal will be displayed, and the request submission will be blocked.
Example error message:
Enable Use User Attribute to Hide Workflow Menu

This feature allows administrators to hide the Workflow menu on the user dashboard based on specific user attributes.
When the toggle is enabled, you can select and enter a User Attribute
KeyandValueas a pair.Users whose profiles match the specified
Key:Valuecondition will not see theWorkflowmenu on their dashboard.Example: If you set the User Attribute Key to DepartmentCode and the Value to Department A, users with that department code will not see the Workflow menu
Use throttling when submitting SQL Request in Workflow
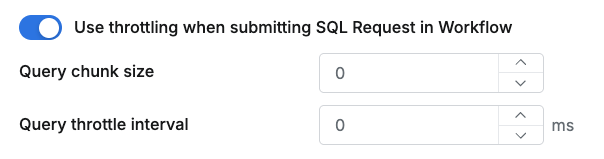
When this option is enabled, the system executes the specified number of queries consecutively, then waits for the specified interval (in milliseconds) before continuing. This helps prevent excessive database load during large-scale query executions.
Query chunk size : Defines how many queries are executed in each batch. Can be set to a value between 1 and 999,999. Multiple queries will be divided into chunks of this size and executed sequentially.
Example : If there are 100 queries and the Query Chunk Size is set to 10, the system will execute 10 queries at a time.
Query throttle interval : The wait time (in milliseconds) between consecutive query batches. Can be set to a value between 1 and 9,999 ms.
Redirect to Custom Page for SQL Request

This option determines whether users are redirected to a predefined custom URL page when a workflow approval request is triggered from INSERT, UPDATE, or DELETE queries executed on Ledger tables via the User Agent. It allows organizations to integrate more seamlessly with their own external workflow systems.
When the toggle is enabled
A field to enter the Custom URL appears on the Administrator > General > Workflow Configurations page.
When a User Agent executes a modification query on a Ledger table and submits an approval request, clicking
Send Requestredirects the user to the specified custom URL page.Note: Query details or user information are not passed to the custom URL during redirection.
When the toggle is disabled
The Custom URL field is hidden on the Administrator > General > Workflow Configurations page.
When a User Agent executes an INSERT, UPDATE, or DELETE query on a Ledger table and submits an approval request, clicking
Send Requestnavigates the user to the standard QueryPie workflow page as usual.
Select Request Types Allowed for Users
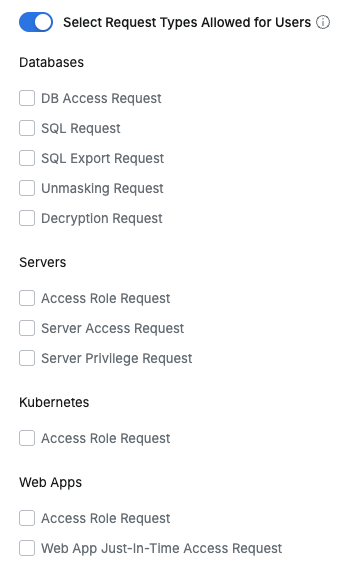
This option allows administrators to selectively control which workflow request types users can access and submit.
When the toggle is enabled
On the Administrator > General > Workflow Configurations page:
A list of request types grouped by product (Databases (DAC), Servers (SAC), Kubernetes (KAC), Web Apps (WAC)) appears as checkboxes under the Select Request Types Allowed for Users toggle.
Administrators can use these checkboxes to specify which request types will be visible and available to users. By default, all request types are selected.
On the User Workflow Submission screen:
Only the request types selected (checked) by the administrator are displayed to users and can be submitted.
Special behavior for Access Role Requests:
At least one product among Servers (SAC), Kubernetes (KAC), or Web Apps (WAC) must have Access Role Request selected for this request type to appear to users.
When submitting an Access Role Request, the Service field will display only the products (e.g., Server Access Control) selected by the administrator.
When the toggle is disabled (Off) (default)
On the Administrator > General > Workflow Configurations page:
The checkbox list for selecting request types is not displayed.
On the User Workflow Submission screen:
All workflow request types associated with the user’s license are visible and can be submitted, as per the standard behavior.
In Access Role Requests, all services are displayed based on the user’s license.
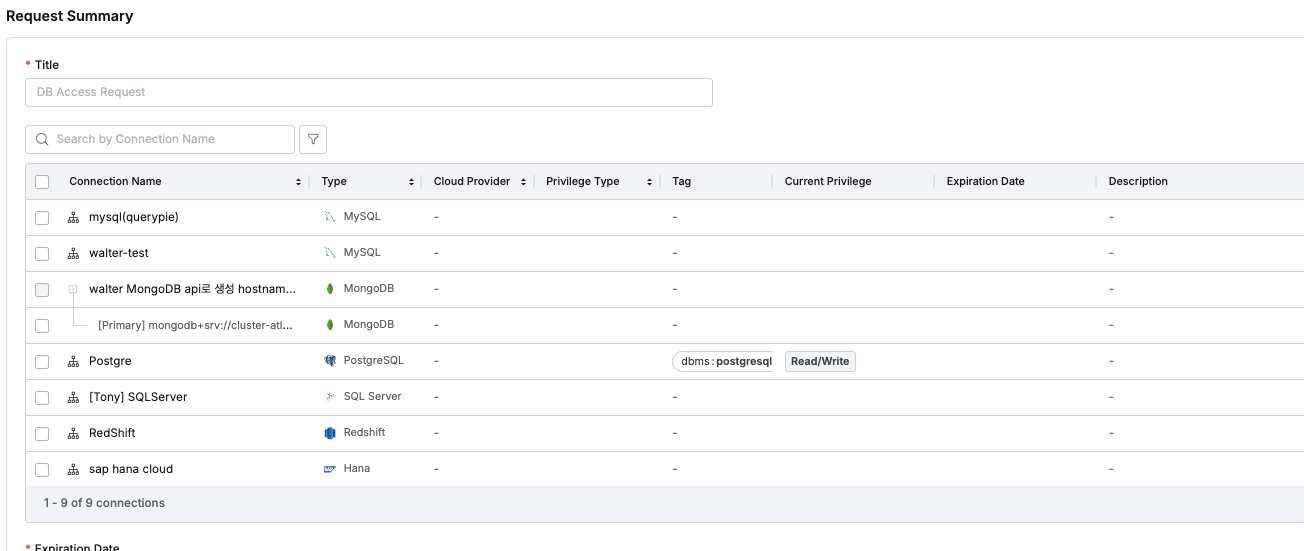
Tag Display and Filtering in DAC Workflow Requests
When this option is activated, the request forms below allow filtering targets by tags.
DB Access Request: Tags assigned to DB Connections are visible in the list, and you can filter to show only connections with specific tags.