Identity Providers
Overview
QueryPie supports two main authentication methods: using QueryPie user accounts (ID and password) and integrating with external Identity Providers (IdP). Administrators can configure IdP integration settings to enable QueryPie to handle user authentication easily through Single Sign-On and synchronize accounts.
The currently supported IdP integration settings are as follows:
- LDAP
- Okta
- SAML 2.0
- OneLogin
- Swivel Secure
- Custom Identity Provider (for special use cases)
- Multiple Identity Providers are not currently supported simultaneously. You must use one IdP in addition to Internal database (QueryPie user ID/PW) authentication.
- MFA (Multi-factor Authentication) support is available only with Internal DB, LDAP, and Custom Identity Provider.
- Starting from 11.5.0, when using Internal DB with LDAP or Internal DB with Custom Identity Provider, you can use MFA in each respective setting.
For example, if MFA is set in LDAP and MFA is set in Internal DB, user accounts that are LDAP accounts are controlled by LDAP’s MFA settings, and user accounts in Internal DB are controlled by Internal DB’s MFA settings. - Scheduled periodic synchronization is available only for LDAP, Okta, One Login, and Custom Identity Provider.
Identity Providers is available under Authentication in Admin > General > System > Integration. Click the item to navigate to the detail page where you can configure settings related to Identity Providers. By default, user authentication is handled using IDs and passwords stored in QueryPie’s Internal database, so the Internal database item exists in the list. This item cannot be deleted.
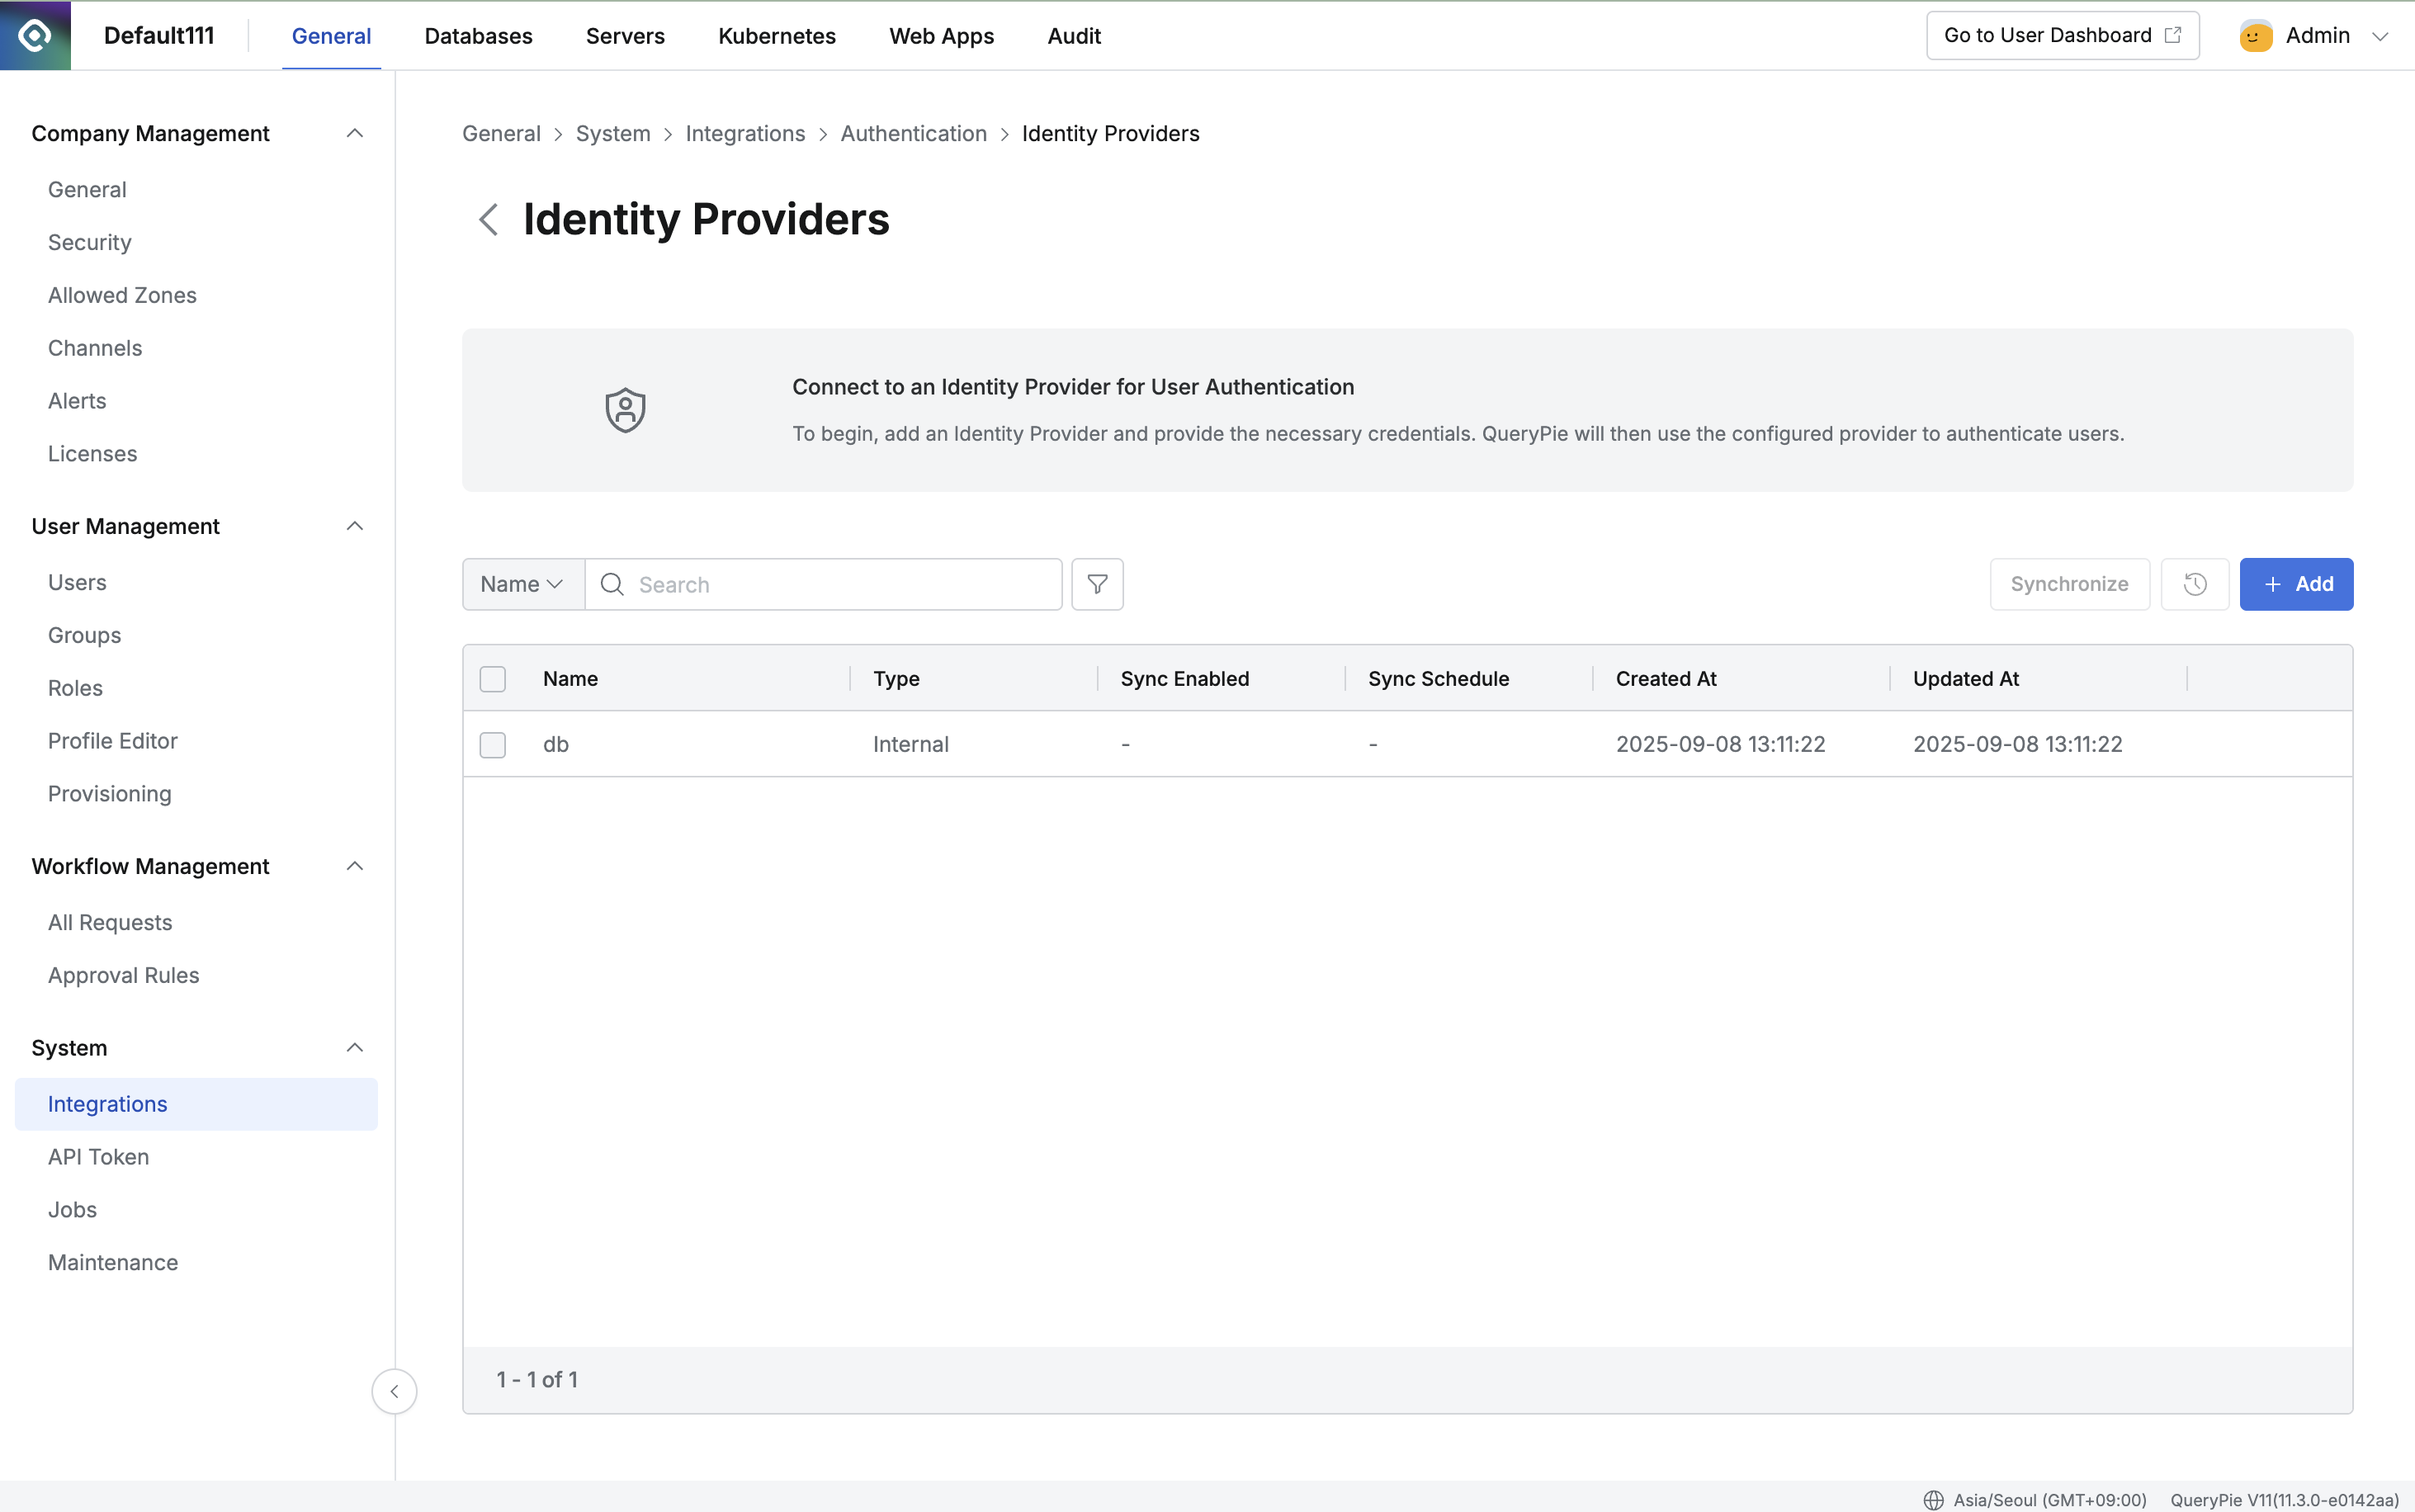
Default authentication details
- Name : A recognizable name displayed in the list.
- Type : One of the IdP types supported by QueryPie is displayed.
- Multi-Factor Authentication Setting : You can configure MFA. Google Authenticator and Email are supported.

Internal database details
Warning: Once you have synchronized users even once after configuration, you cannot delete the configured IdP (delete and switch to another IdP). If you need to change or delete the IdP, please contact us through the Customer Portal.
LDAP Integration
Click the + Add button at the top right of the list, and select LDAP for Type in the popup screen to add LDAP as an IdP.
- Name : Enter a suitable name for the IdP for easy identification.
- Type : Select LDAP.
- Server URL : Enter the LDAP server address in the format
ldap://ldap.example.com:389. For LDAPS, enter the scheme as ldaps://. - BindDN : Enter the Distinguished Name (DN) of the service account used to bind to the LDAP server. This account requires at least read permission for user information.
Example: cn=admin,ou=Services,dc=example,dc=com - Bind Password : Enter the password for the BindDN.
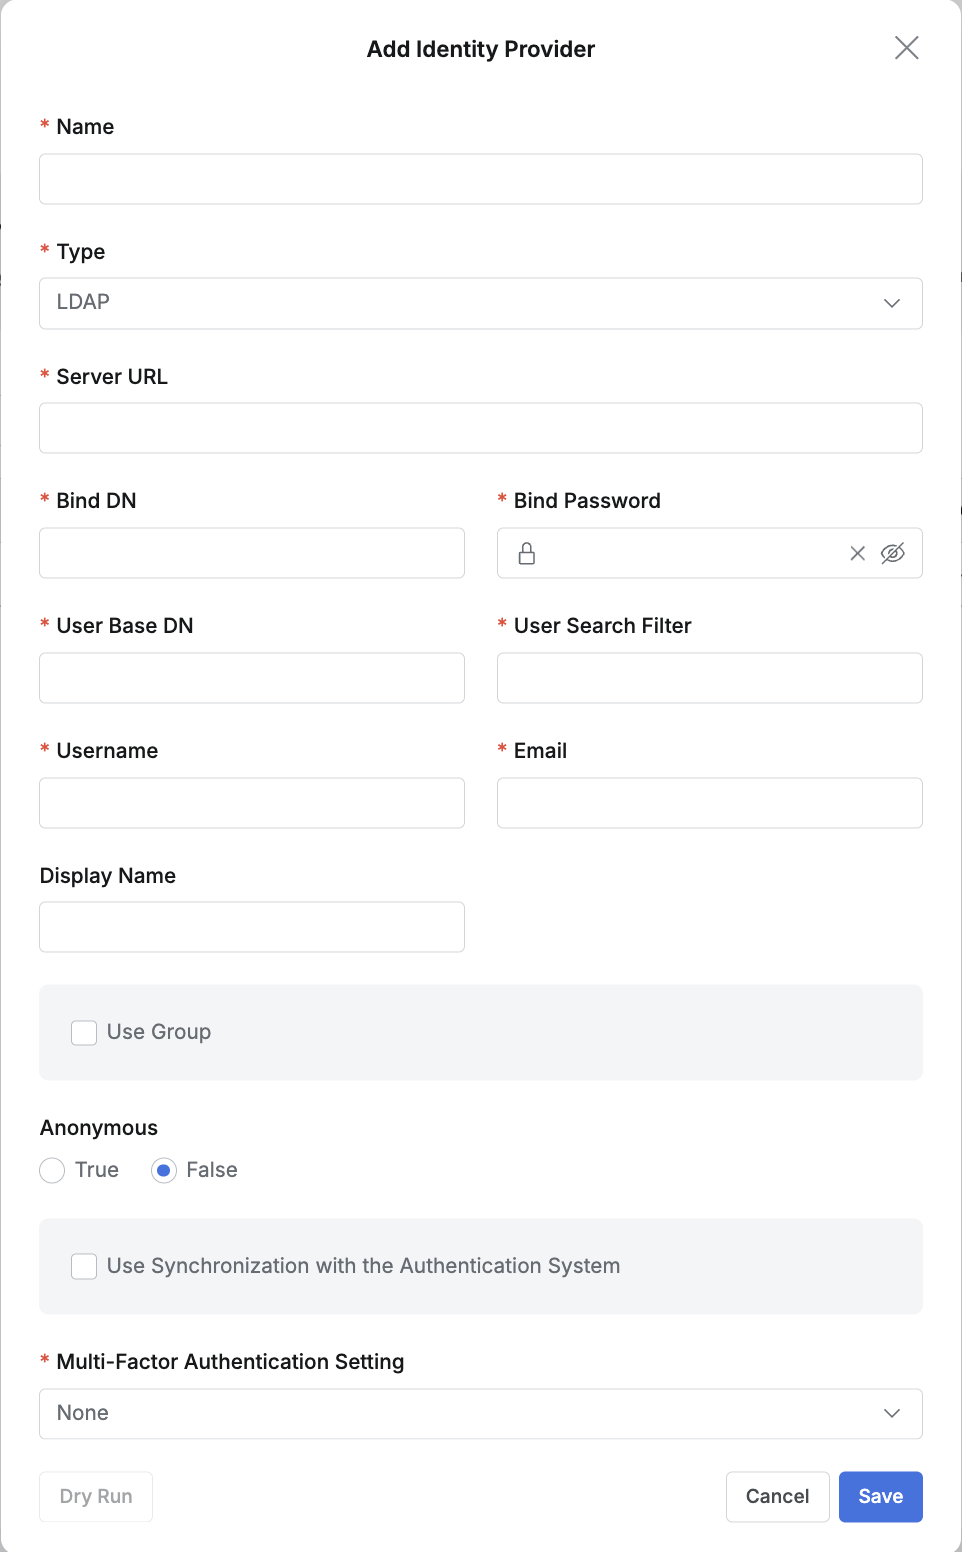
LDAP details
Enter the mapping information to synchronize and map QueryPie user accounts with LDAP user accounts.
| Attribute | Required | Description |
|---|---|---|
| User Base DN | Required | The starting location in the LDAP tree to search for user accounts. Only users under this path are considered login targets. Example: ou=People,dc=example,dc=com or cn=Users,dc=example,dc=com |
| User Search Filter | Required | Enter the query (filter) used to find the user in LDAP based on the login ID entered by the user. Example: (objectClass=inetOrgPerson) |
| User Name | Required | Enter the name of the attribute used as the user’s login ID in the LDAP server. This maps to the QueryPie user’s Login ID when synchronizing with QueryPie. Example: uid |
| Required | Enter the name of the attribute used as the user’s email address in the LDAP server. This maps to the QueryPie user’s Email when synchronizing with QueryPie. Example: email | |
| Display Name | - | Enter the attribute used in the LDAP server to map to the QueryPie user’s Display Name. Example: cn or displayName, etc. |
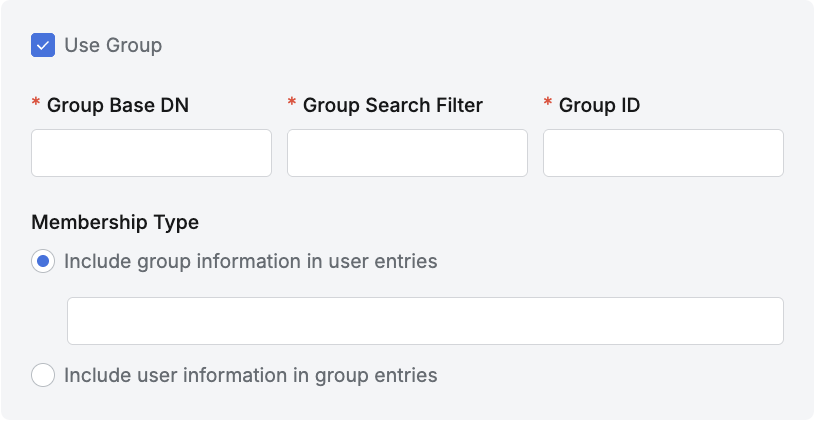
To synchronize user group information and membership information from LDAP, enable (check) the Use Group option and enter the required information.
Attribute | Required | Description |
|---|---|---|
Group Base DN | Required | Enter the group Base DN value of the LDAP server. Only groups under this path are synchronized as Groups.
|
Group Search Filter | Required | Enter the filter value to fetch groups from the LDAP server.
|
Group ID | Required | Enter the attribute value to use as the group identifier.
|
Membership Type | Required | If user entries contain group information, select
|
If group entries contain user information, select
|
To run user information synchronization from the LDAP server, enable the Use Synchronization with the Authentication System option.
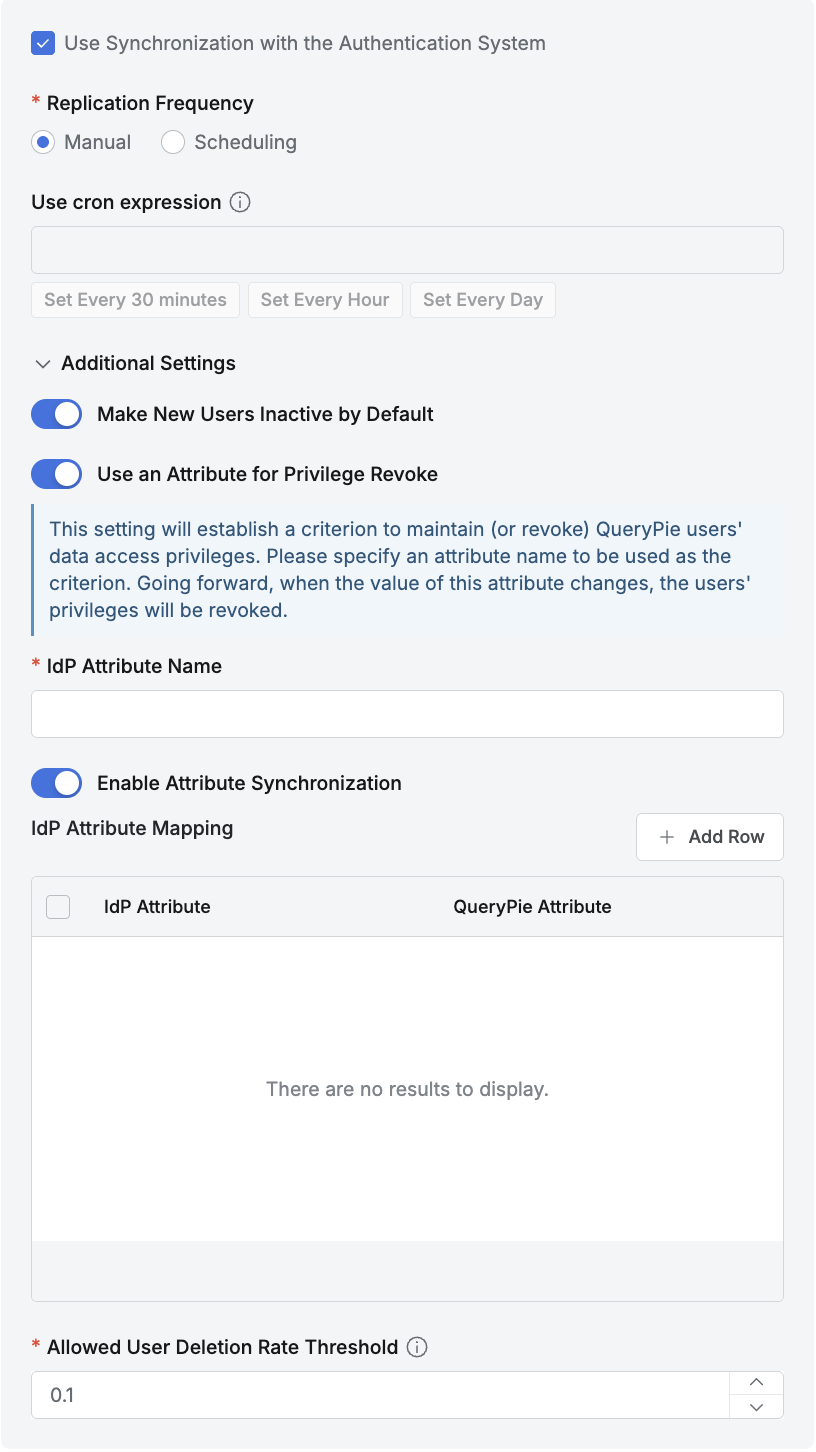
- Replication Frequency : Configure whether to use automatic synchronization.
- Manual : Synchronization is performed only manually. User information is fetched from the LDAP server only when you click the
Synchronizebutton on the current page. - Scheduling : Periodic synchronization is performed. The “Use cron expression” field below is enabled.
- Manual : Synchronization is performed only manually. User information is fetched from the LDAP server only when you click the
- Additional Settings
- Make New Users Inactive by Default : Select whether to add new users as inactive when synchronizing.
- We recommend enabling this option when there are many users to synchronize or when you want to manage individual QueryPie access via LDAP authentication.
- Use an Attribute for Privilege Revoke : Select whether to revoke Privileges based on a specific Attribute during synchronization.
- Enable this option if you want to automatically revoke DAC Privileges based on changes to a specific LDAP Attribute.
- Enter the attribute name to monitor for activation changes in the LDAP Attribute input field.
- Enable Attribute Synchronization : Select whether to map and synchronize LDAP user attributes with QueryPie user attributes.
- We recommend enabling this option when you want to automatically link user attributes managed in LDAP with Attributes in QueryPie.
- When the option is enabled, an LDAP Attribute Mapping UI is displayed below, allowing you to specify the LDAP Attribute and QueryPie Attribute to link through mapping.
- However, this feature applies only to Attributes whose Source Priority is set to Inherit from profile source in Profile Editor (Admin> General > User Management > Profile Editor).
- Allowed User Deletion Rate Threshold :
- This feature causes synchronization to fail when the percentage of existing users deleted during synchronization is greater than or equal to this value.
- Enter a value between 0.0 and 1.0 (default is 0.1).
- Example: If there are 100 existing users and the Allowed User Deletion Rate Threshold is 0.1, synchronization fails when 10 or more users are deleted after re-synchronization.
- When upgrading the product to 11.3.0 from a version before 11.3.0 with synchronization configured, this value is set to 1.0 by default.
- Make New Users Inactive by Default : Select whether to add new users as inactive when synchronizing.
LDAP Attribute Mapping
To map and synchronize user attributes managed in LDAP with QueryPie Attributes, enable the Enable Attribute Synchronization option and enter the following information.
Click the Add Row button at the top right to add a new mapping row, and you can specify the LDAP Attribute and corresponding QueryPie Attribute for each row.
- This feature applies only to QueryPie Attributes whose Source Priority is set to Inherit from profile source in Admin > General > User Management > Profile Editor.
- The QueryPie Attributes
Username (loginId)andPrimary Email (email)are entered separately during LDAP integration configuration, so these items are not exposed in the LDAP–QueryPie Attribute Mapping UI. - When deleting or changing a mapping row, you must click Save for the changes to be reflected in the UI, and you must additionally click Synchronize for actual synchronization with LDAP to be performed. In other words, Save means changes on the screen, and Synchronize means system reflection.
When integrating Active Directory with LDAP, you must set the Anonymous option to false. AD does not allow search operations in an anonymous bind state by default.

Okta Integration
Add QueryPie as an application in Okta
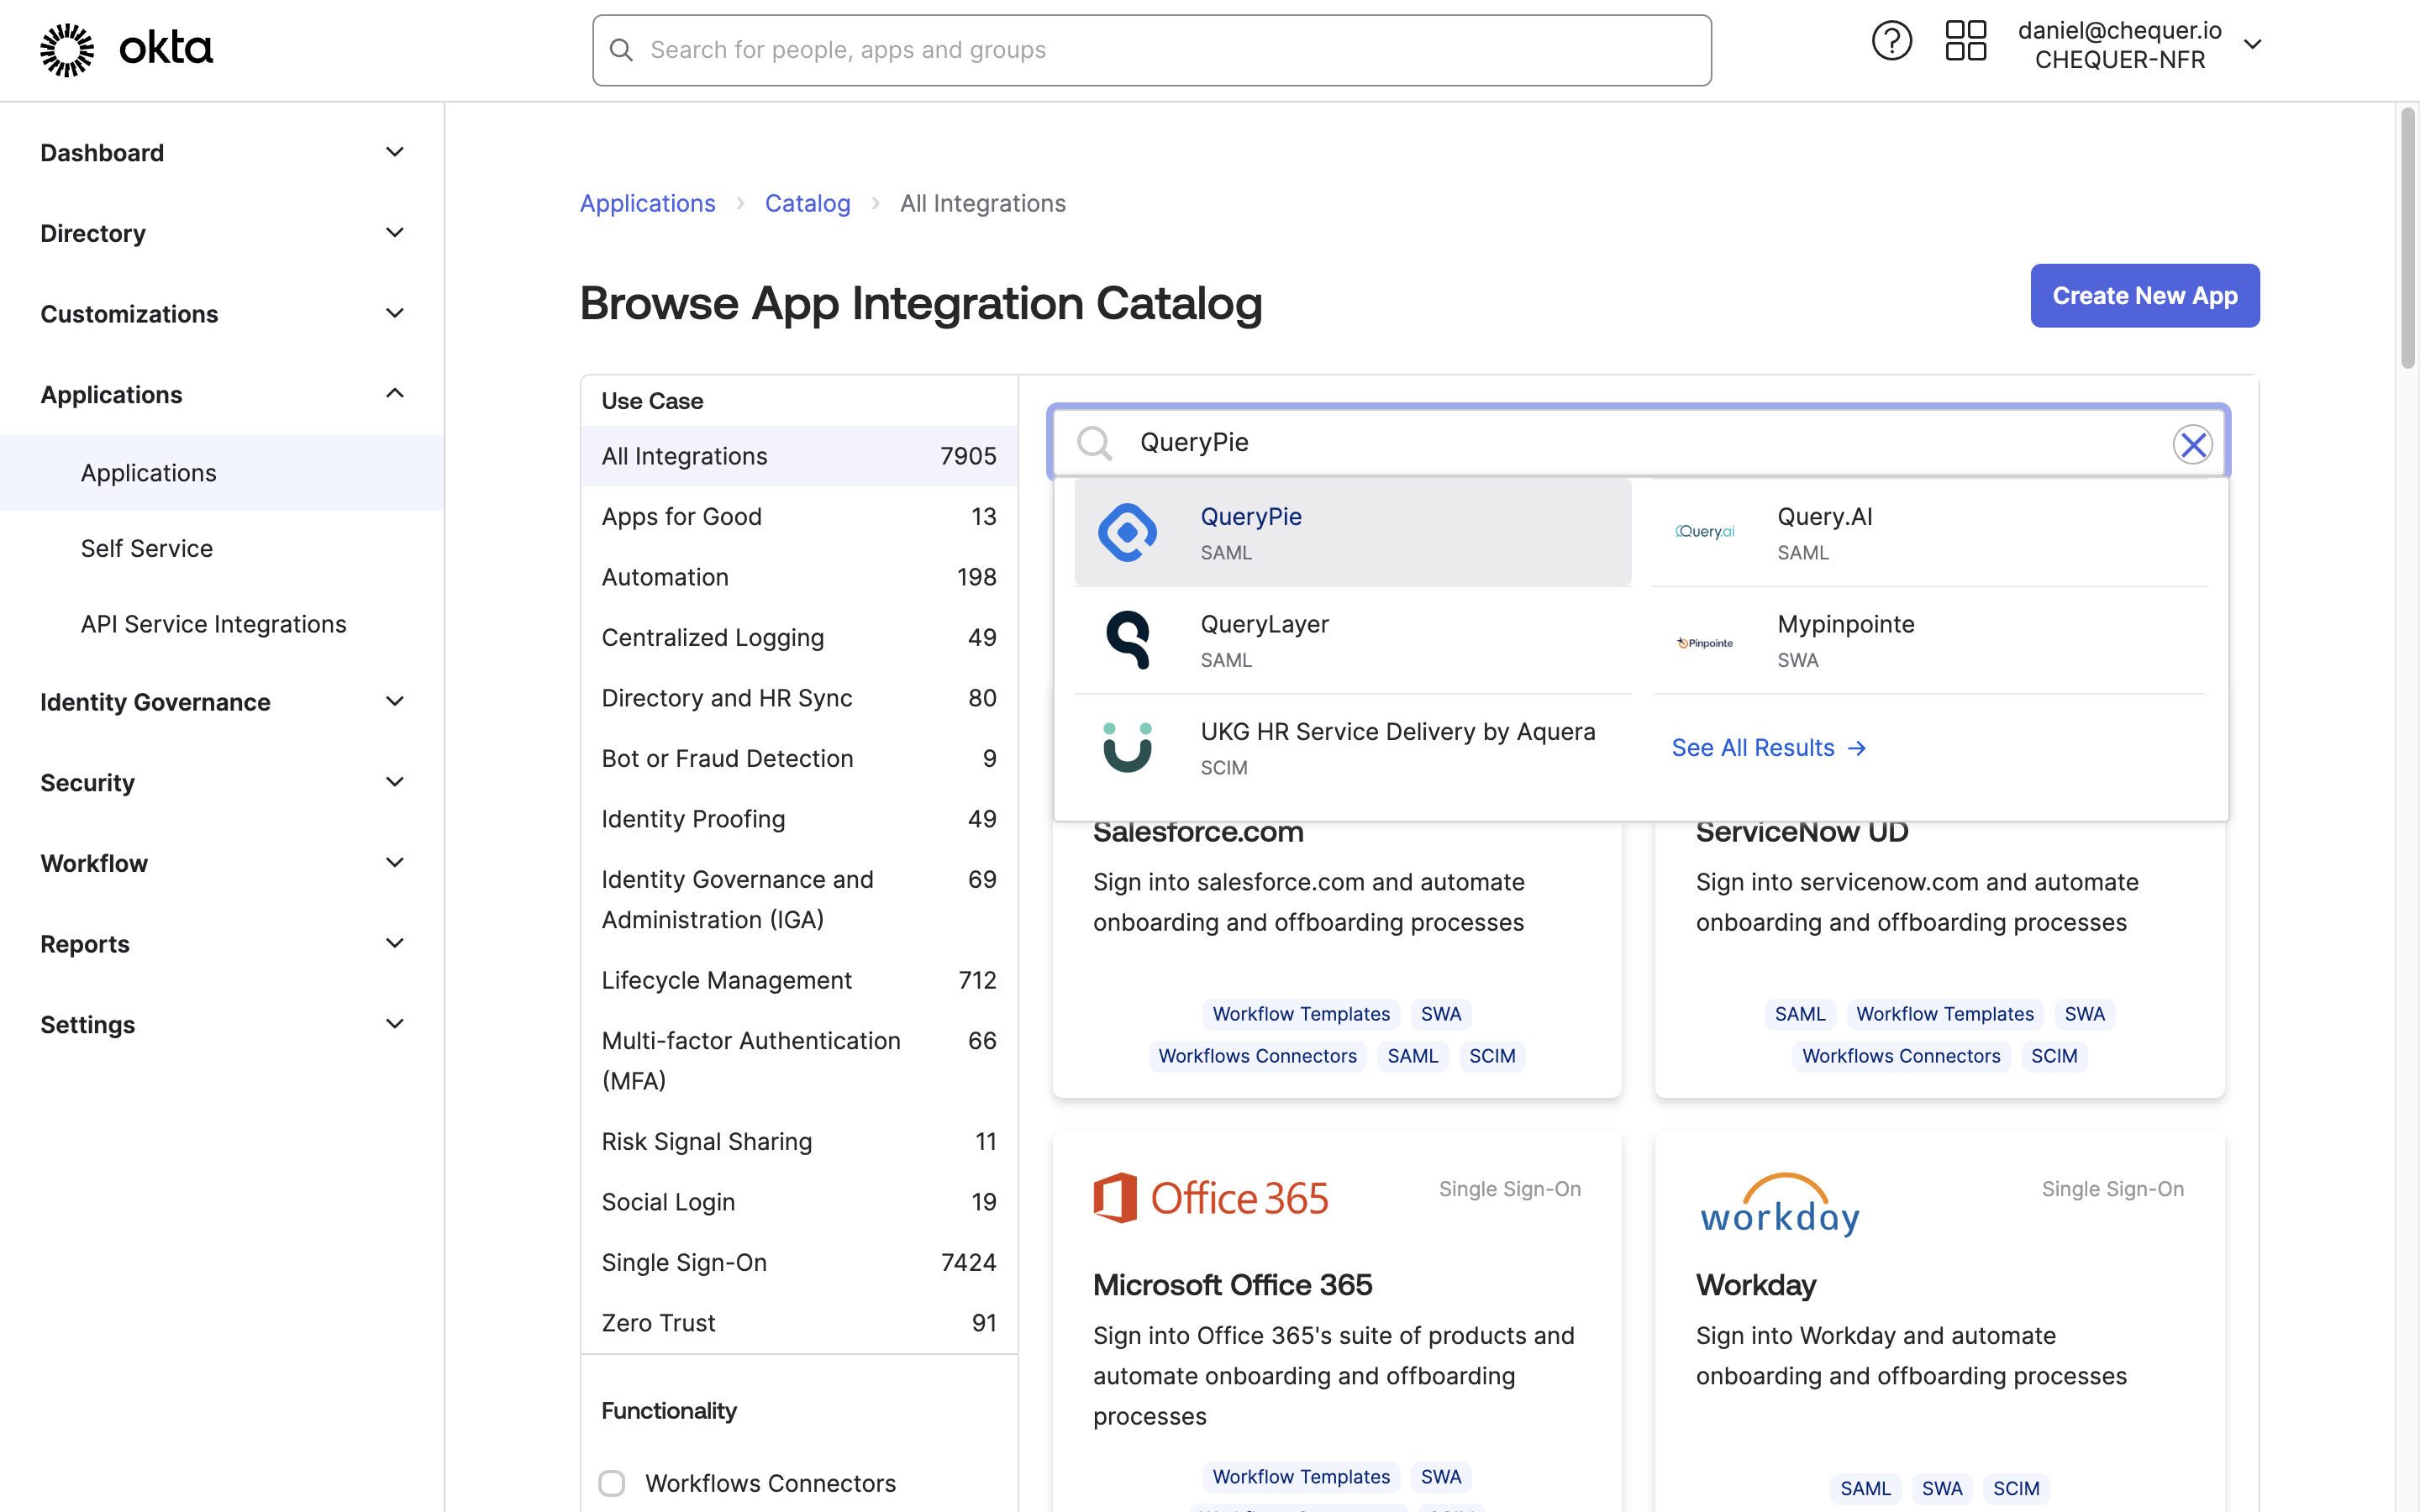
Okta Admin > Applications > Applications > Browse App Catalog > Search for QueryPie
- Access the Okta service and sign in with an administrator account.
- Click your profile at the top right to access Your Org.
- Go to Applications > Applications in the left panel of the Okta admin page.
- Click the
Browse App Catalogbutton to search for QueryPie. - Open the QueryPie application page and click the
Add Integrationbutton. - Confirm that Application Label is set to QueryPie, then click the
Donebutton to add the application.
Profile settings for Okta account integration
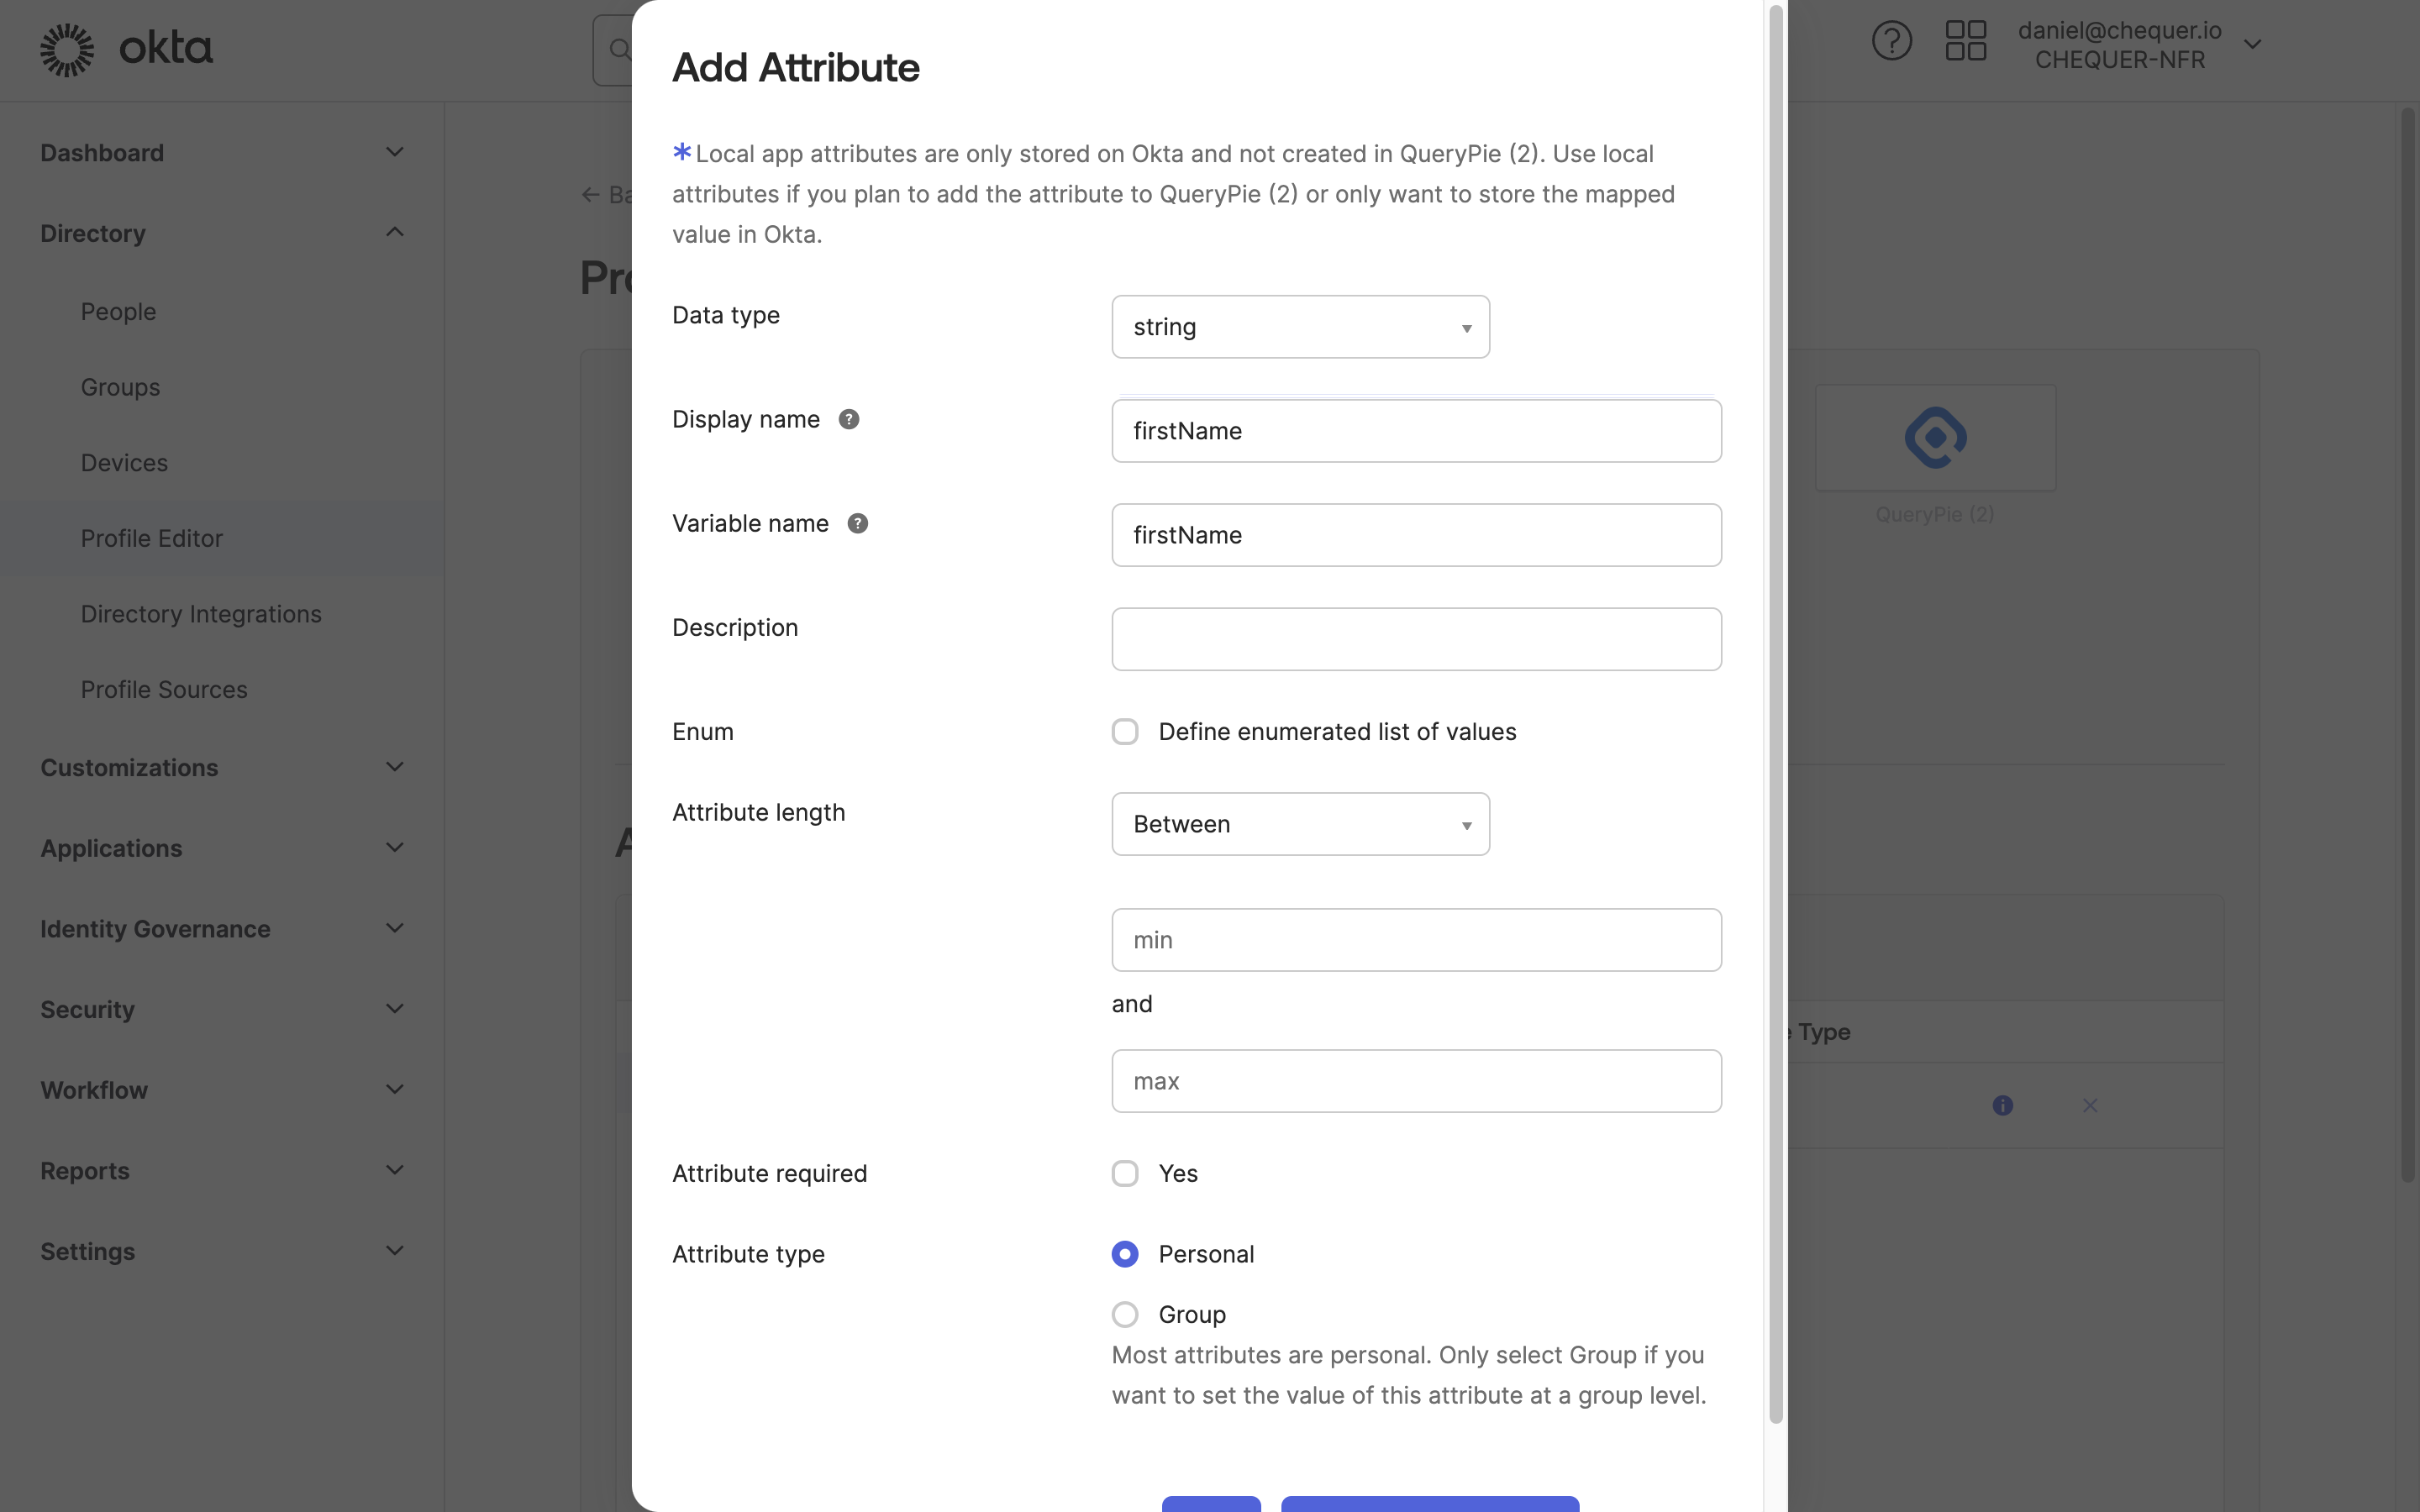
Okta Admin > Directory > Profile Editor > QueryPie User > Add Attribute
- Go to Directory > Profile Editor in the left panel of the Okta admin page.
- Click ‘QueryPie User’ in the Profile list.
- Click the
Add Attributebutton in Attributes settings. - In the Add Attribute screen, enter the following four items in order and save:
- Display name: firstName / Variable name: firstName, then click
Save and Add Another - Display name: lastName / Variable name: lastName, then click
Save and Add Another - Display name: email / Variable name: email, then click
Save and Add Another - Display name: loginId / Variable name: loginId, then click
Save
- Display name: firstName / Variable name: firstName, then click

Okta Admin > Directory > Profile Editor > QueryPie User > Mappings
- After confirming that the four Attributes have been added, click the
Mappingsbutton. - Link Okta User Profile Attributes to QueryPie User Profile Attributes as follows:
- user.firstName ↔︎ firstName
- user.lastName ↔︎ lastName
- user.email ↔︎ email
- user.email ↔︎ loginId (Use Okta’s email attribute as QueryPie’s Login ID.)
- Click the
Save Mappingsbutton to save.
Assign users to the QueryPie application added in Okta
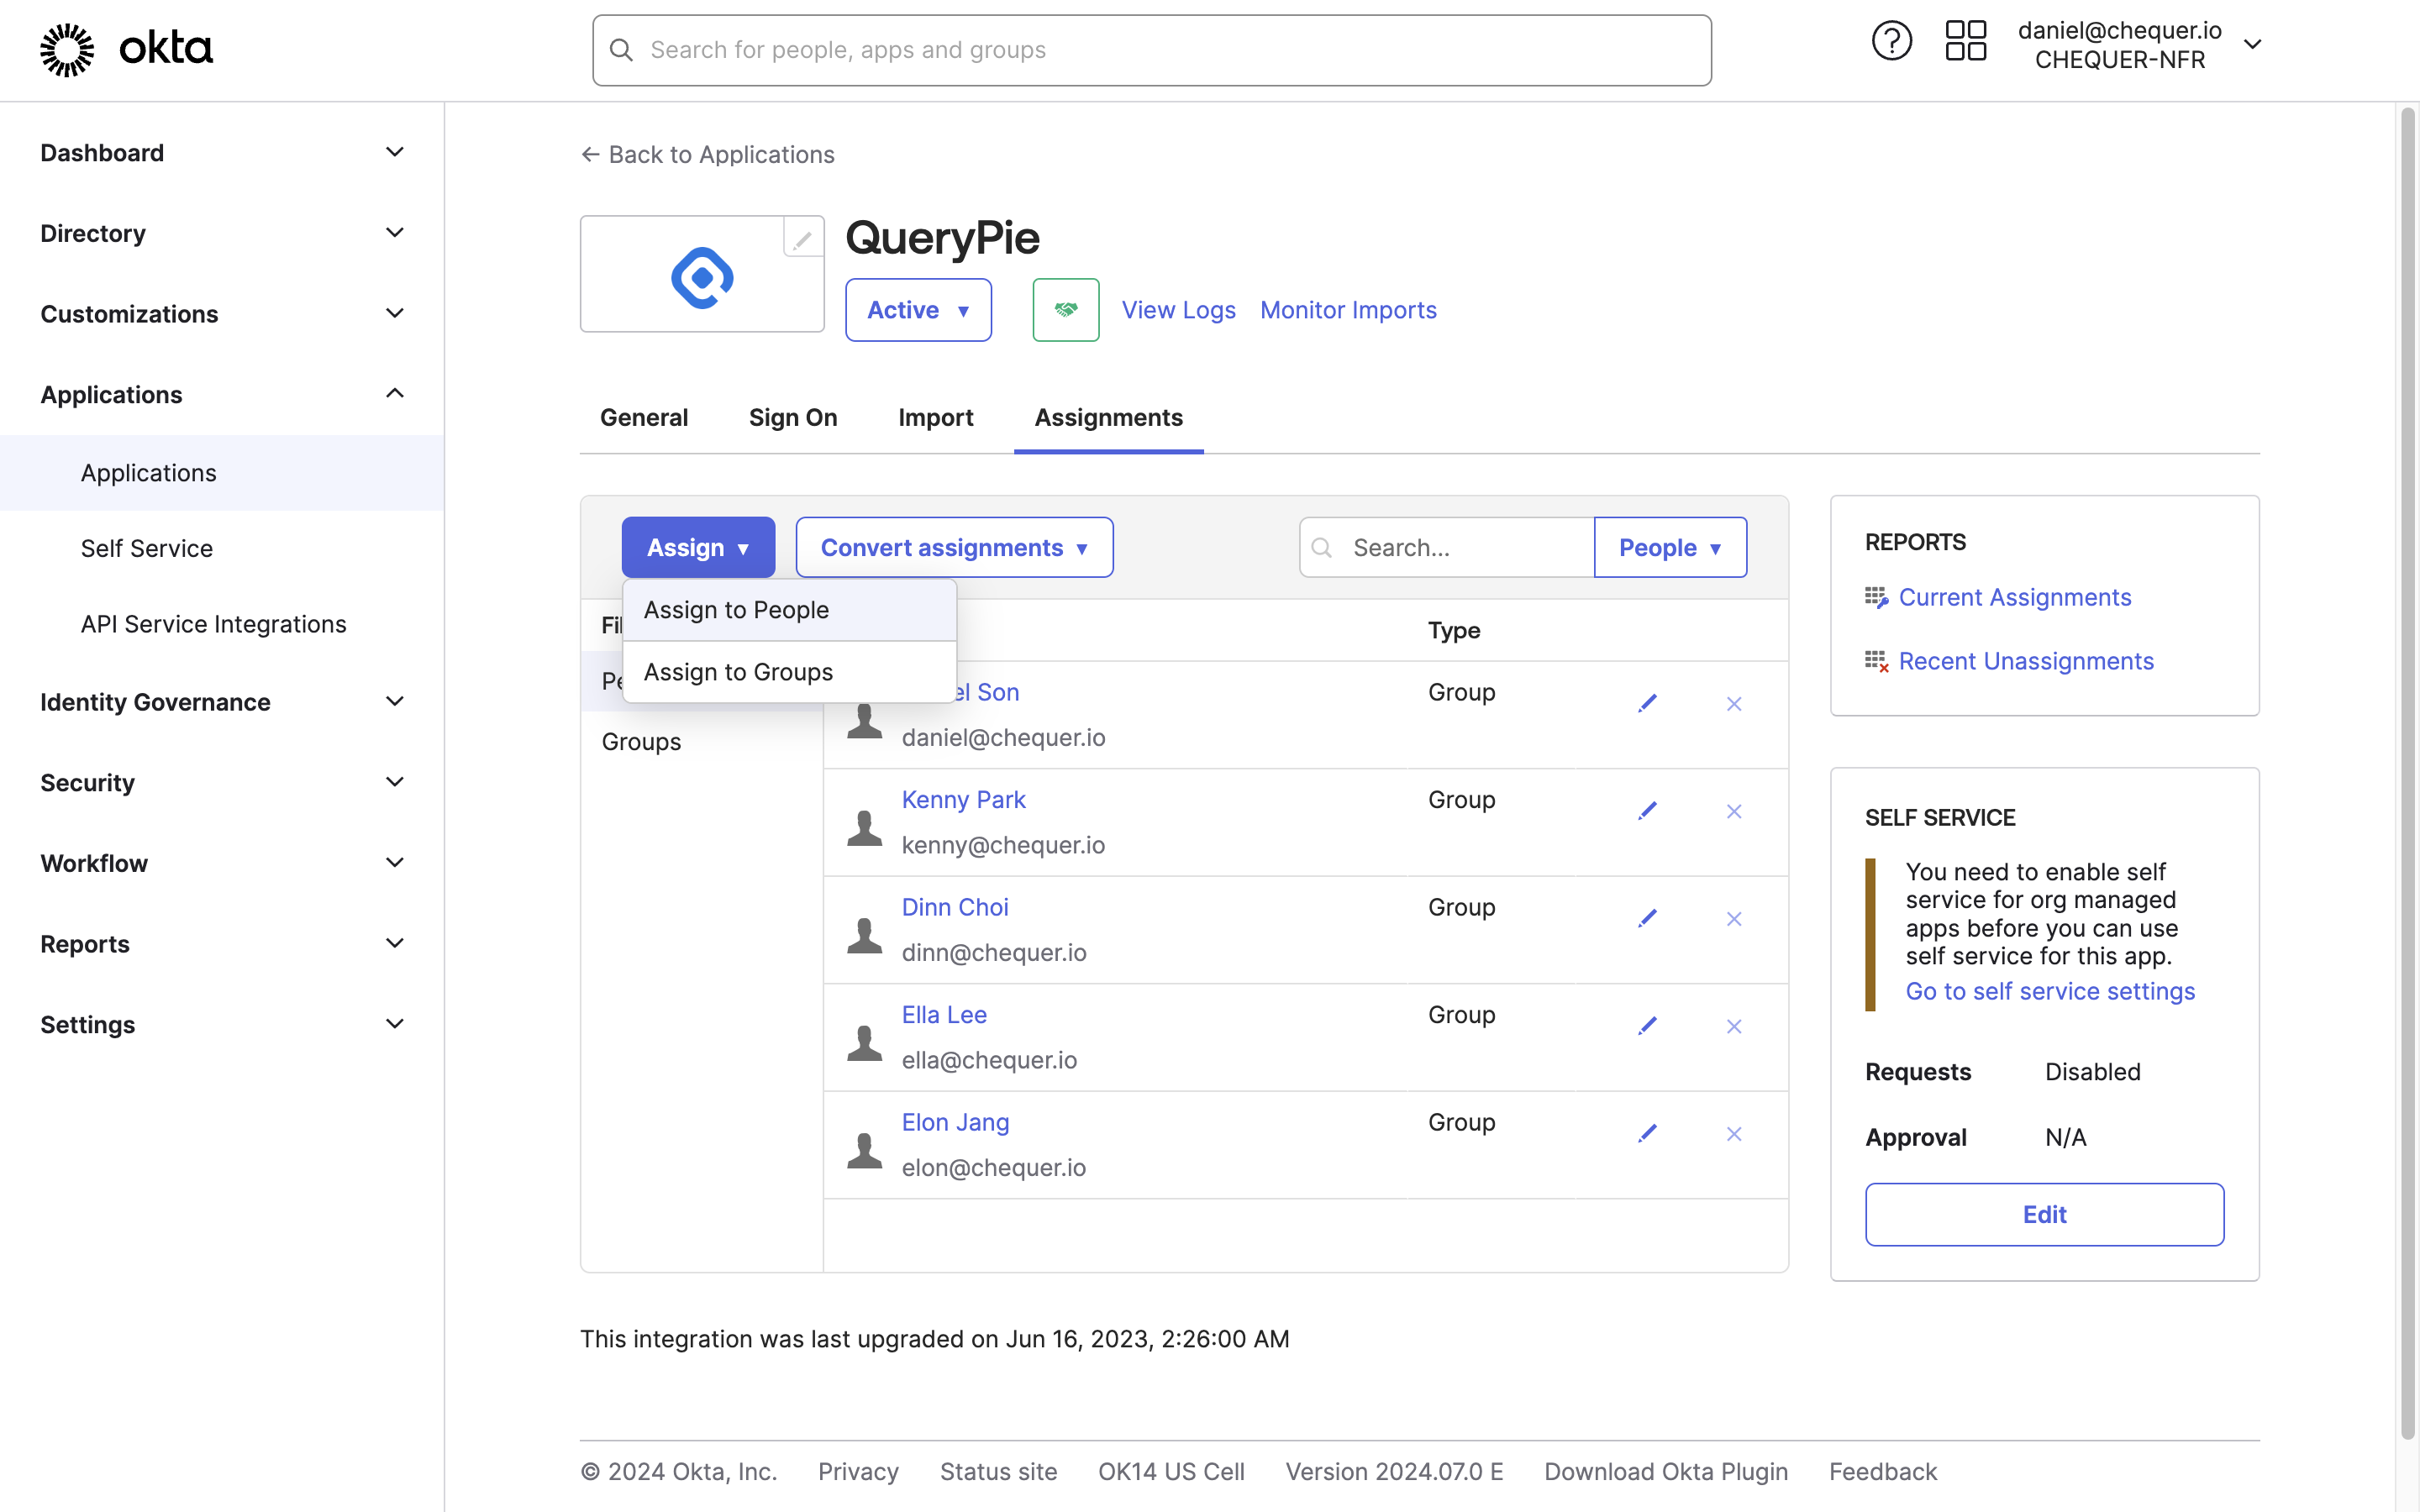
Okta Admin > Applications > Applications > QueryPie App
- Go to Applications > Applications in the left panel of the Okta admin page.
- Click the QueryPie application in the list.
- Go to the Assignments tab, click the
Assignbutton, and selectAssign to PeopleorAssign to Group. - Assign the user(s) or group(s) to allow QueryPie access with Okta accounts, then click the Done button.
- For People assignment, review the user information and click the
Save and Go Backbutton. - For Group assignment, leave the loginId field empty and click the
Save and Go Backbutton.
- For People assignment, review the user information and click the
- You can verify that the user(s) or group(s) have been added and assigned to the QueryPie application.
Configure QueryPie application integration settings in Okta
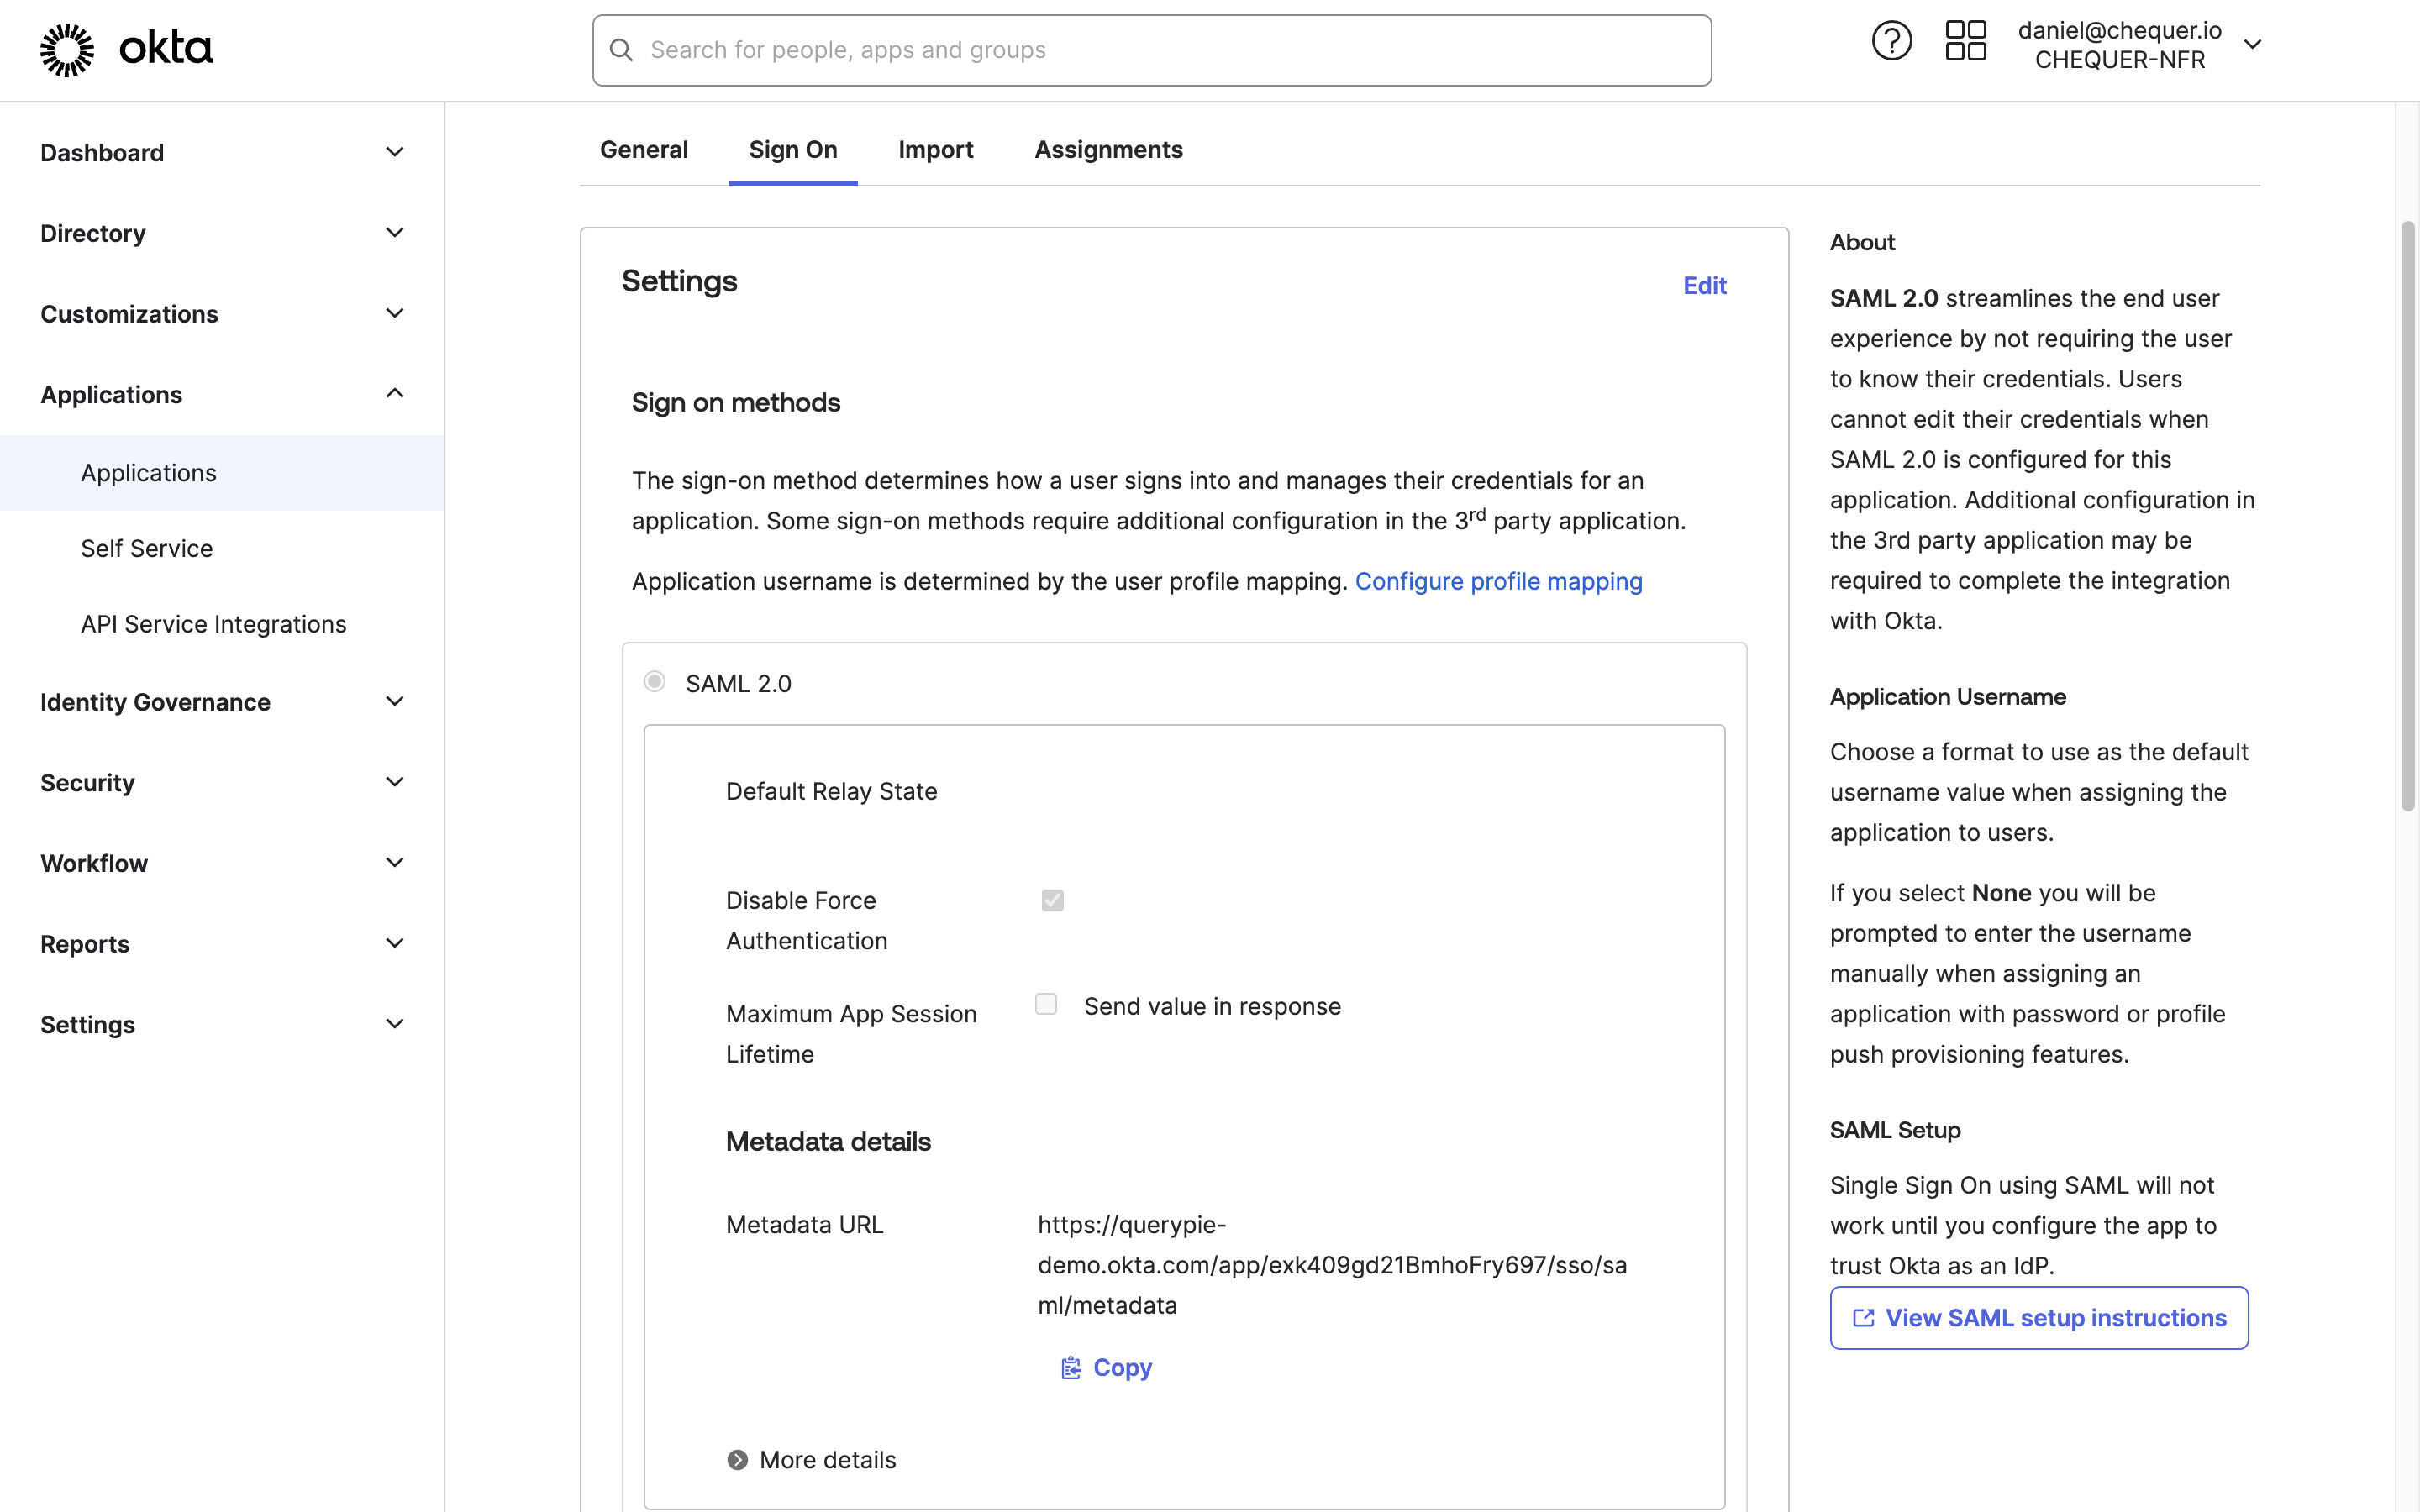
Okta Admin > Applications > Applications > QueryPie App
- In the QueryPie application page in Okta, go to the Sign On tab.
- Click the
Editbutton in the Settings area, enter the domain address where QueryPie is installed in the Base URL field, and save. - Access the address shown in Metadata URL in a separate tab and copy the displayed XML information.
Issue a minimum-privilege Okta API token
An Okta Admin API token is required to synchronize users, groups, and group memberships between QueryPie and Okta. Typically, you can issue an API token using your Okta Super Administrator/Read-Only Administrator account and apply it as follows:
- Go to Security > API in the left panel of the Okta admin page.
- Go to the Tokens tab in the API menu.
- Click the Create Token button to create an authentication token.
However, to improve security, we recommend creating an API token with minimum permissions according to the following permissions and methods.
Okta Admin Console > Security > Administrators > Roles > Create new role
- Go to Directory > People in the left panel of the Okta admin page, click Add Person, and create a dedicated system integration account.
- If you already have an account available for QueryPie integration, skip this step.
- Go to Security > Administrators in the left panel of the Okta admin page and go to the Roles tab.
- Select Create new role.
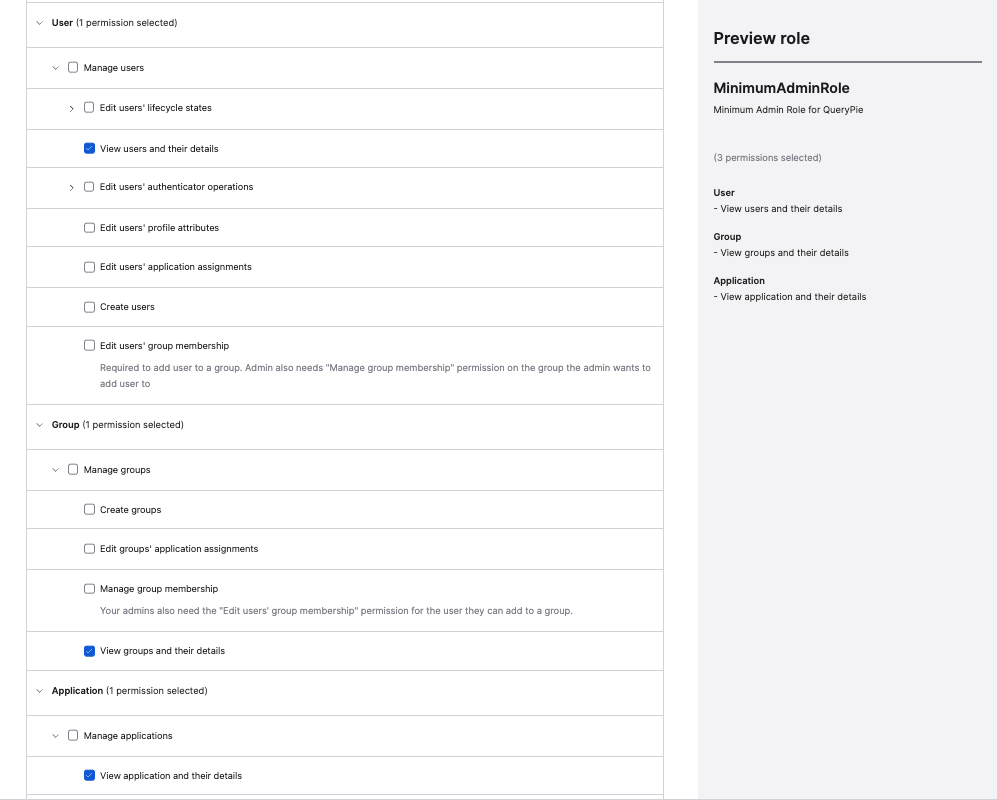
- Define Role name (e.g., MinimumAdminRole) and Role description, then check only the following permissions in Select Permissions:
- User
- View users and their details
- Group
- View groups and their details
- Application
- View application and their details
- User
- Click Save role to save the custom role.
- Go to the Resources tab.
- Select Create new resource set.
- If you already have a resource set created for specifying the permission scope to assign, skip this step and proceed to step 10.
- Define Name (e.g., MinimumResources) and Description, then search for and specify the following scope:
- User: Select all QueryPie users
- Group: Select all QueryPie user groups
- Application: Limited to the QueryPie app
- Select Create to create it.
- Go to the Admins tab and assign the following permissions to the QueryPie integration account.
- Role: MinimumAdminRole | Resource: MinimumResources
- Role: Read-Only Administrator
- Temporarily granted to access the API token creation menu
- Sign in to the Okta admin console page with the QueryPie integration account.
- Go to Security > API in the API menu and go to the Tokens tab.
- Click the Create Token button to create an authentication token and store it securely.
- Then, sign back in with the original administrator account you worked with initially, go to Security > Administrators > Admins tab, edit the integration account, and revoke the Read-Only Administrator permission.
Configure Okta integration and synchronization in QueryPie
Click the + Add button at the top right of the list, and select Okta for Type in the popup screen to add Okta as an IdP.
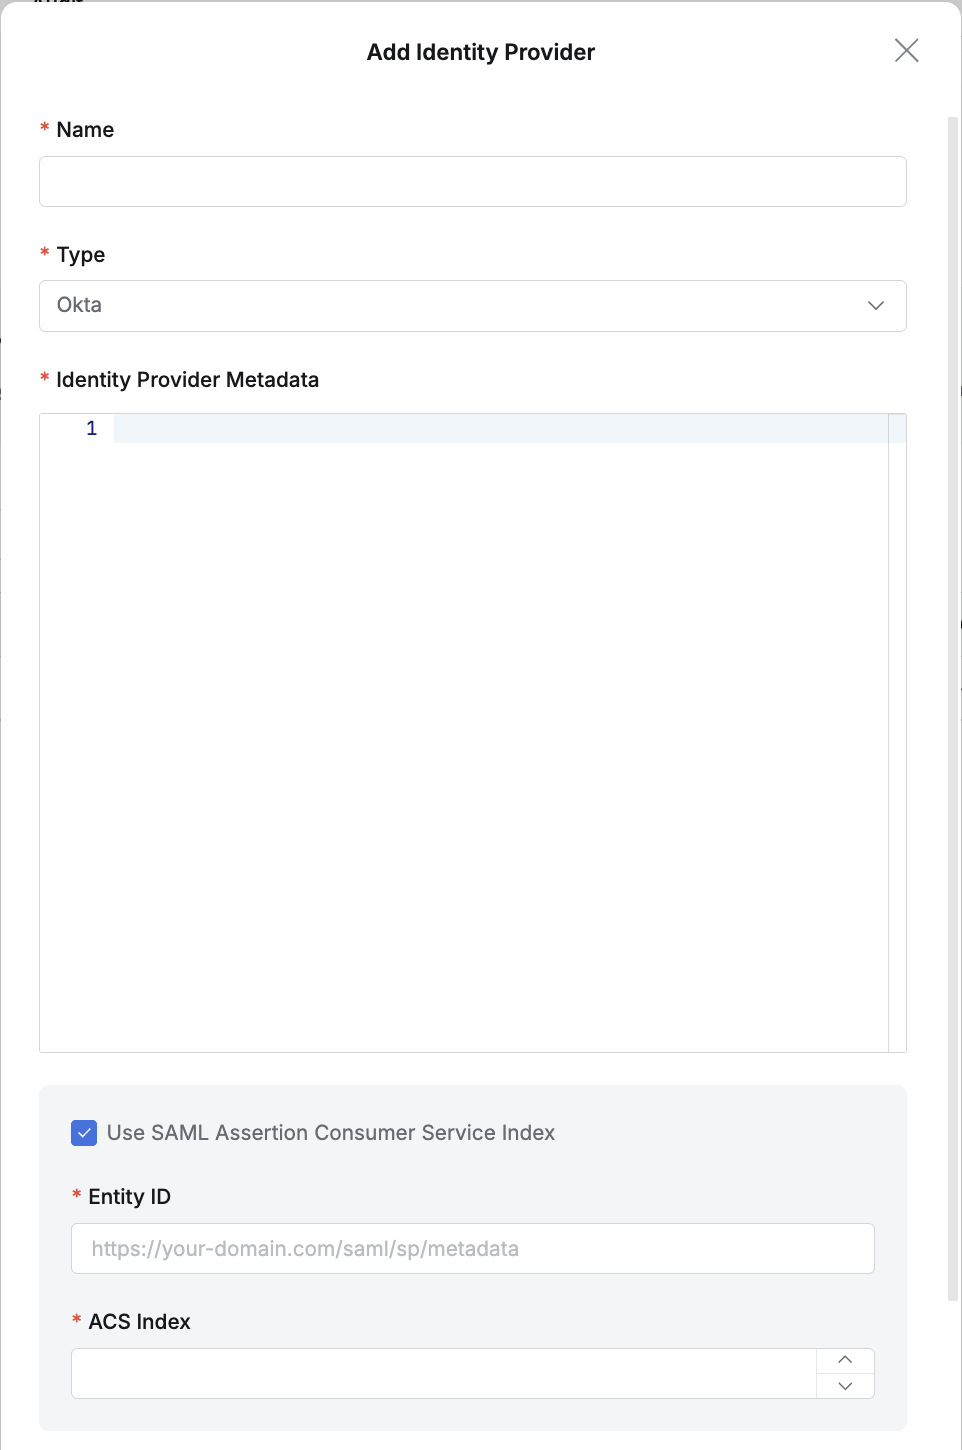
Okta details (1)
- Name : Enter a suitable name for the IdP for easy identification.
- Type : Select Okta.
- Identity Provider Metadata :
Paste the XML information copied in the Configure QueryPie application integration settings in Okta section into the Identity Provider Metadata field. - Use SAML Assertion Consumer Service Index : When the Service Provider uses multiple Endpoints, you can use the ACS Index to specify each endpoint.
- Entity ID : Enter in the format
https://your-domain.com/saml/sp/metadata. This is the Audience URI (SP Entity ID) value in Okta SAML 2.0 settings. - ACS Index : Enter a value between 0 and 2,147,483,647 (default is 0).
- Entity ID : Enter in the format
Assertion Consumer Service (ACS): A specific Endpoint (URL) located in the SP (Service provider) that receives SAML Assertions from the IdP, verifies them, and processes user login.
Why the Assertion Consumer Service Index is needed and its role
A single SP can have multiple ACS URLs for various reasons. In this case, AssertionConsumerServiceIndex plays an essential role.
When the SP sends a SAML message (AuthnRequest) requesting authentication to the IdP with this index value included, the IdP sends the SAML assertion to the ACS URL mapped to that index. If this index is not specified, the assertion is typically sent to a pre-agreed default ACS URL.
This index-based routing is very useful in the following specific situations.
Key use cases
- Support for various protocol bindings:
SAML assertions can be delivered via multiple methods such as HTTP POST and HTTP-Artifact. The SP can operate separate ACS URLs for each binding method. For example, index=“0” can point to an ACS URL for HTTP POST, and index=“1” can point to an ACS URL for HTTP-Artifact.
- Support for multi-tenant architecture:
When a single SaaS application supports multiple customers (tenants), a unique ACS URL can be assigned for each tenant. This allows isolation and customized management of the authentication flow for each customer.
- Distinguishing different authentication flows within an application:
Even for the same application, different post-authentication processing may be needed depending on the user’s role or access path. For example, when you want to set different post-login redirect pages for regular users and administrators, you can use different ACS URLs and distinguish them by index.
- Dynamic or special ACS URL handling:
When assertions must be received at a dynamically generated ACS URL depending on specific situations or client requirements, you can guide the selection of one of the statically defined URLs through the index.
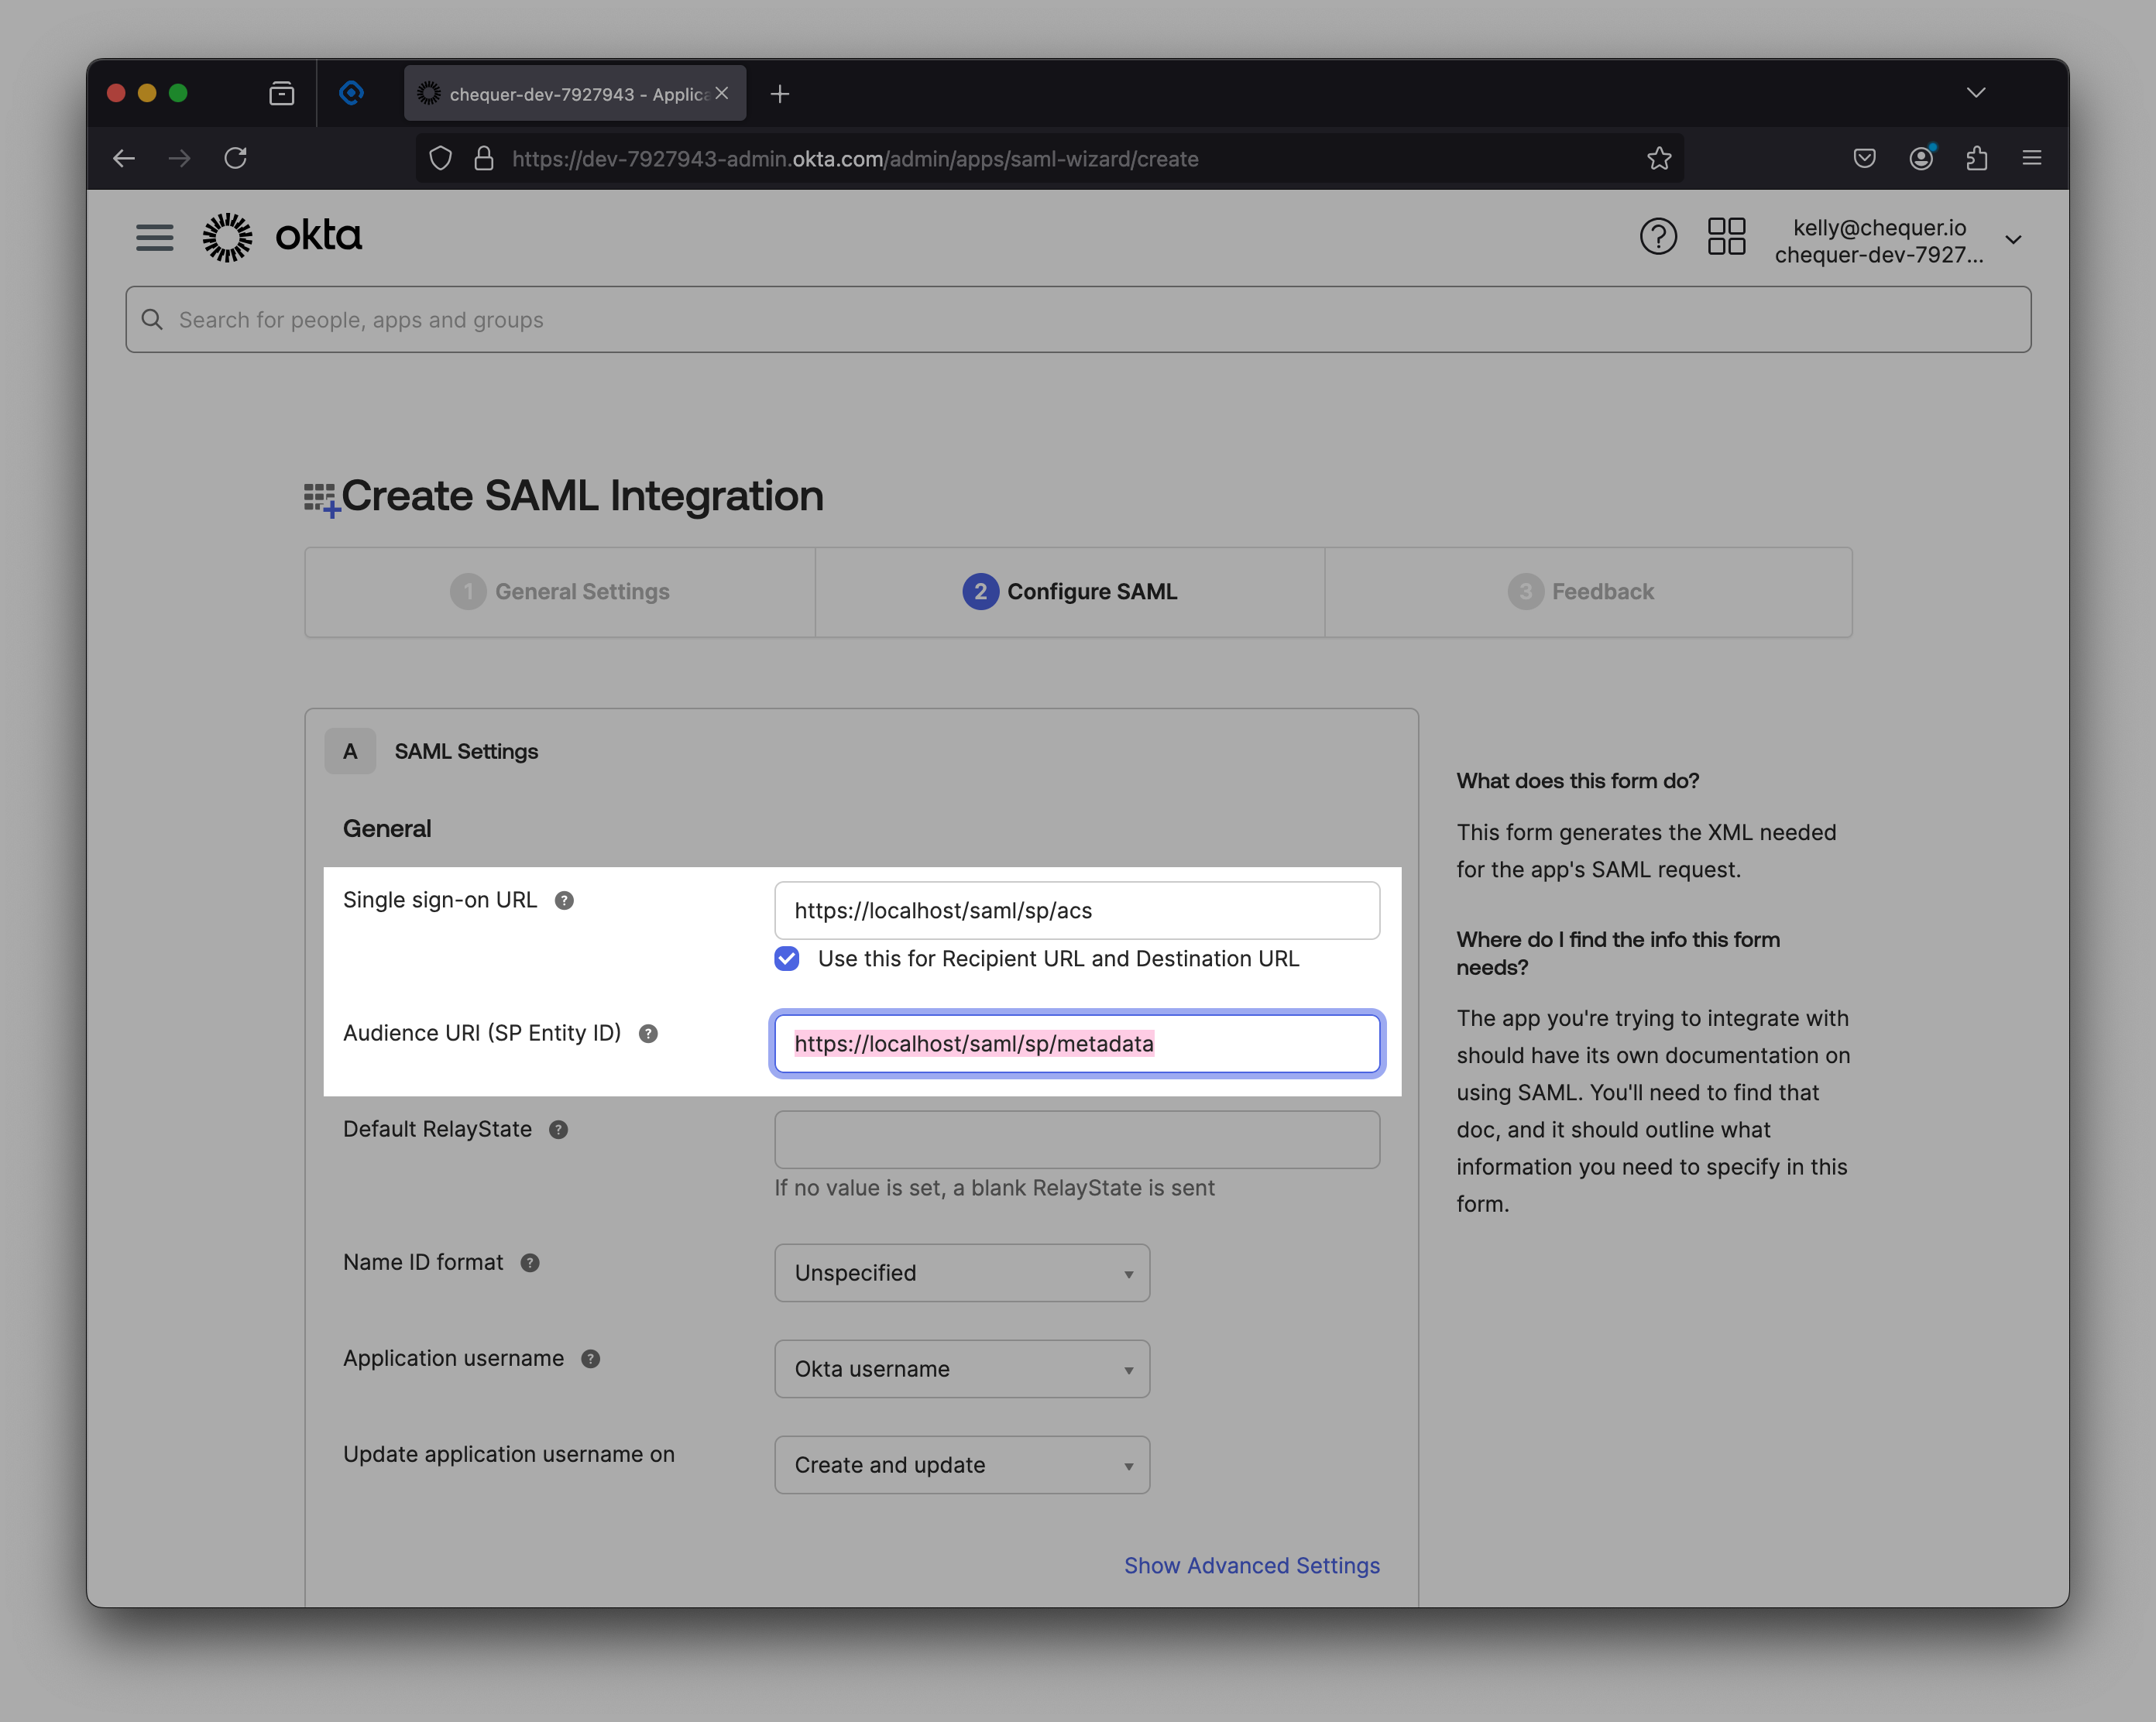
Audience URI (SP Entity ID) in Okta app settings
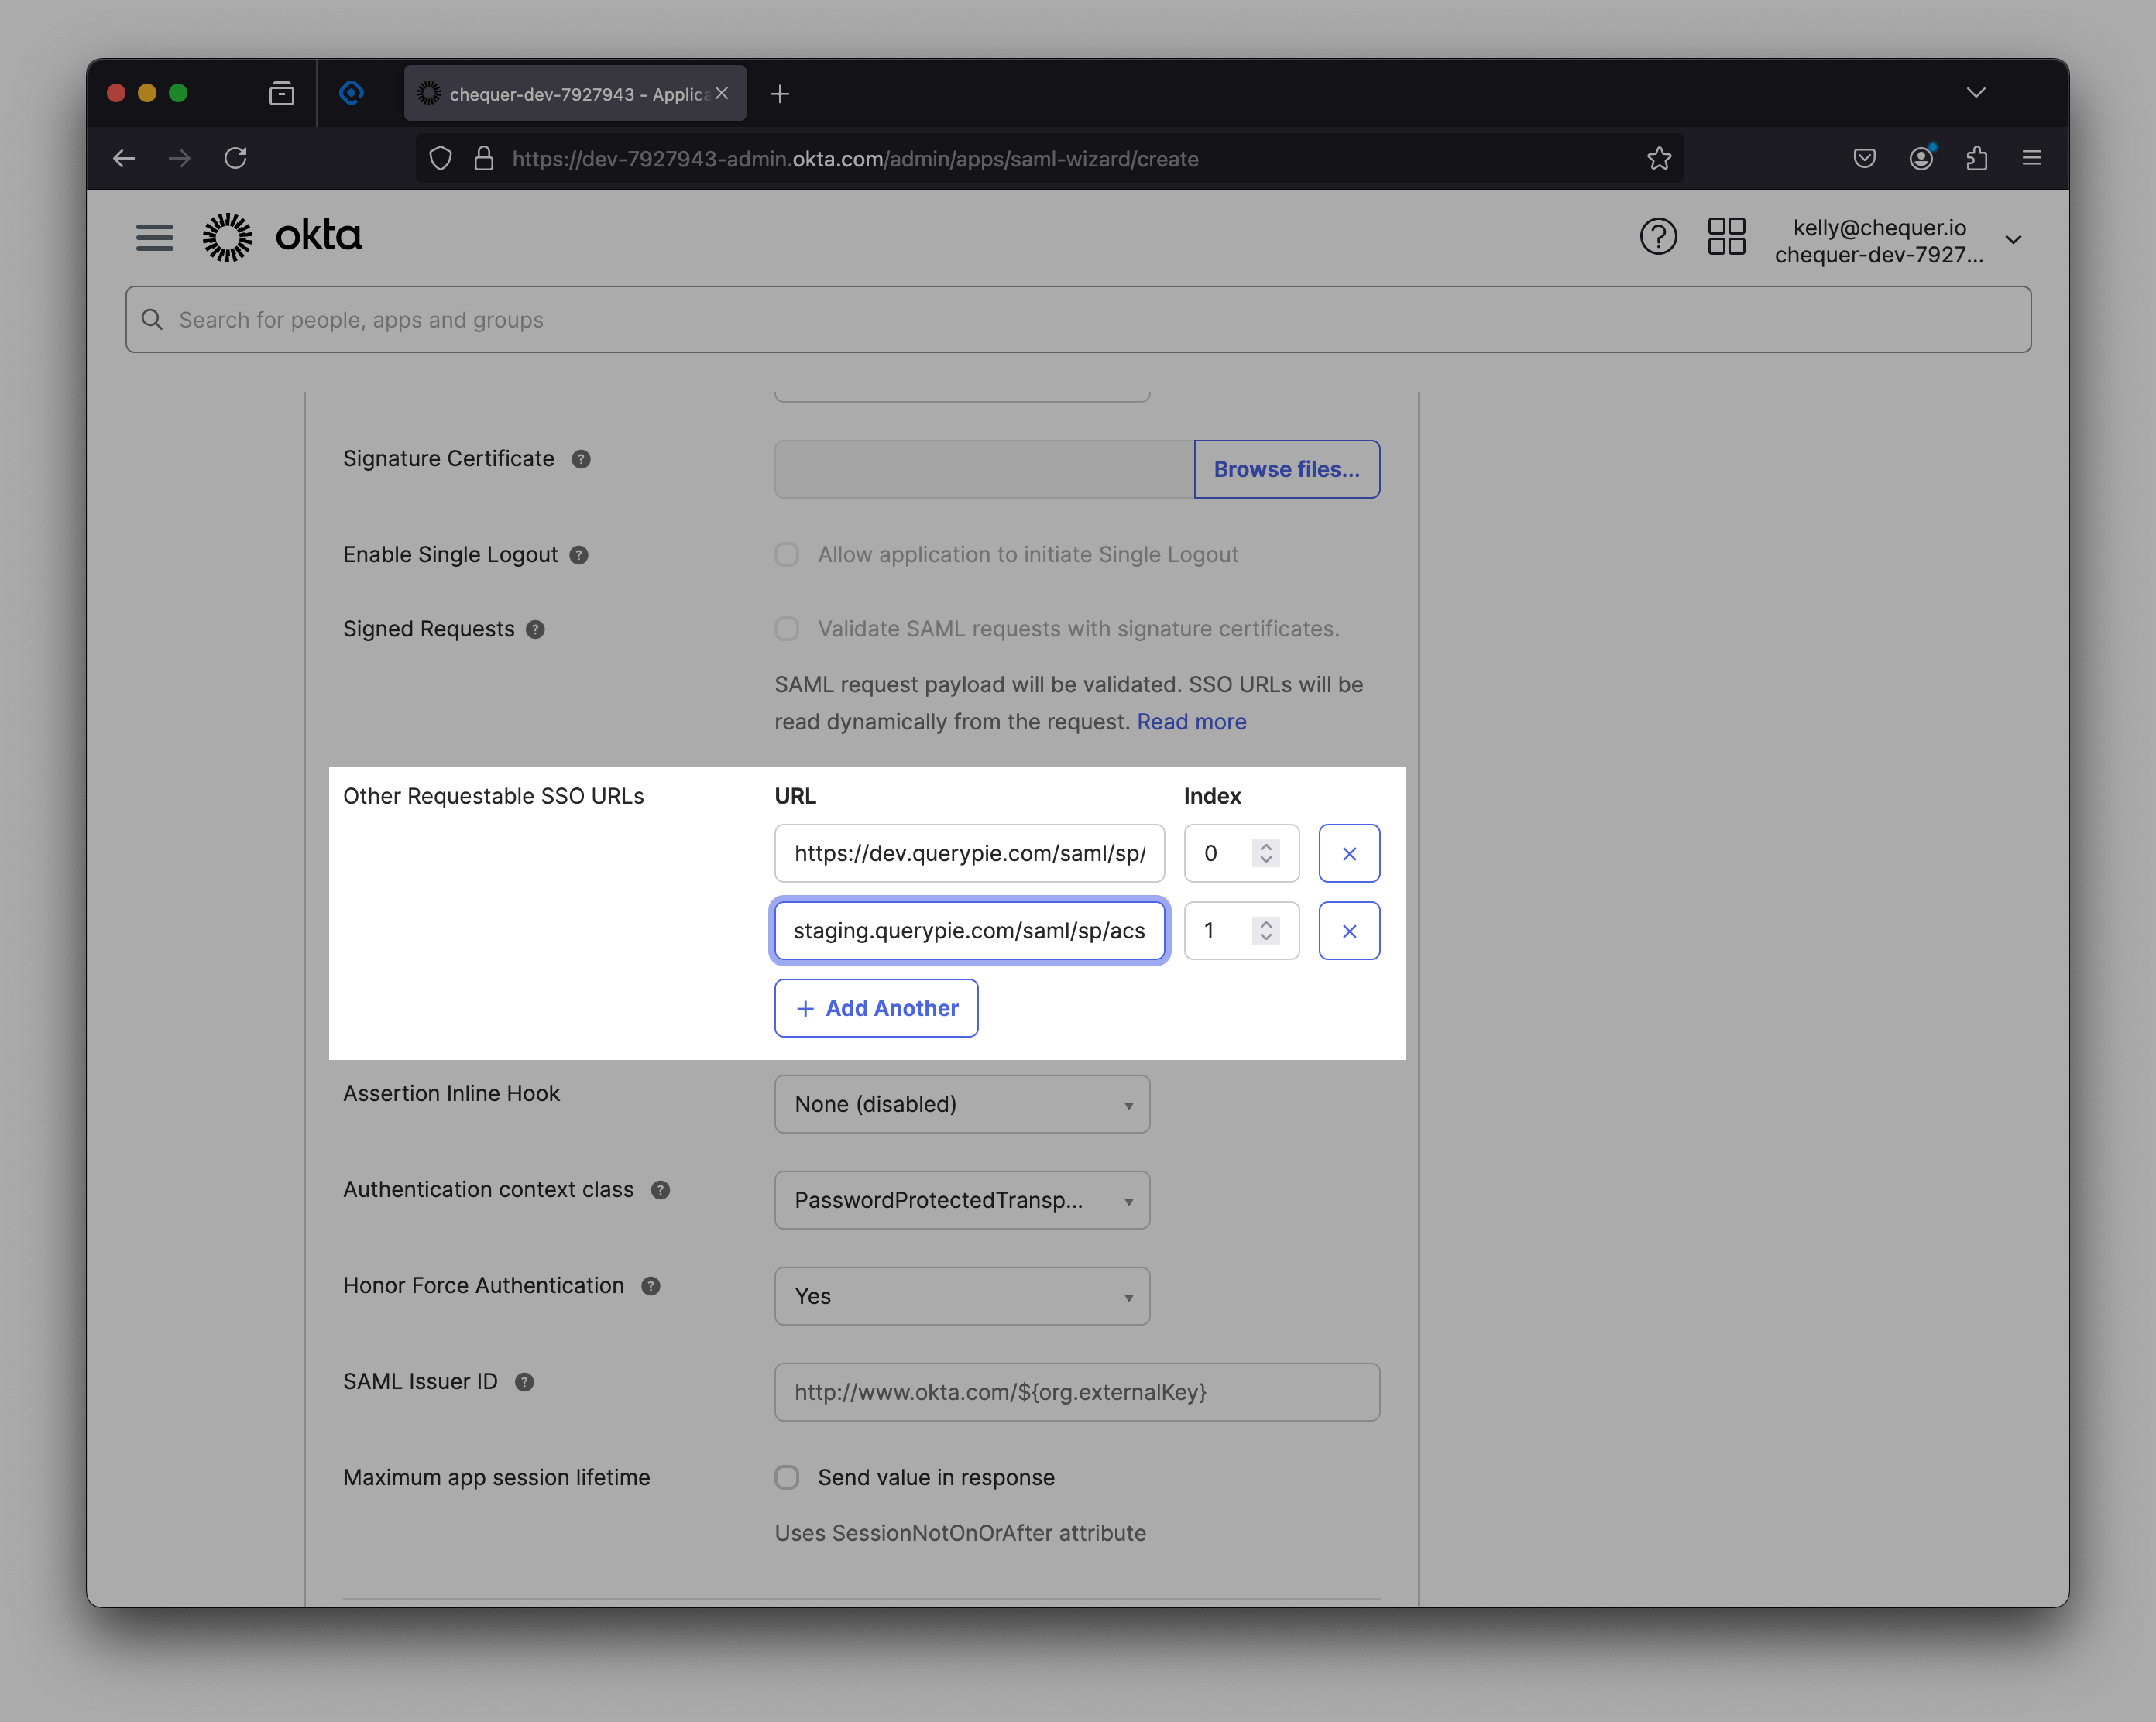
Index for Other Requestable SSO URLs
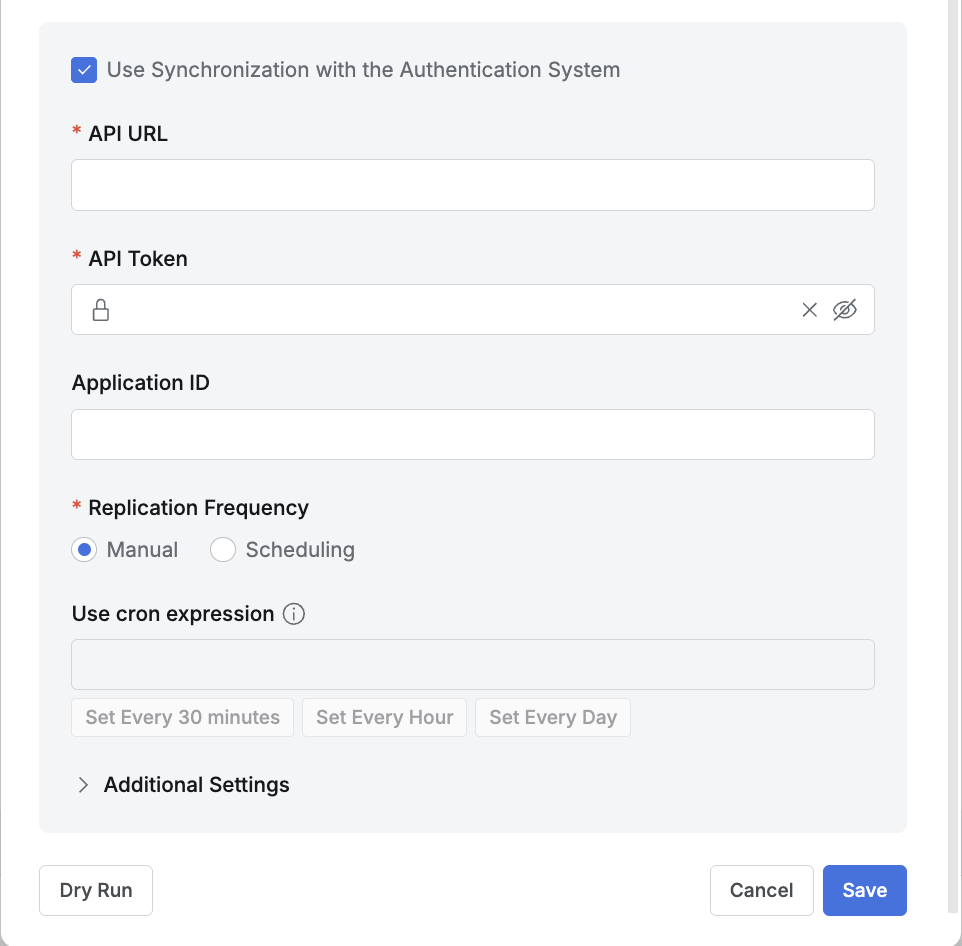
Okta details (2)
- To configure synchronization, enable (check) the “Use Synchronization with the Authentication System” option.
- API URL : Click your profile at the top right of the Okta admin page to see a URL in the format
{domain}.okta.com. - API Token : Enter the Okta Admin API token.
- Application ID : Enter this when using two or more QueryPie Apps in Okta.
- API URL : Click your profile at the top right of the Okta admin page to see a URL in the format
- To use periodic synchronization, configure Scheduling in the Replication Frequency field.
- Additional Settings
- Make New Users Inactive by Default : Select whether to add new users as inactive when synchronizing.
We recommend enabling this option when there are many users to synchronize or when you want to manage individual QueryPie access via authentication. - Use an Attribute for Privilege Revoke : Select whether to revoke Privileges based on a specific Attribute during synchronization.
Enable this option if you want to automatically revoke DAC Privileges based on changes to a specific Attribute.
Enter the attribute name to monitor for activation changes in the Attribute input field. - Enable Attribute Synchronization : Select whether to map and synchronize IdP user attributes with QueryPie user attributes.
We recommend enabling this option when you want to automatically link user attributes managed in the IdP with Attributes in QueryPie.
When the option is enabled, an Attribute Mapping UI is displayed below, allowing you to specify the IdP Attribute and QueryPie Attribute to link through mapping.
However, this feature applies only to Attributes whose Source Priority is set to Inherit from profile source in Profile Editor (Admin> General > User Management > Profile Editor). - Allowed User Deletion Rate Threshold :
- This feature causes synchronization to fail when the percentage of existing users deleted during synchronization is greater than or equal to this value.
- Enter a value between 0.0 and 1.0 (default is 0.1).
- Example: If there are 100 existing users and the Allowed User Deletion Rate Threshold is 0.1, synchronization fails when 10 or more users are deleted after re-synchronization.
- When upgrading the product to 11.3.0 from a version before 11.3.0 with synchronization configured, this value is set to 1.0 by default.
- Make New Users Inactive by Default : Select whether to add new users as inactive when synchronizing.
- Click the
Dry Runbutton to verify that the integration information has been entered correctly. - Click the
Savebutton to save.
How to find the Application ID When using two or more QueryPie Applications, go to Okta Admin > Applications, open the detail screen of the QueryPie app, and you can find the Application ID in the top URL as shown in the screenshot above.
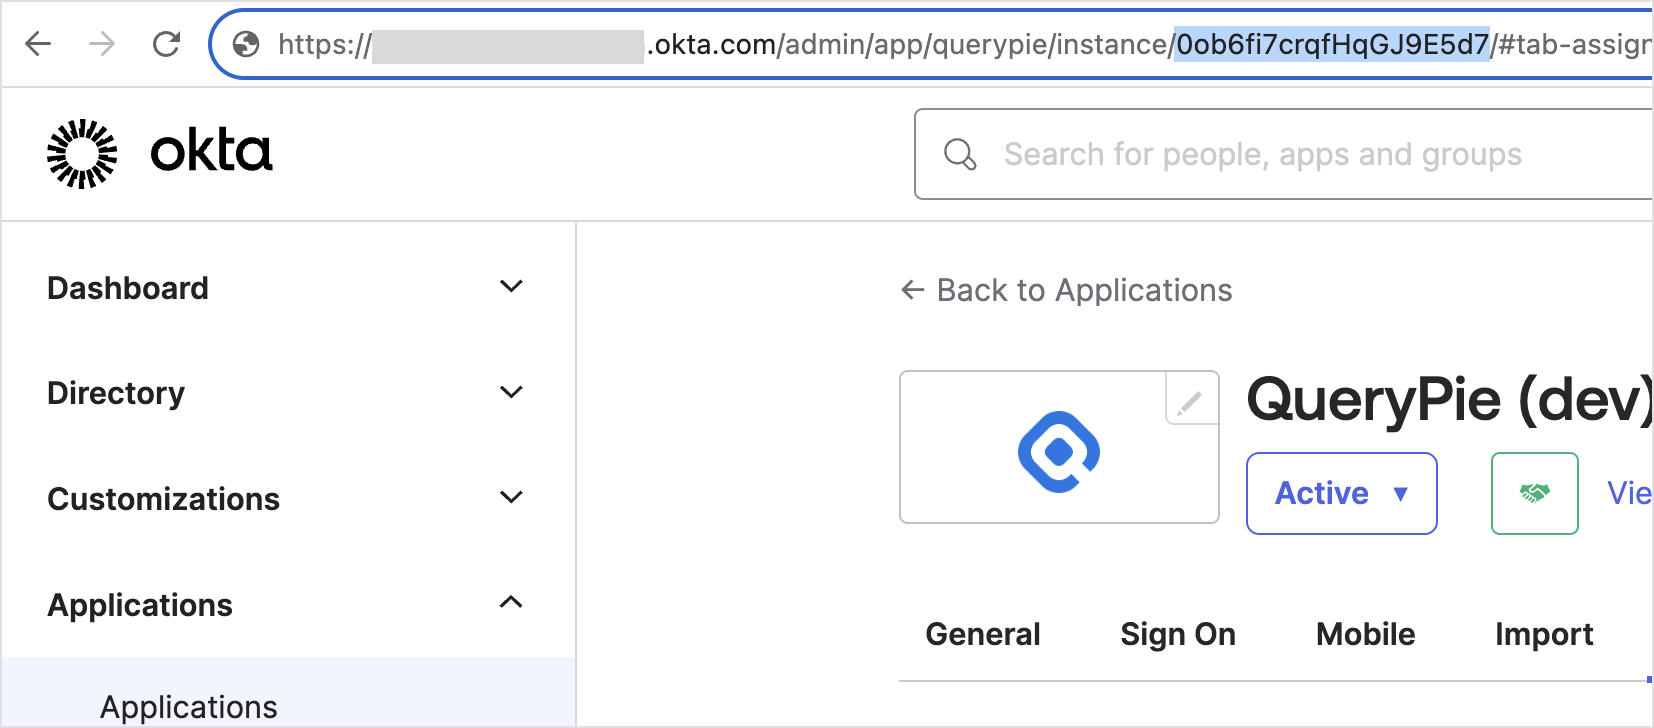
Top URL of Okta Admin > Applications > QueryPie App
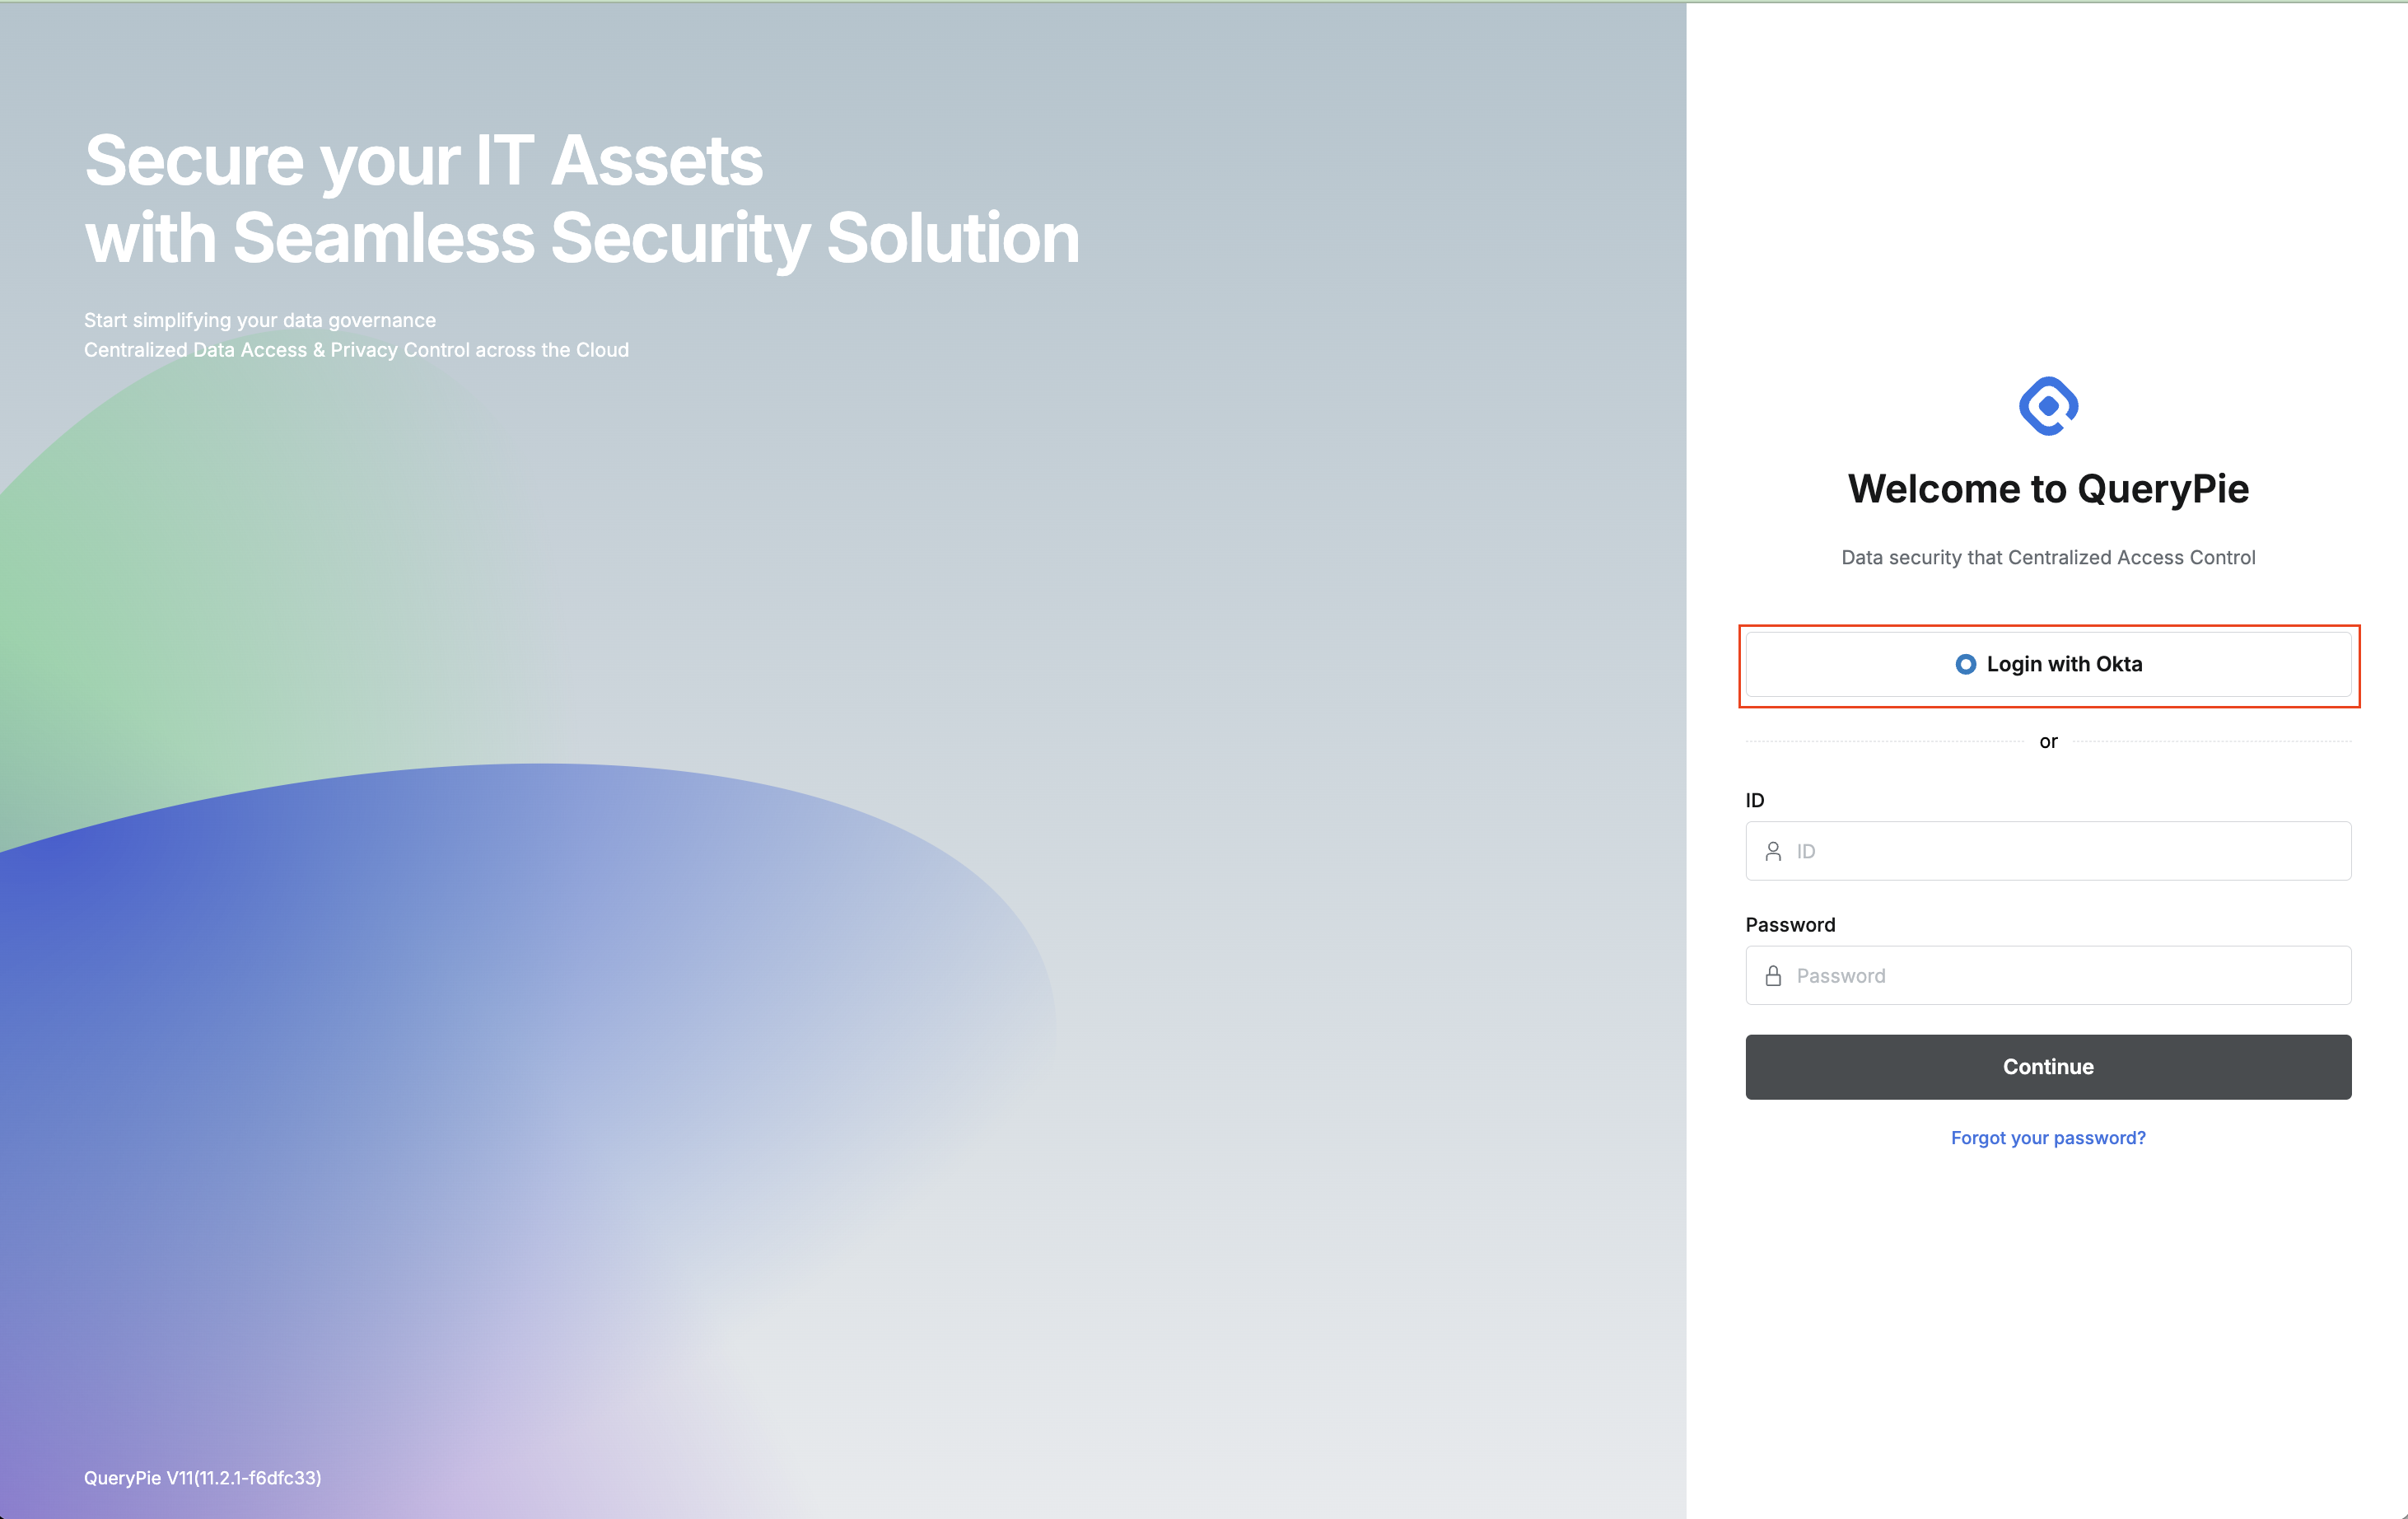
Sign in to QueryPie with Okta
- You can verify synchronized users and groups in General Settings > Users or Groups menu.
- You can now sign in to QueryPie with an Okta account using the
Login with Oktabutton on the login page.
This integration method supports one-way synchronization of users and groups from Okta to QueryPie. If you want to implement SCIM provisioning integration, please follow the procedures in the [Okta] Provisioning Integration Guide instead.
One Login Integration
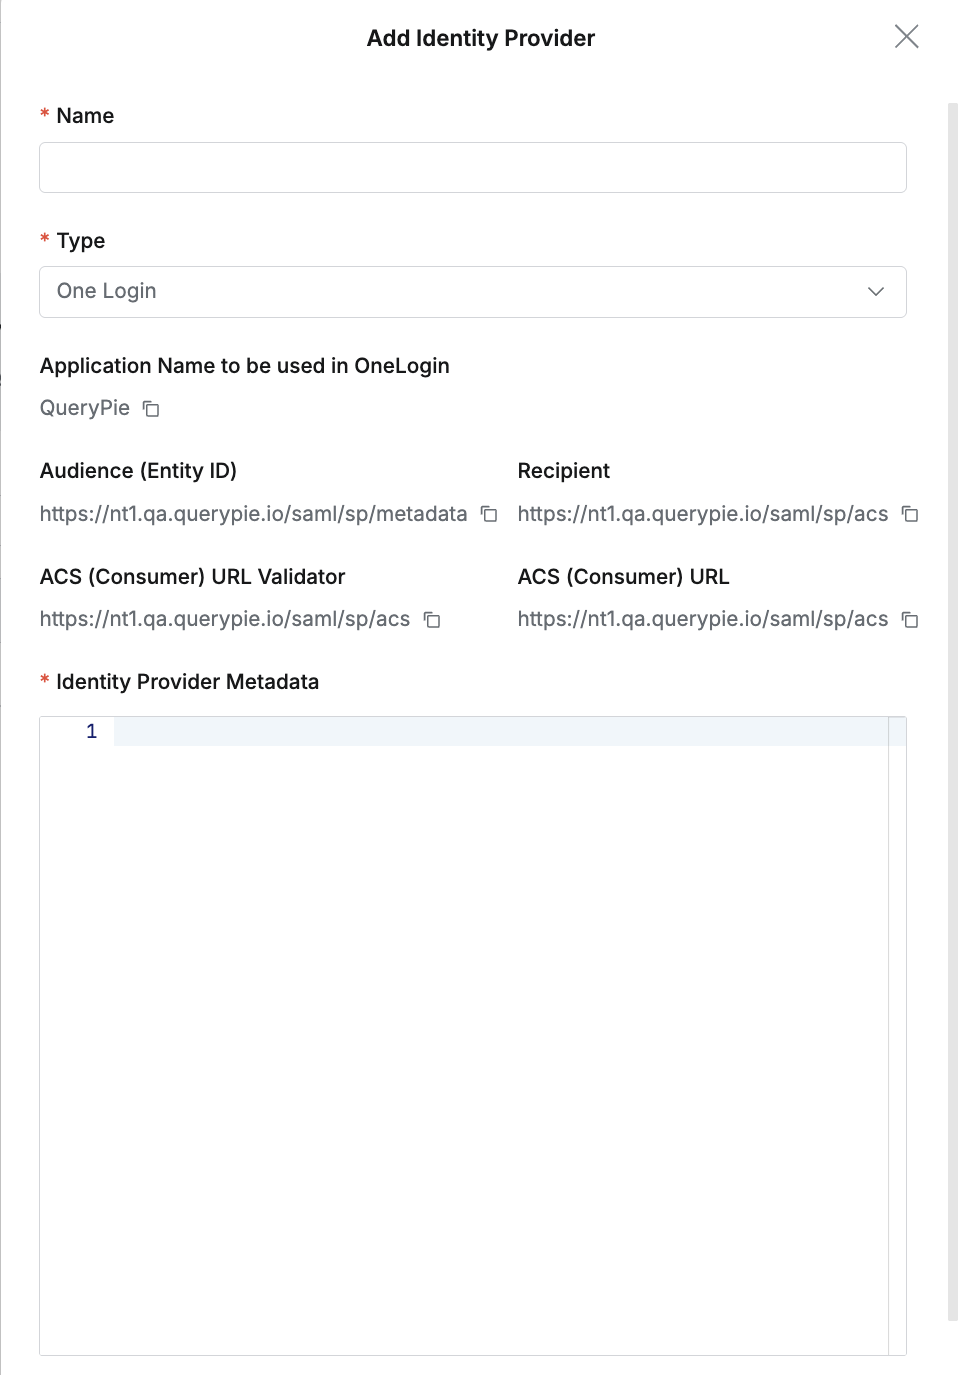
Click the + Add button at the top right of the list, and select One Login for Type in the popup screen to add One Login as an IdP.
- Name : Enter a suitable name for the IdP for easy identification.
- Type : Select One Login.
One Login SAML Custom Connector configuration and Metadata XML download
- After accessing OneLogin, click Applications > Applications menu at the top of the screen.
- Click the
Add Appbutton. - Enter ‘SAML Custom Connector (Advanced)’ in the search area and click the search result.
- For Display Name, copy and paste the content of “Application Name to be used in OneLogin” confirmed in QueryPie, and also copy Audience (Entity ID), Recipient, ACS (Consumer) URL Validator, and ACS (Consumer) URL into the One Login settings.
- Click the
Savebutton to save. - Select the Configuration menu on the left, then click More Actions > SAML Metadata at the top right.
- Check the downloaded XML file.
For detailed information on One Login SAML Custom Connector configuration, please refer to https://onelogin.service-now.com/support?id=kb_article&sys_id=8a1f3d501b392510c12a41d5ec4bcbcc&kb_category=de885d2187372d10695f0f66cebb351f .
- Identity Provider Metadata : Copy and paste the contents of the XML file downloaded from One Login.
One Login details (1)
- To configure synchronization, enable (check) the “Use Synchronization with the Authentication System” option.
- To use periodic synchronization, configure Scheduling in the Replication Frequency field.

One Login details (2)
- Additional Settings
- Make New Users Inactive by Default : Select whether to add new users as inactive when synchronizing.
We recommend enabling this option when there are many users to synchronize or when you want to manage individual QueryPie access via authentication. - Use an Attribute for Privilege Revoke : Select whether to revoke Privileges based on a specific Attribute during synchronization.
Enable this option if you want to automatically revoke DAC Privileges based on changes to a specific Attribute.
Enter the attribute name to monitor for activation changes in the Attribute input field. - Enable Attribute Synchronization : Select whether to map and synchronize IdP user attributes with QueryPie user attributes.
We recommend enabling this option when you want to automatically link user attributes managed in the IdP with Attributes in QueryPie.
When the option is enabled, an Attribute Mapping UI is displayed below, allowing you to specify the IdP Attribute and QueryPie Attribute to link through mapping.
However, this feature applies only to Attributes whose Source Priority is set to Inherit from profile source in Profile Editor (Admin> General > User Management > Profile Editor). - Allowed User Deletion Rate Threshold :
- This feature causes synchronization to fail when the percentage of existing users deleted during synchronization is greater than or equal to this value.
- Enter a value between 0.0 and 1.0 (default is 0.1).
- Example: If there are 100 existing users and the Allowed User Deletion Rate Threshold is 0.1, synchronization fails when 10 or more users are deleted after re-synchronization.
- When upgrading the product to 11.3.0 from a version before 11.3.0 with synchronization configured, this value is set to 1.0 by default.
- Make New Users Inactive by Default : Select whether to add new users as inactive when synchronizing.
SAML 2.0 Integration (one-time without periodic synchronization)
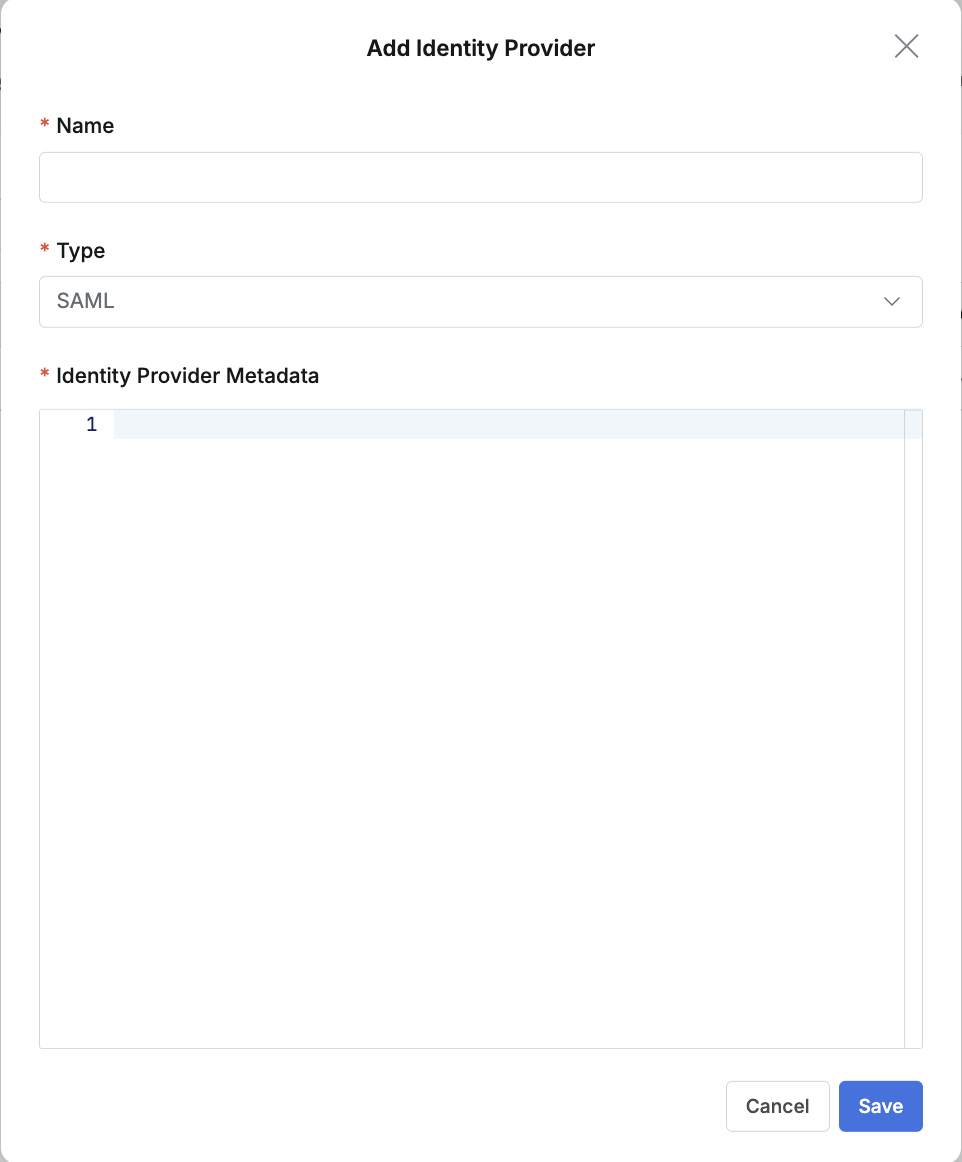
For a one-time SAML integration without periodic synchronization, configure by entering only the SAML metadata.
- Name : Enter a suitable name for the IdP for easy identification.
- Type : Select SAML.
- Identity Provider Metadata : Copy and paste the contents of the SAML metadata XML confirmed in the IdP.
< Reference > AWS SSO Integration
Custom Identity Provider
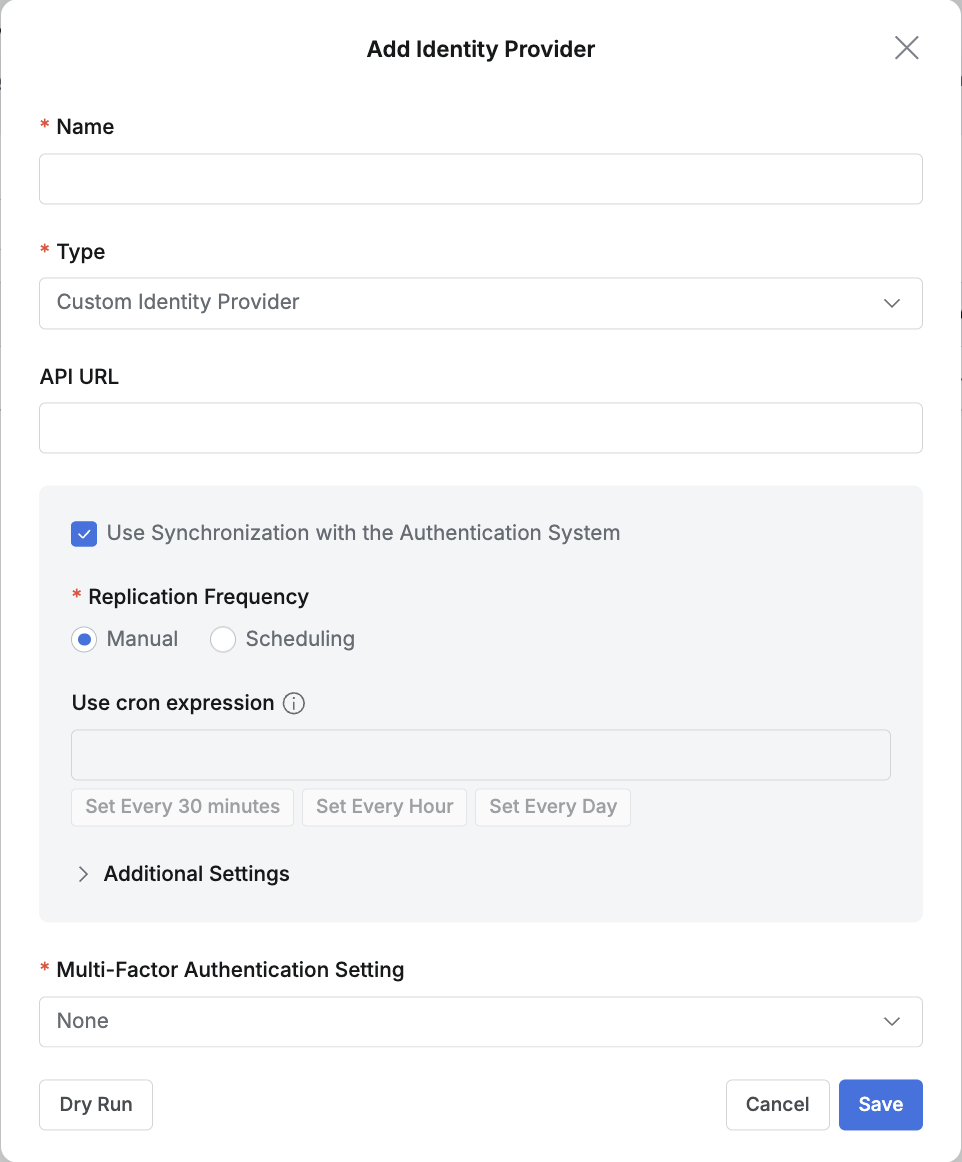
Custom Identity Provider is used only for special cases that use an authentication API server.
- Name : Enter a suitable name for the IdP for easy identification.
- Type : Select Custom Identity Provider.
- API URL : Enter the End-point URL of the API server.
- To run user information synchronization, enable the Use Synchronization with the Authentication System option.
- Additional Settings
- Make New Users Inactive by Default : Select whether to add new users as inactive when synchronizing.
We recommend enabling this option when there are many users to synchronize or when you want to manage individual QueryPie access via authentication. - Use an Attribute for Privilege Revoke : Select whether to revoke Privileges based on a specific Attribute during synchronization.
Enable this option if you want to automatically revoke DAC Privileges based on changes to a specific Attribute.
Enter the attribute name to monitor for activation changes in the Attribute input field. - Enable Attribute Synchronization : Select whether to map and synchronize IdP user attributes with QueryPie user attributes.
We recommend enabling this option when you want to automatically link user attributes managed in the IdP with Attributes in QueryPie.
When the option is enabled, an Attribute Mapping UI is displayed below, allowing you to specify the IdP Attribute and QueryPie Attribute to link through mapping.
However, this feature applies only to Attributes whose Source Priority is set to Inherit from profile source in Profile Editor (Admin> General > User Management > Profile Editor). - Allowed User Deletion Rate Threshold :
- This feature causes synchronization to fail when the percentage of existing users deleted during synchronization is greater than or equal to this value.
- Enter a value between 0.0 and 1.0 (default is 0.1).
- Example: If there are 100 existing users and the Allowed User Deletion Rate Threshold is 0.1, synchronization fails when 10 or more users are deleted after re-synchronization.
- When upgrading the product to 11.3.0 from a version before 11.3.0 with synchronization configured, this value is set to 1.0 by default.
- Make New Users Inactive by Default : Select whether to add new users as inactive when synchronizing.