Managing Servers as Groups
Overview
You can group numerous servers and apply accessible accounts and policies at once. You can create server groups according to purpose and conveniently manage policies in bulk, and grant grouped server group permissions to individual users or user groups at once.
We recommend registering each resource required for server group registration in advance.
- Administrator > Servers > Server Account Management > Server Account Templates
- Administrator > Servers > Server Account Management > SSH Key Configurations
Creating Server Groups
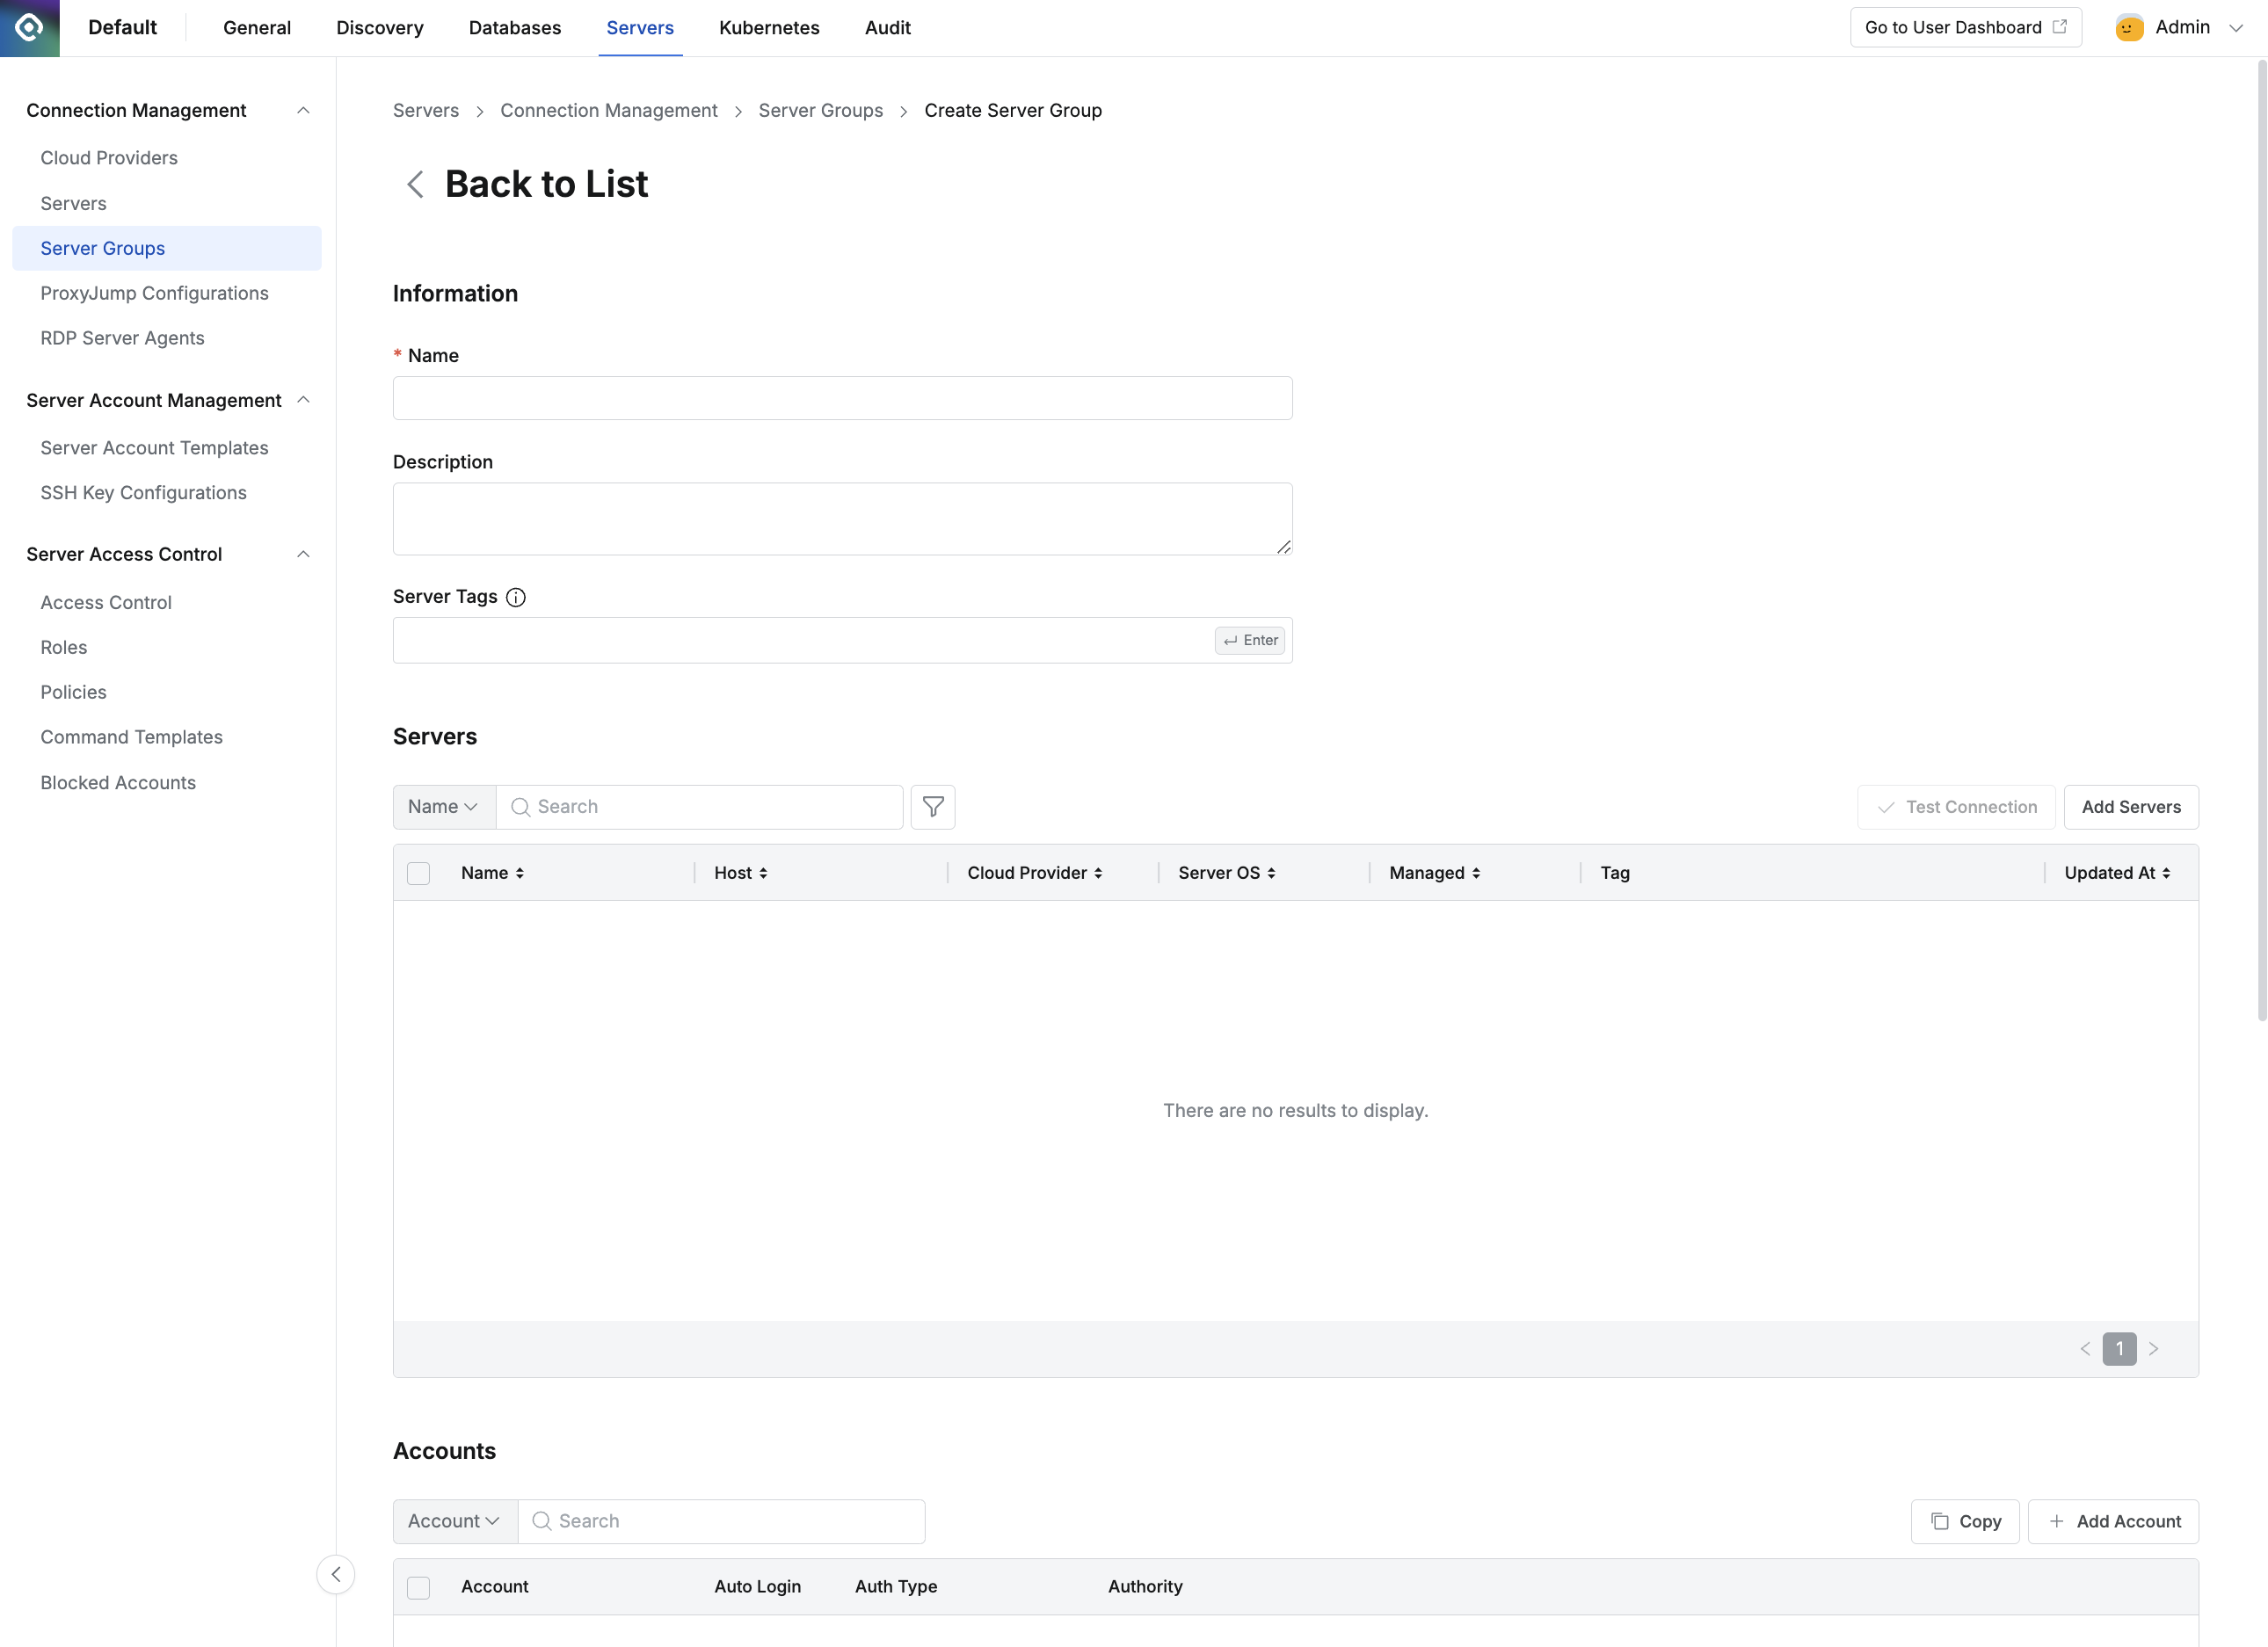
Administrator > Servers > Connection Management > Server Groups > Create Server Group
- Navigate to Administrator > Servers > Connection Management > Server Groups menu.
- Click the
+ Create Groupbutton in the top right. - Enter the following information for group creation.
- Name: Name that can distinguish the server group on the screen.
- Description: You can enter additional descriptions of the server group. If there are multiple administrators, we recommend entering detailed names and descriptions according to purpose for easy identification between server groups.
- Server Tags: You can dynamically manage server group targets by specifying tags of servers to be grouped through Server Tags.
- Save through the
Savebutton.
Server groups can manage servers based on Tags. By specifying specific Tags in the Server Tags of server groups, flexible server management is possible where all servers with those Tags are included in the server group.
Creating/Modifying Server Groups
You can create server groups by entering the information below. Some items can be modified after creation.
1. Entering Basic Information and Adding Servers by Tag
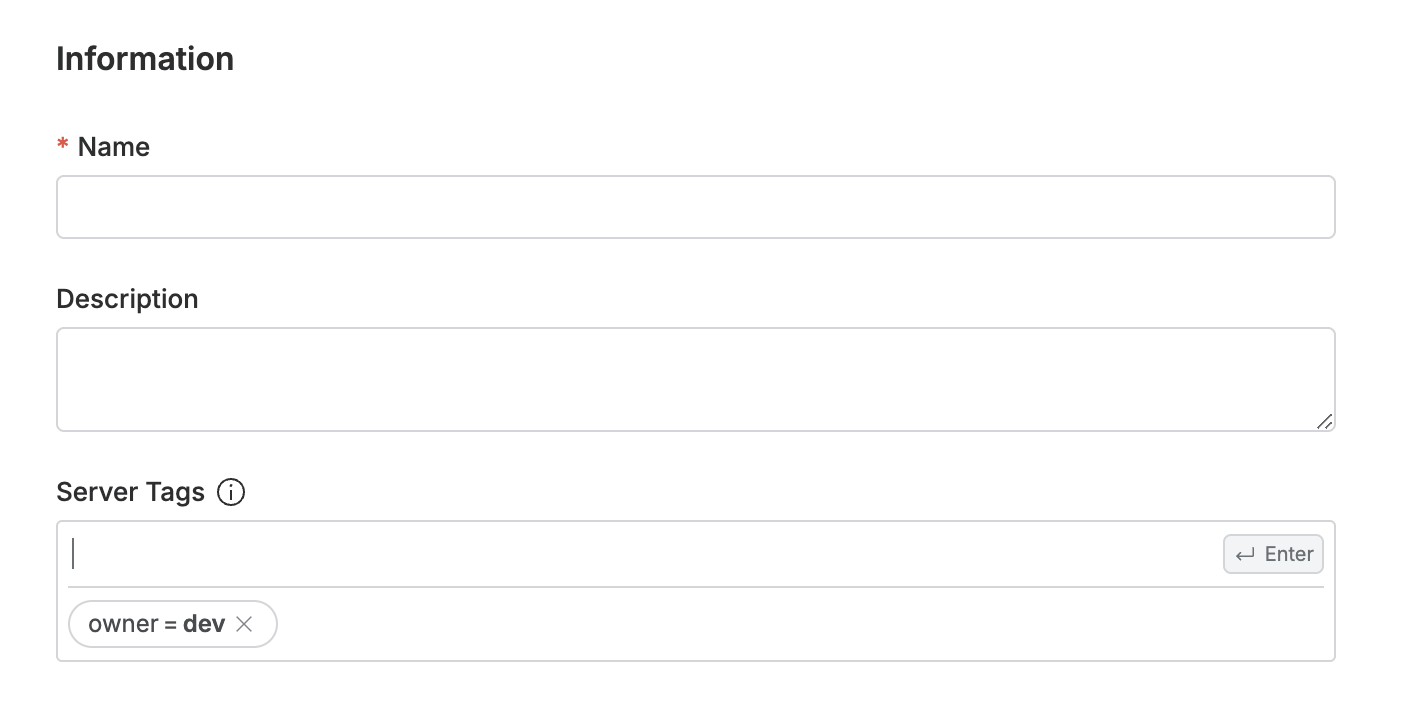
- Name : Enter the name of the server group.
- Description : Enter content that can describe the server group. If there are multiple administrators, we recommend entering detailed names and descriptions according to purpose for easy identification between server groups.
- Server Tags : You can dynamically manage server group targets by specifying tags of servers to be grouped. Servers added through tags cannot be manually deleted from the server table, so you must modify the tags in Server Tags.
2. Manually Adding Servers
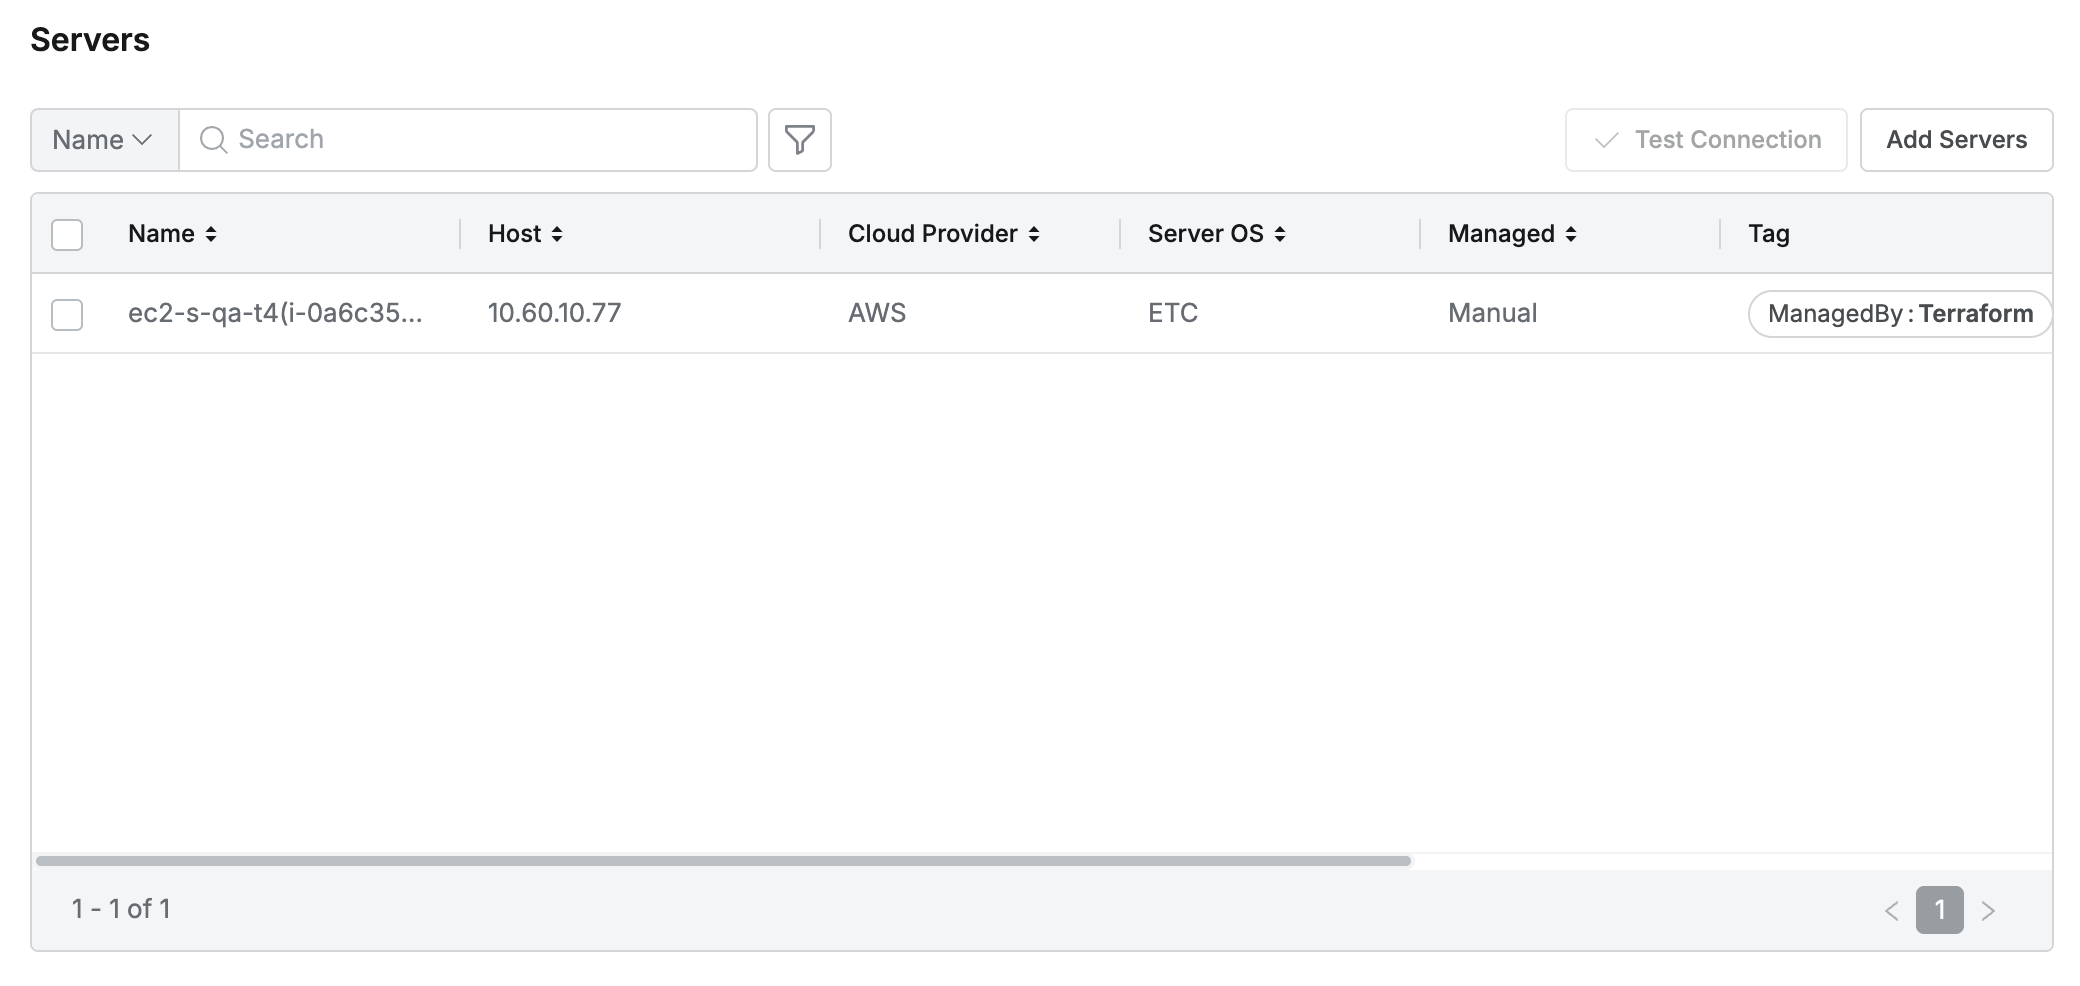
- In Servers, you can check servers that belong to the server group or manually add servers to the server group.
- Clicking the
Add Serverbutton in the top right displays a popup showing the server list above the screen. - In the popup window, select individual servers to add to the server group and click the
Addbutton.- You can filter servers with various conditions using the filter(:filter:) function in the popup.
- You can check the servers finally added to the server group.
- Clicking the
In 11.3.0, you can now filter targets using tags in the popup for adding servers to Server groups.
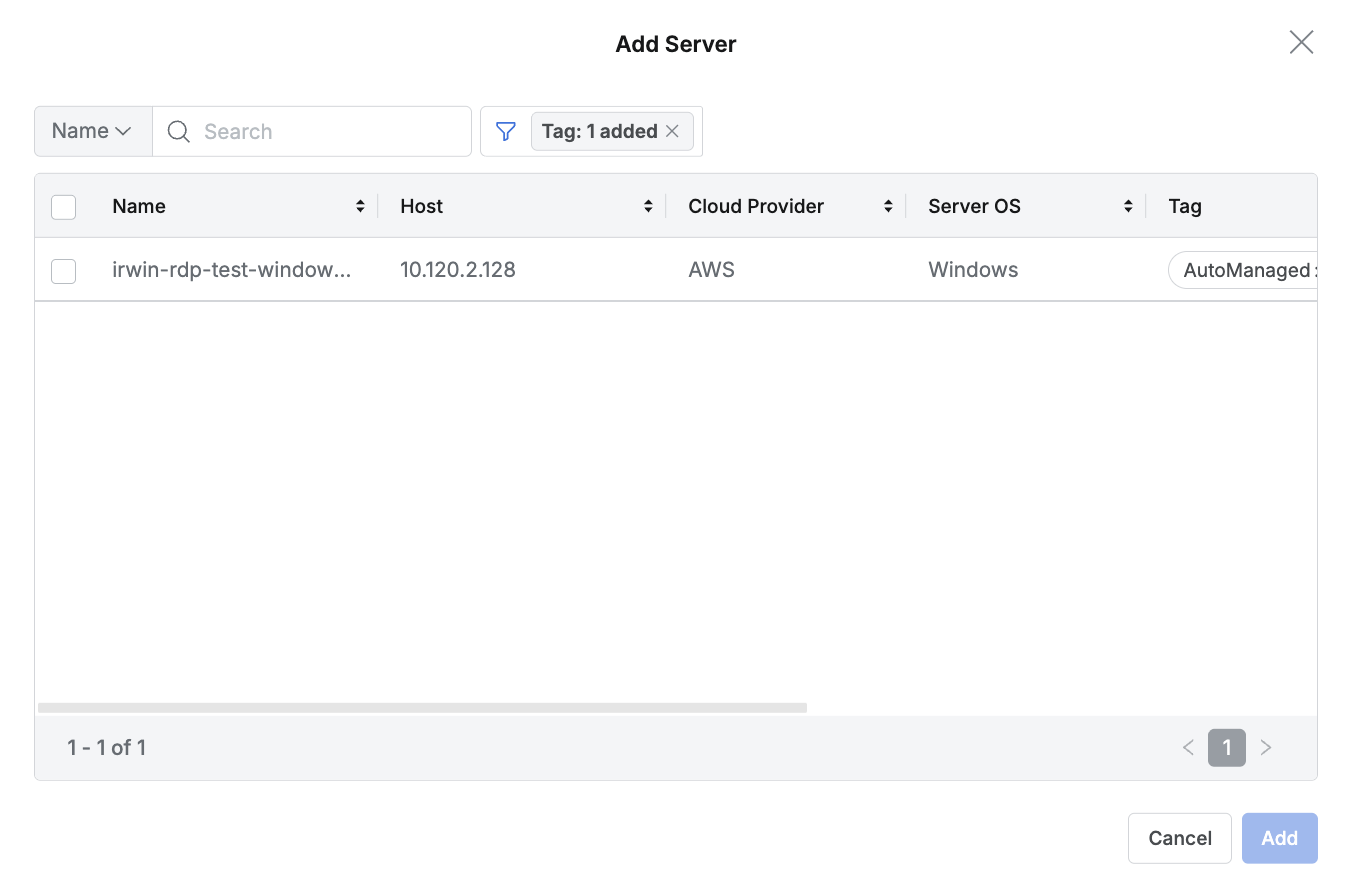
Example of filtering targets to add to Server Group using tags
- Even if you delete tags related to manually added servers in the Server Tags of Information, manually added servers are not excluded from the server group. Only manual deletion through the
Deletebutton that appears after selecting the checkbox in the Servers table is possible. - You can check account information for Servers and Accounts added to the Server Group through Test Connection.
- To use Test Connection, you must add at least 1 Server and Account to the Server Group.
Test Connection can only be used after saving the Server Group.
3. Registering Accounts
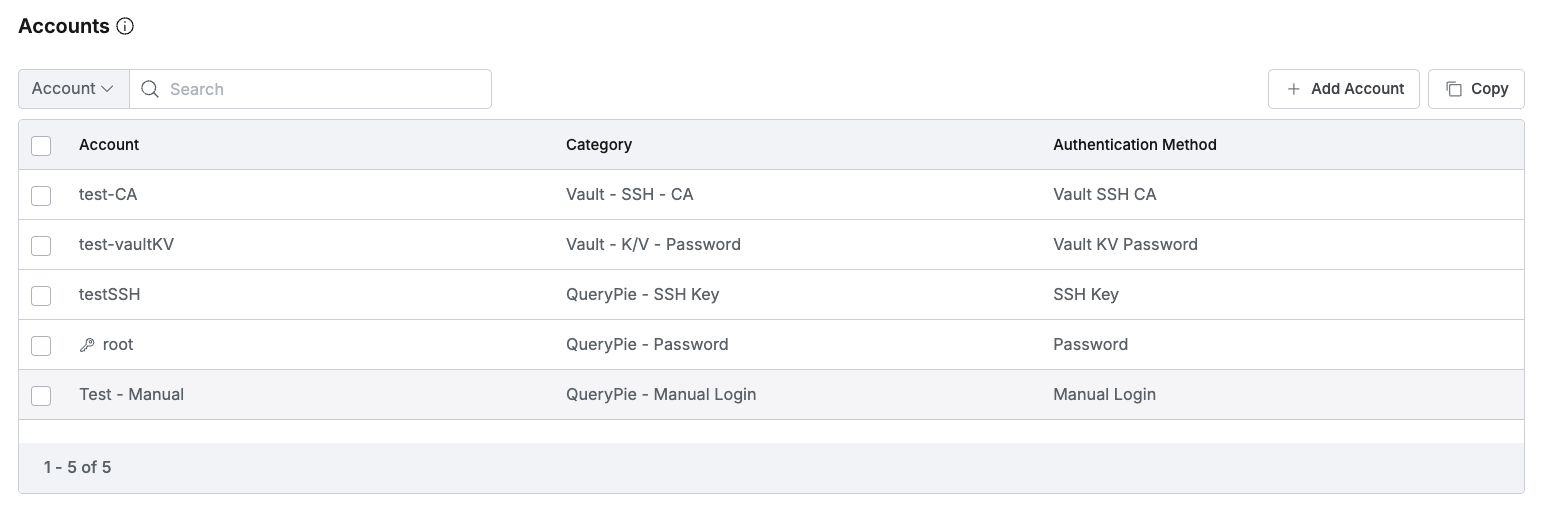
- Register and manage Accounts required to access the connection. There are two ways to register Accounts.
- You can load already registered Accounts from the Server Account Templates menu at once by pressing the
Copybutton.- For how to register Server Account Template, refer to Server Account Templates.
- Or you can manually add Accounts using the
Add Accountfunction.- When clicking the
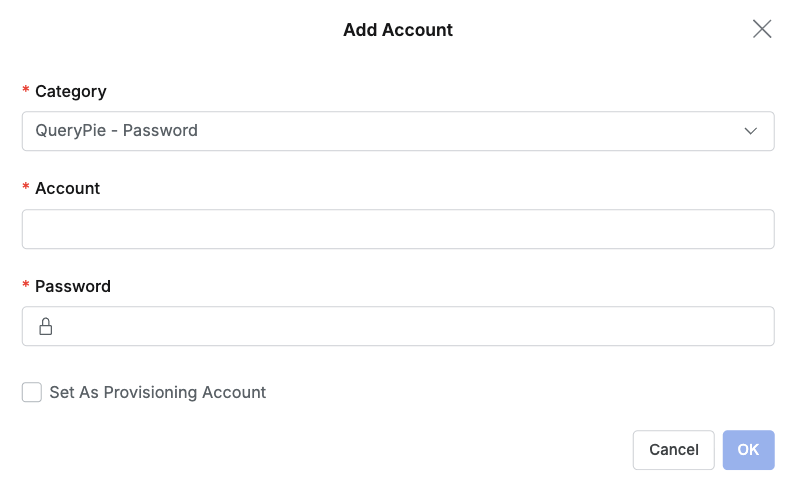
Add Accountbutton, a modal window for account settings is displayed. Items to be entered differ for each selected Category.
- When clicking the
- You can load already registered Accounts from the Server Account Templates menu at once by pressing the
- Accounts designated as Provisioning accounts display a key icon next to the Account.
- You can set accounts by category.
- Category : You must first select a Category that defines the authentication method and type of the account. The setting items displayed below change dynamically according to the selected Category.
- Caution: After creating an account, the Category cannot be modified, so you must choose carefully.
- Setting items by Category
- QueryPie Internal Authentication
QueryPie - Manual Login: Users directly enter the password of the set account when accessing the server.- Required items : Account
QueryPie - Password: Automatically logs in using the password stored in QueryPie.- Required items : Account, Password
- When Admin > Servers > Configurations > Using One Time Accounts is activated, Set As Provisioning Account checkbox can be checked
QueryPie - SSH Key: Automatically logs in using the SSH Key registered in QueryPie.- Required items : Account, SSH Key
- When Admin > Servers > Configurations > Using One Time Accounts is activated, Set As Provisioning Account checkbox can be checked
QueryPie - Custom Account: Allows users to directly enter account information instead of pre-registered accounts when accessing servers. Users must manually enter account and password in the input fields exposed at the time of access.- Required items : Alias
- Custom Account access is not supported in Seamless SSH method.
- Custom Account access is not supported on Windows Servers with Server Agent installed.
- On Windows Servers without Server Agent, only Custom Account access is possible.
- Provisioning and One Time Account
- Category items are visible only when Password Provisioning and Using One Time Accounts are activated in Admin > Servers > Configures.
QueryPie - Provisioning: Uses accounts registered in QueryPie for Provisioning purposes.- Required items : Account
- When Admin > Servers > Configurations > Using One Time Accounts is activated, Set As Provisioning Account checkbox can be checked
Active Directory - Provisioning: Uses Active Directory accounts for Provisioning purposes.- Required items : Account, Secret Store
QueryPie - One Time Account: Used for one-time temporary accounts that are only valid while users access the server.- Required items : Account
- Required condition: To use One Time Account, a Provisioning account must be designated first in the server group.
- Secret Store Integration (Hashicorp Vault)
- Category items are visible only when Admin > General > Security > Secret Stores is activated.
Vault - K/V - Password: Uses passwords stored in Vault K/V engine.- Required items : Alias, Secret Store, Account Path, Password Path
- Secret Store : Only items with K/V engine type are filtered and displayed.
- When utilizing Secret Store integration information when registering Account information in server groups, you can access connections through pre-designated Secret Store authentication information integration. By pre-storing server authentication information in Secret Store and having users utilize server authentication information stored in Secret Store when accessing servers remotely, security for server authentication information can be enhanced. Servers designated for Server Groups are forced to use the same Secret Store as Server Groups.
- Enter the server account name to be exposed to users in the Alias field.
- Required items : Alias, Secret Store, Account Path, Password Path
Vault - K/V - SSH Key: Uses SSH Keys stored in Vault K/V engine.- Required items : Alias, Secret Store, Account Path, SSH Key Path
- Secret Store : Only items with K/V engine type are filtered and displayed.
- Required items : Alias, Secret Store, Account Path, SSH Key Path
Vault - SSH - OTP: Uses Vault’s SSH OTP engine.- Required items: Account, Secret Store, Vault Role Path
- Secret Store : Only items with OTP engine type are filtered and displayed.
- You can manage server accounts in Passwordless form using Hashicorp Vault’s SSH OTP engine. However, you must install vault-ssh-helper, which is Vault’s server agent, on the server. For detailed guide, please refer to Hashicorp Vault Official Guide .
- Required items: Account, Secret Store, Vault Role Path
Vault - SSH - CA: Uses Vault’s SSH CA engine.- Required items: Account, Secret Store, Vault Role Path
- Secret Store : Only items with CA engine type are filtered and displayed.
- You can manage server accounts in Passwordless form using Hashicorp Vault’s SSH CA engine (Signed SSH certificates). However, you must add the Public Key issued by the vault ca engine to the TrustedUserCAKeys of the server to be accessed. For detailed guide, please refer to Hashicorp Vault Official Guide .
- Required items: Account, Secret Store, Vault Role Path
- QueryPie Internal Authentication
Common Item: Account
- Enter a name that can distinguish individual accounts.
- When entering
{username}, it is replaced with QueryPie’s username when users with permissions access the server through QueryPie. - When username is in email format, entering
{username_prefix}replaces it with the prefix part of QueryPie’s username (part before @).
- When entering
Reference: Vault Role Path In Vault SSH-OTP and SSH-CA authentication methods, you must enter the complete API path (e.g., engine path/creds/role name) to access specific Roles set in Vault in the Vault Role Path field.
Reference: QueryPie - Custom Account
- This function is not supported in Seamless SSH access method, and the error message “Custom account not supported on seamless SSH” is displayed when attempting access.
- The Alias used for access is recorded in Admin > Audit > Server Access History. For SSH access, the account name entered by the user is also recorded, but for Windows RDP access without Server Agent, only the Alias is recorded.
Provisioning accounts must be accounts actually registered on the server and require the following settings.
- Account creation/deletion permissions are required.
- Must be set to not enter password when using sudo.
Due to macOS VNC protocol limitations, automatic login through VNC is blocked. Therefore, when accessing macOS servers through QueryPie, users must directly enter login information after VNC connection.
When setting Roles in Vault,
- You must enter the following values in Default extensions.
{
"permit-port-forwarding": "",
"permit-pty": ""
}- When setting TTL / Max TTL, set it to 60 or higher.
- In QueryPie, the TTL (Time To Live) of certificates is 60 seconds.
- Set Signing Algorithm to rsa-sha2-256.
4. Registering Server Group Owner
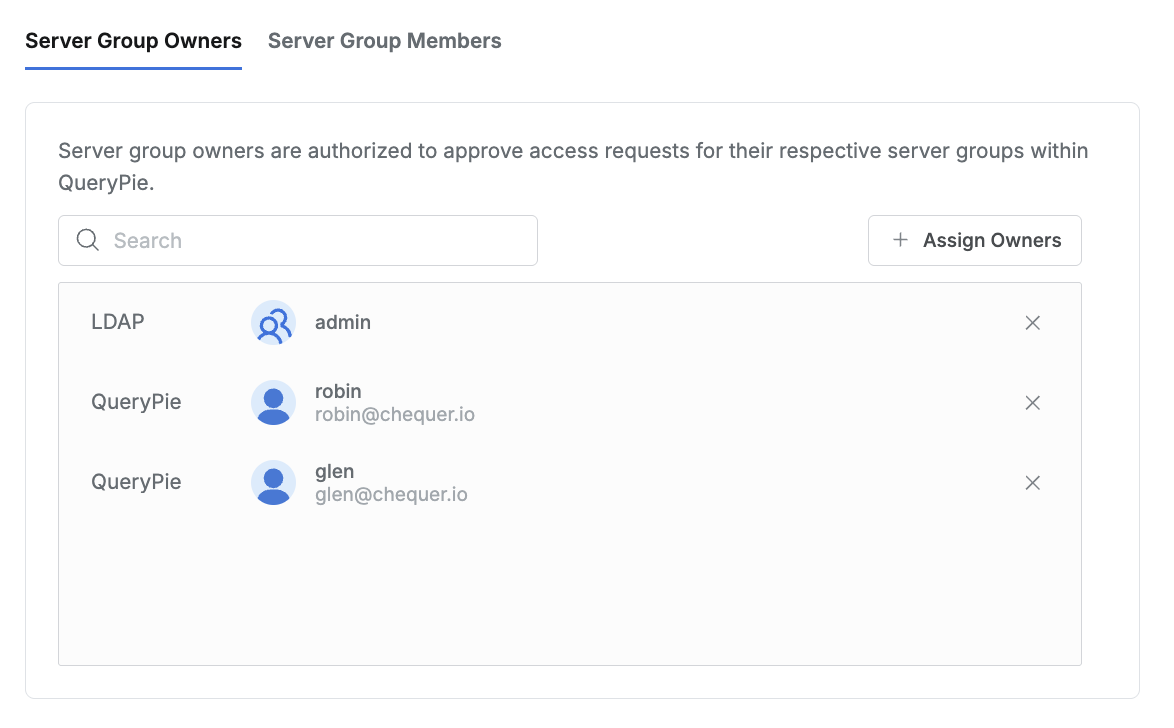
You can register server group owners to designate them as approvers in Workflow.
- Clicking the
Assign Ownersbutton in the top right displays a popup showing Users and User Groups. - In the popup window, select the User or User Group to designate as server group owner and click the
Savebutton. - You can check the User or User Group designated as owner of the server group.
- Save through the
Save Changesbutton.
5. Registering Server Group Member
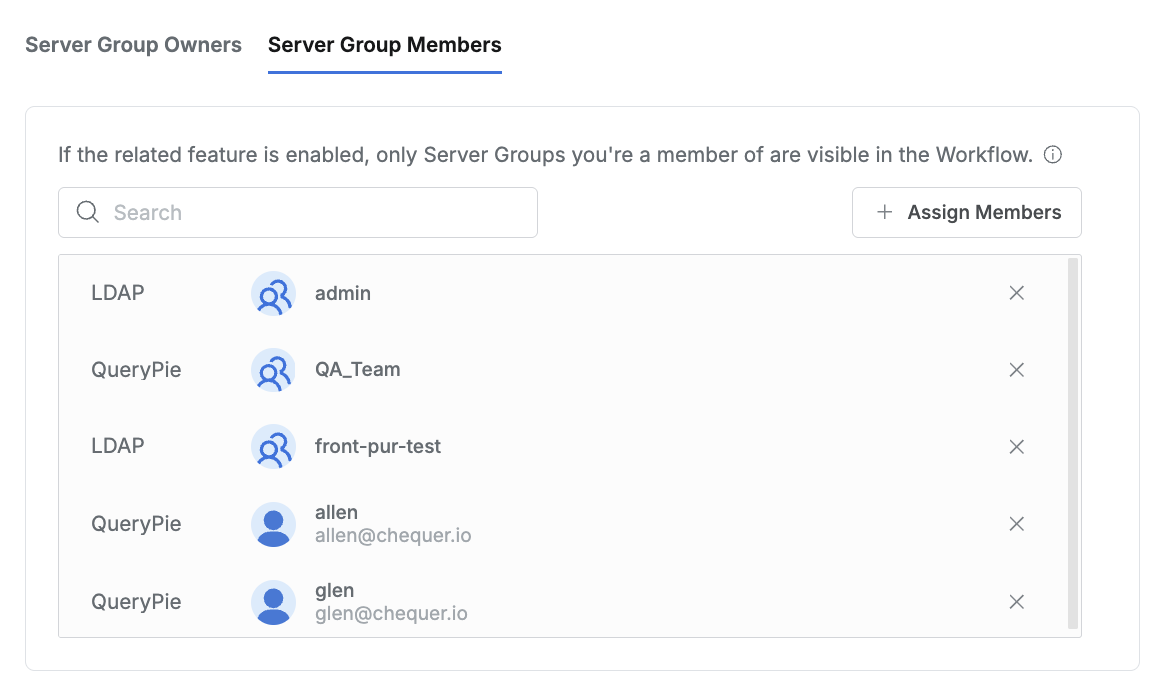
You can register server group members to specify Server Groups displayed in user-specific Workflow.
- Clicking the
Assign Membersbutton in the top right displays a popup showing Users and User Groups. - In the popup window, select the User or User Group to designate as server group member and click the
Savebutton. - You can check the User or User Group designated as member of the server group.
- Save through the
Save Changesbutton.
To limit Server Groups shown in Workflow, you must activate the “Show Server Groups in Workflow if Assigned as Member” item in Admin > Servers > General > Configurations. For detailed location, please refer to the Server Access Request Default Settings | Basic Server Access Policy Settings guide.