Approval Rules
Overview
Approval Rules refer to workflow approval processes that administrators configure in advance. Approval rules are created for each request type, allowing you to set approval stages from 1 to 4 levels and configure assignee selection methods for each stage. The Approval Rules page provides the following features:
- Approval Rules List View: View the list of registered approval rules (sorted by most recent)
- Approval Settings: Configure approval submission and approval processes
- For detailed instructions, refer to the Workflow Configurations document
- Approval Rule Creation: Click the
Add Approval Rulebutton in the top right of the page - View and Edit Details: Click on an approval rule in the list to view and edit registered content
- Approval Rule Deletion: Select checkboxes in the list to display the
Deletebutton in the table header for deleting registered rules
This document guides you through creating, viewing, modifying, and deleting approval rules.
Viewing Approval Rules List
View the approval rules list in the Administrator > General > Workflow Management > Approval Rules menu.
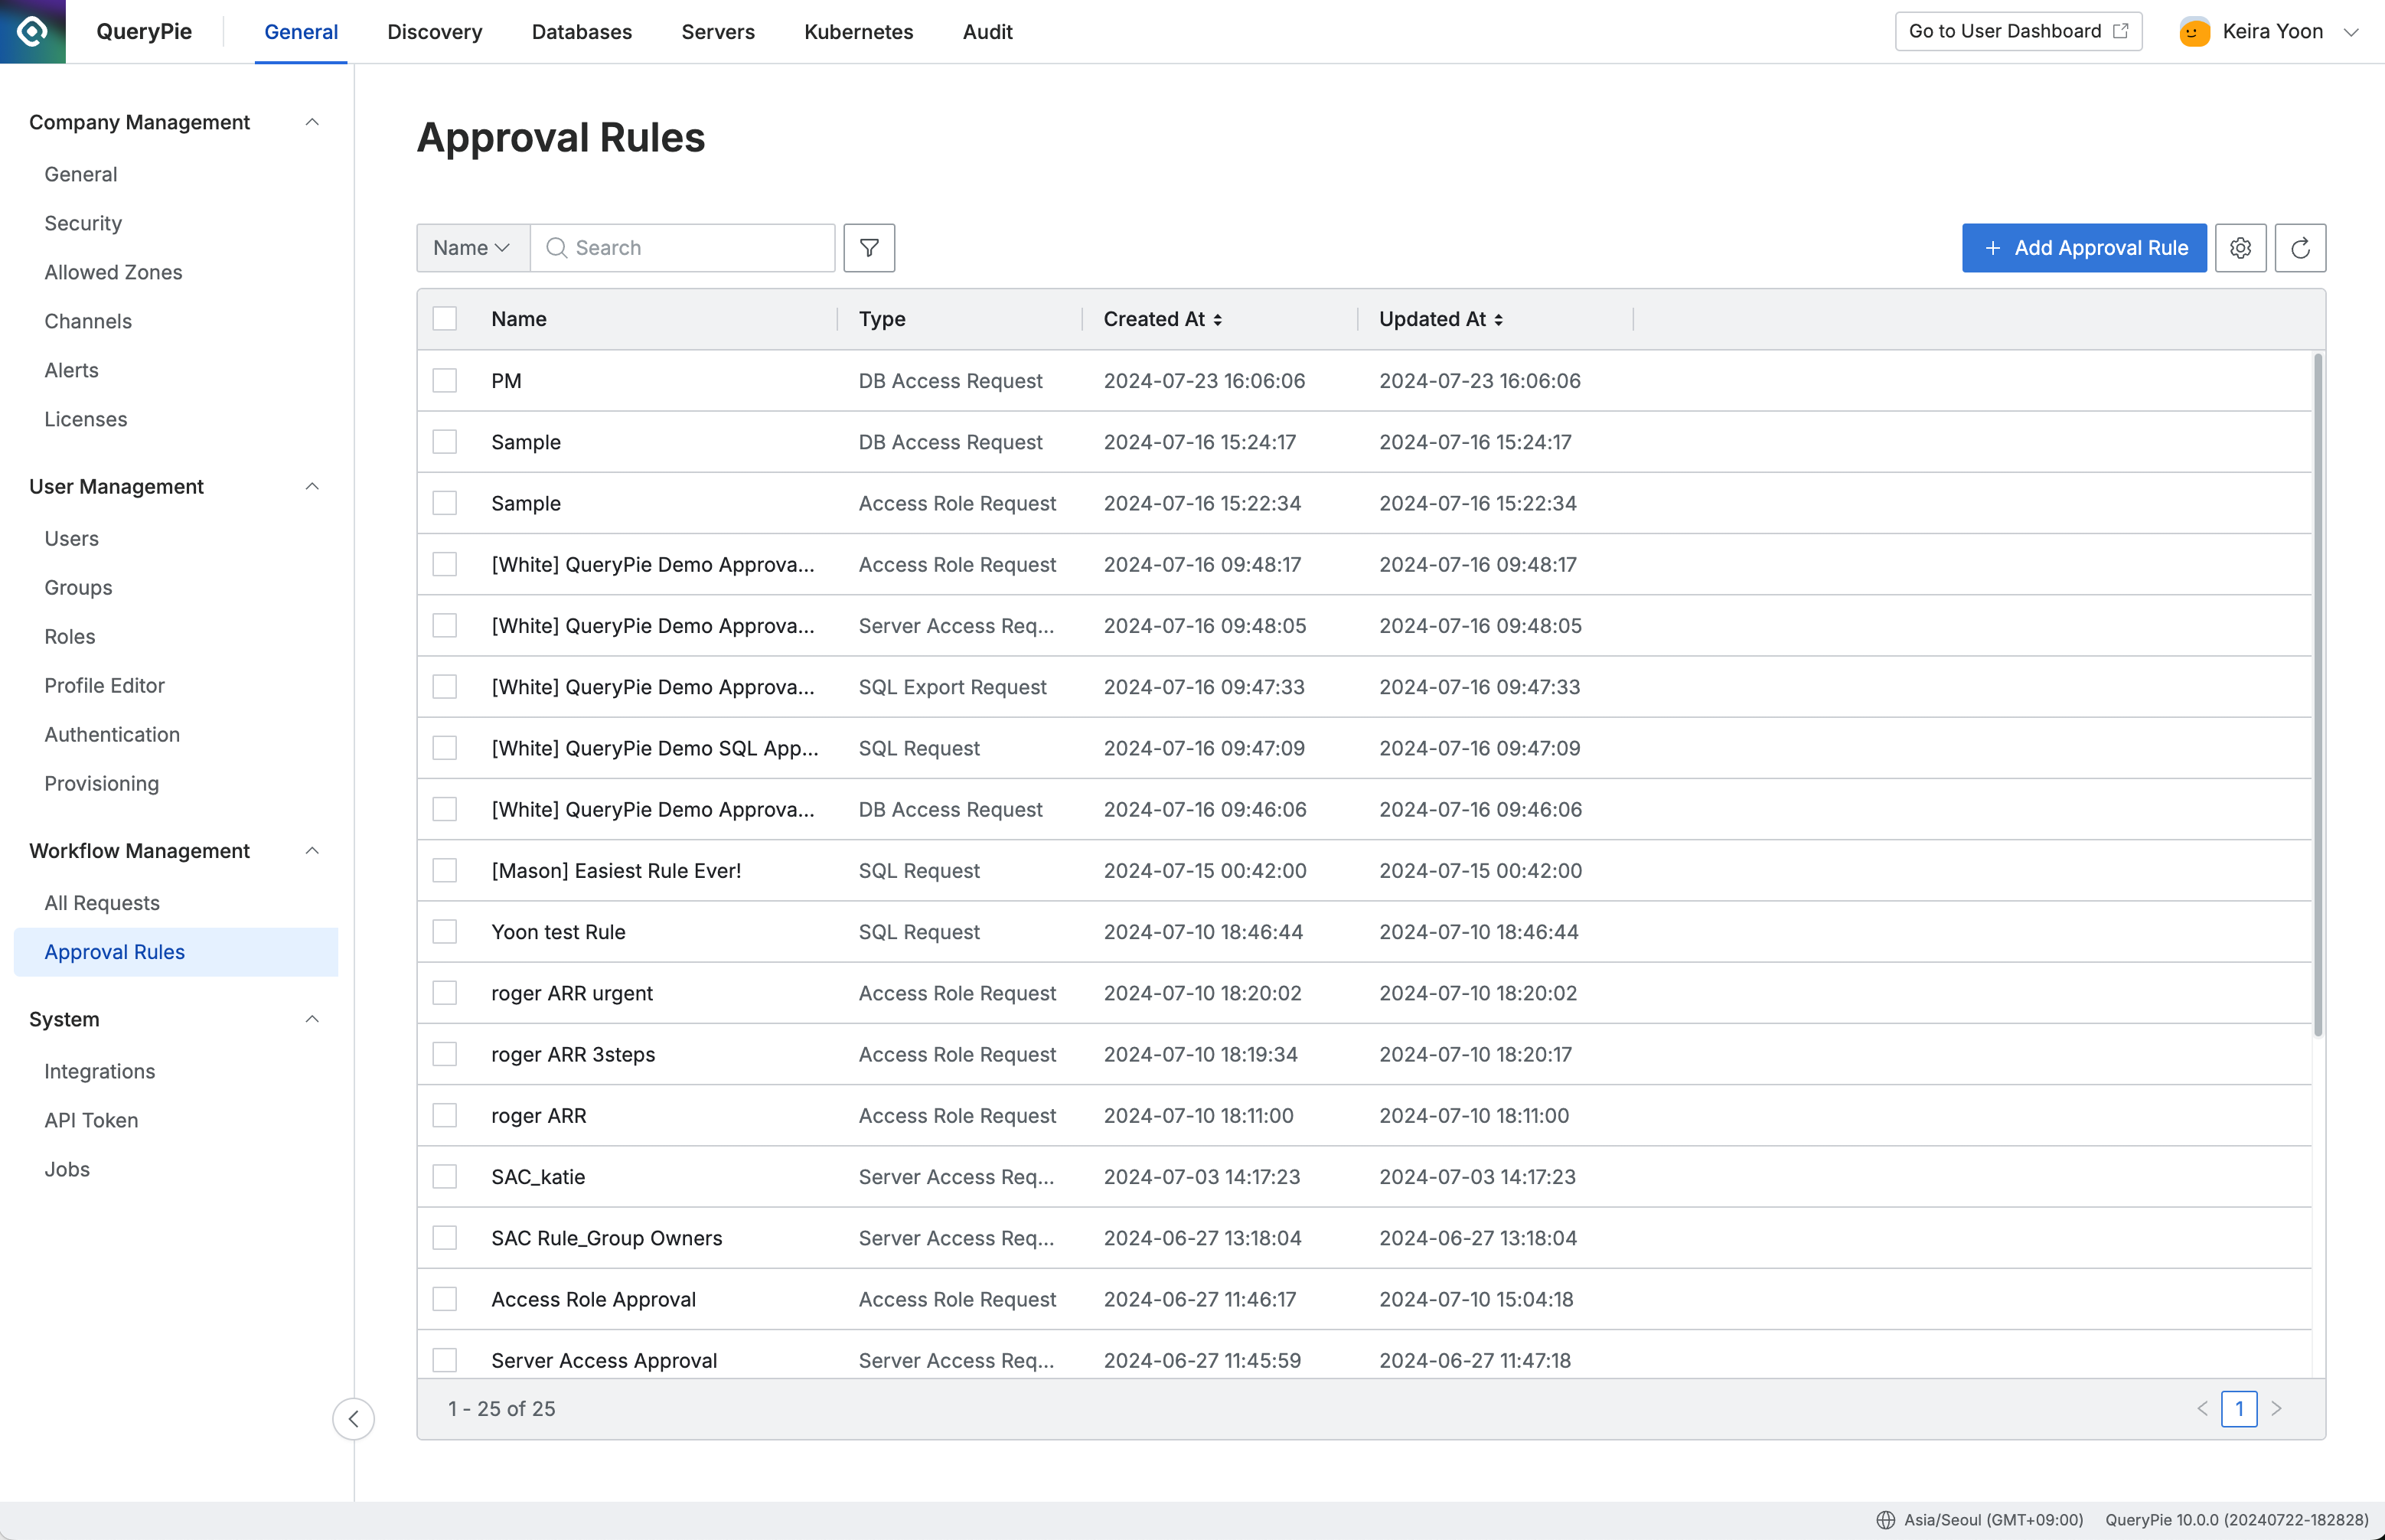
Administrator > General > Workflow Management > Approval Rules
Creating Approval Rules
Click the Add Approval Rule button in the top right corner of the Approval Rules page to display a modal.
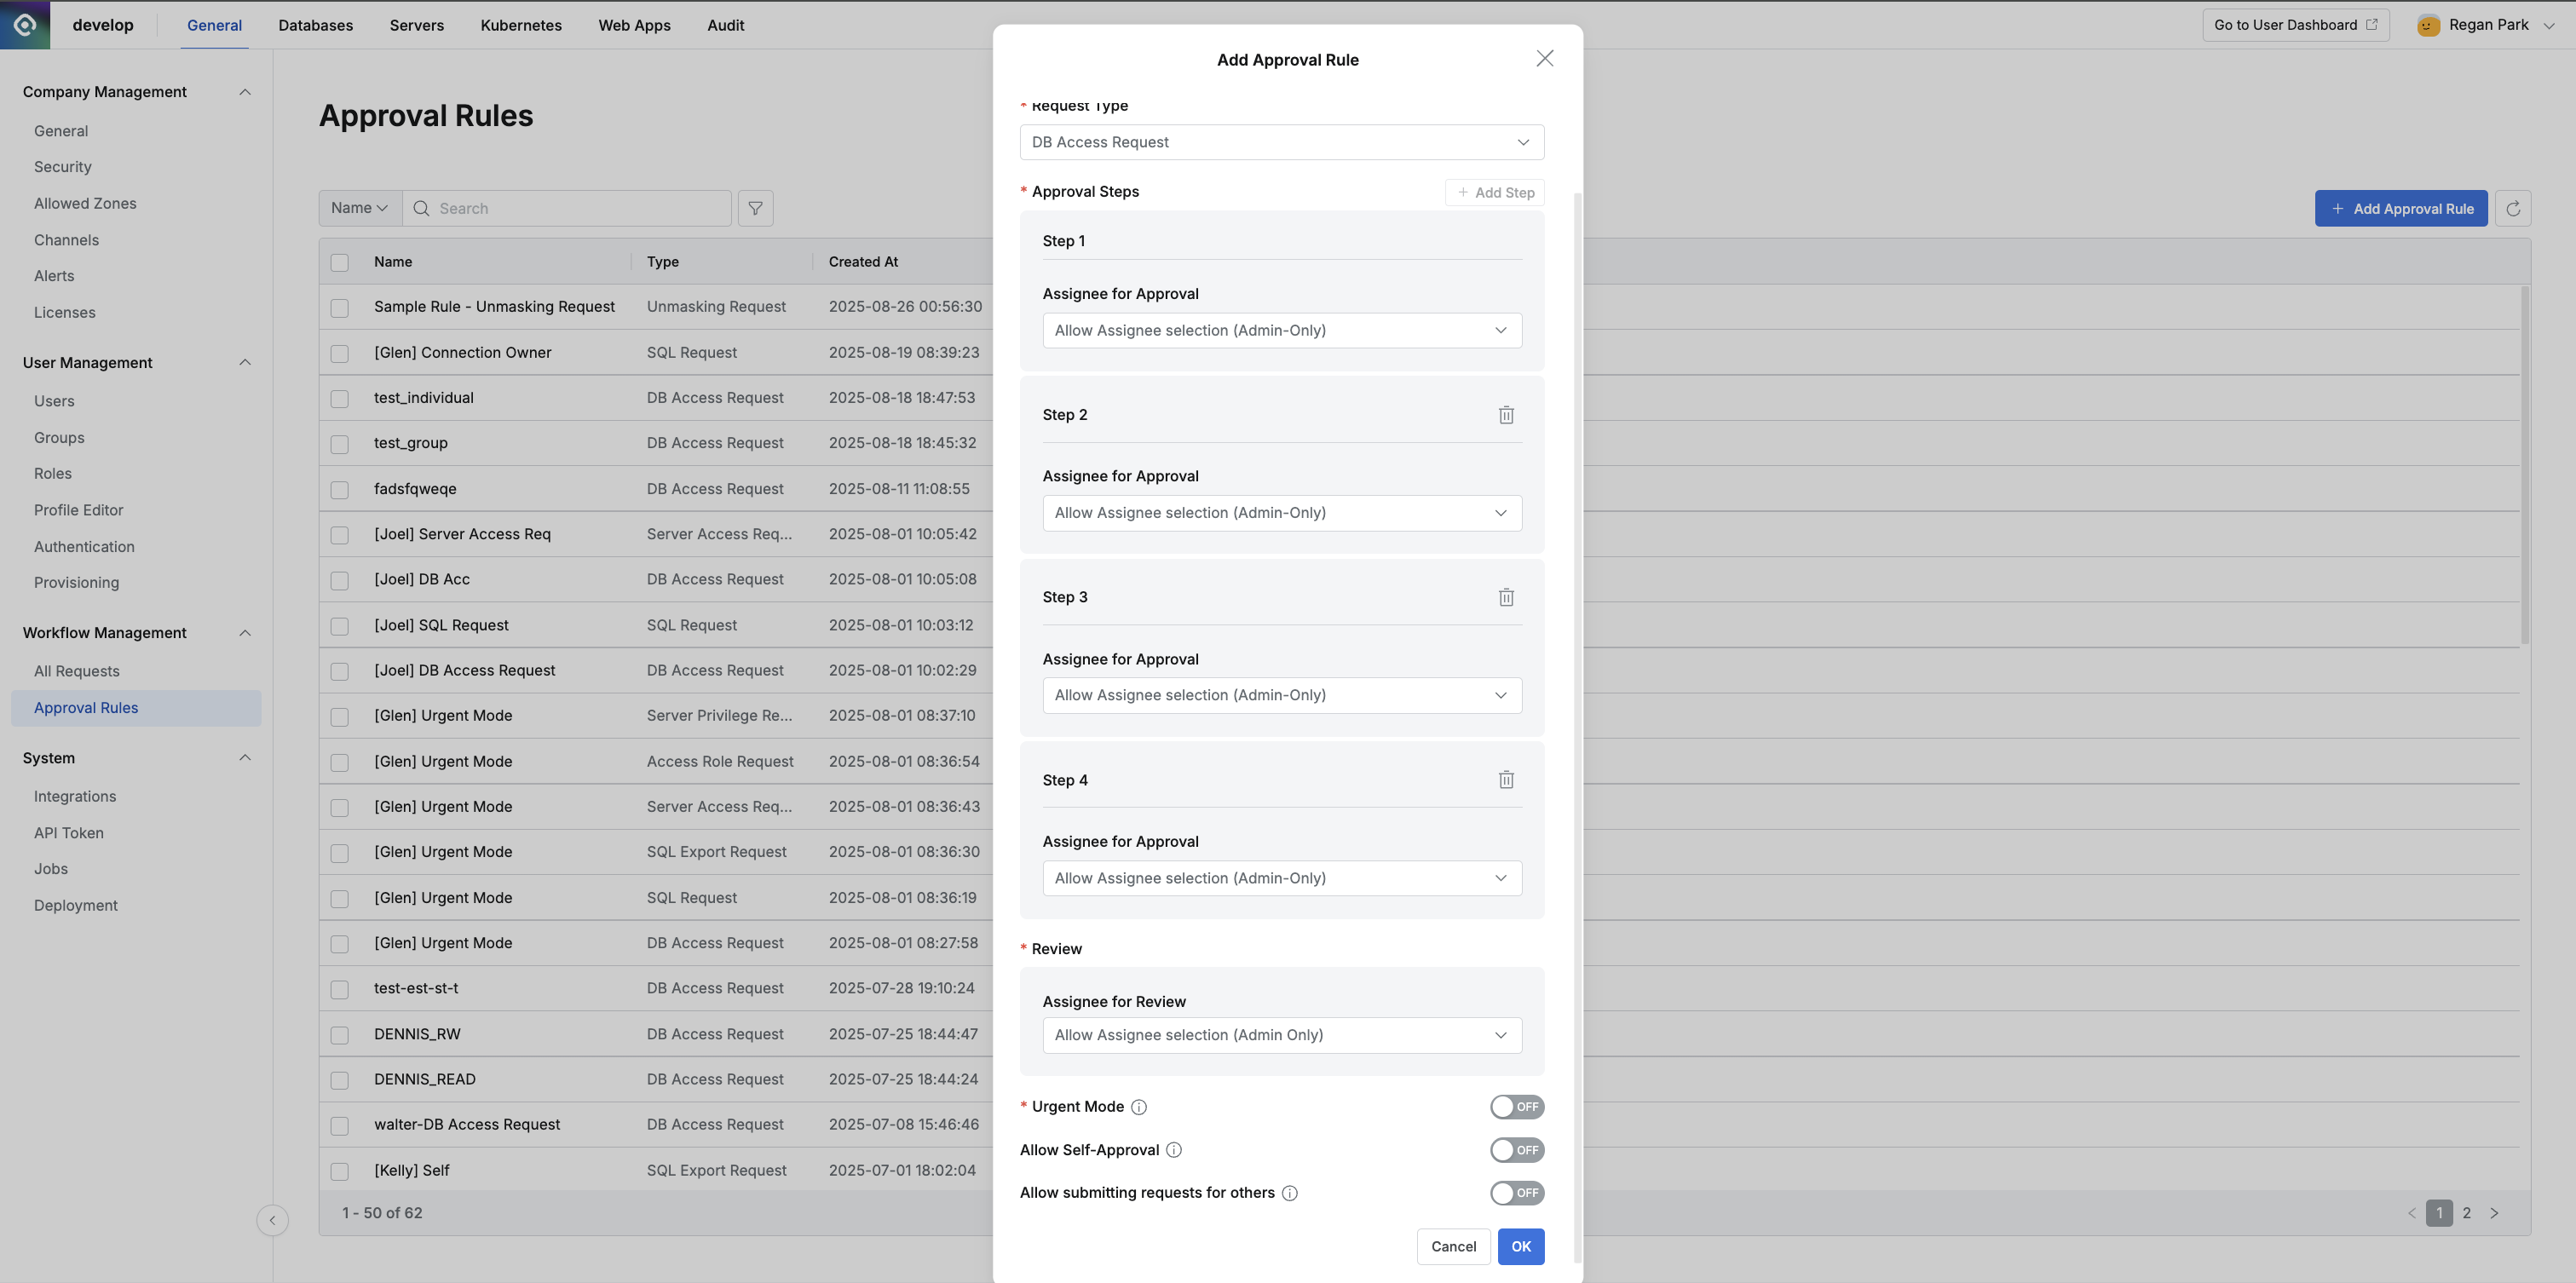
Administrator > General > Workflow Management > Approval Rules > Add Approval Rule
- Rule Name: A name that can distinguish the approval rule on screen
- Request Type: Select the request type to add the approval rule to. Approval rules are categorized by request type
- ⚠️ Request Type cannot be changed once an approval rule is created
- Approval Steps: Configure approval stages and assignee designation methods
- Click the
Add Stepbutton to add approval stages. Up to 4 stages are possible (however, Web App JIT Request does not support 4-stage approval) - Assignee designation methods:
- Allow Assignee selection (Admin-Only): Requesters can directly designate assignees, but only Owners and administrators with approval permissions can be selected
- Allow Assignee selection (All Users): Requesters can directly designate assignees from all users
- Selecting this option allows requesters to designate themselves as assignees
- Assign Connection Owner: The Connection Owner of the connection selected at request time is designated as the assignee (activated only when SQL/Export Request is specified as Request Type)
- Assign Server Group Owners: The Server Group Owner of the server group selected at request time is designated as the assignee (activated only when Server Access Request/Server Privilege Request is specified as Request Type)
- Select Assignees: Only currently selected users or groups are designated as assignees, and assignees cannot be changed when creating requests
- Allow Assignee selection (Attribute-Based): Automatically designate assignees based on specific user attribute values in the requester’s profile
- Click the
- Execution Steps: Configure SQL executor designation methods (activated only when SQL/Export Request is specified as Request Type)
- Allow Assignee selection (Admin-Only): Requesters can directly designate executors, but only Owners and administrators with approval permissions can be selected
- Allow Assignee selection (All Users): Requesters can directly designate executors from all users
- Selecting this option allows requesters to designate themselves as executors
- Assign Connection Owner: The Connection Owner of the DB connection selected at request time is designated as the executor. Executors cannot be changed when creating requests
- See DB Connections for how to designate Connection Owner for each DB connection
- Select Assignees: Only currently selected users or groups are designated as executors, and executors cannot be changed when creating requests
- Review: Displayed only when the Activate Review Step to collaborate with others option is enabled in Administrator > General > Workflow Configurations. Configure the method for designating reviewers for approval requests
- Reviewer designation methods:
- Select Assignee(s) / Group(s) : Administrators pre-designate specific users or groups as fixed reviewers. Users submitting approvals with this rule cannot change reviewers
- Allow Assignee selection (All Users) : Allow approval submitters to directly select reviewers from all active users
- Allow Assignee selection (Admin Only) : Only users with administrator privileges can be selected
- Connection Owner and Server Owner cannot be designated as fixed reviewers
- Reviewer designation methods:
In version 11.3.0, the default “Web App Just In Time Access Request” Approval Rule has been changed to allow reviewer designation.
- Urgent Mode: Decide whether to allow post-approval (Urgent Mode) under this approval rule
- Default is disallowed (Off), and can be turned On/Off later through Approval Rule modification
- This option is displayed only when post-approval is allowed in Workflow Configurations
- Allow Self-Approval: Decide whether to allow requesters to designate themselves as assignees or directly approve their own requests under this approval rule
- Workflow submission page
- Note:
- Even if self-approval rules change after submitting a specific request, they are not retroactively applied to already submitted requests
- Allow Assignee selection (Admin-Only):
- When enabled: Requesters can designate themselves as assignees on the workflow submission page
- When disabled: Requesters are excluded from the assignee selection list on the workflow submission page
- Allow Assignee selection (All Users):
- When enabled: Requesters can designate themselves as assignees on the workflow submission page
- When disabled: Requesters are excluded from the assignee selection list on the workflow submission page
- Select Assignees:
- When the approval rule has only the requester set as Approver:
- When enabled: Requesters can designate themselves as assignees on the workflow submission page
- When disabled: The Approval Rule is displayed on the submitter page screen, but an error occurs when selecting and submitting
- When the approval rule has a group including the requester set as Approver:
- When enabled: Requesters can designate themselves as assignees on the workflow submission page
- When disabled: Requesters are included and displayed in the assignee list. Submission is possible, but the requester’s name is excluded from the actual assignee screen and only other group members are registered as Approvers
- When the approval rule has only the requester set as Approver:
- Assign Connection Owner:
- When enabled: If the requester is included, they are automatically designated as the assignee
- When disabled: Even if the requester is included in Owner, they are not displayed in the assignee list on the request submission page
- Assign Server Group Owners:
- When enabled: If the requester is included, they are automatically designated as the assignee
- When disabled: Even if the requester is included in Owner, they are not displayed in the assignee list on the request submission page
- Note:
- Workflow approval page
- When new option is disabled:
- If the requester is designated as an assignee, clicking the
Approvebutton displays an error message and self-approval is not possible
- If the requester is designated as an assignee, clicking the
- When new option is enabled:
- If the requester is designated as an assignee, clicking the
Approvebutton enables self-approval
- If the requester is designated as an assignee, clicking the
- When new option is disabled:
- Workflow submission page
- Allow submitting requests for others: Allow users to submit workflow requests on behalf of other users (proxy submission)
- This feature is activated only when Request Type is
DB Access Request,Unmasking Request,Restricted Data Access Request,DB Policy Exception Request, orDecryption Request - When selecting an approval rule with the
Allow submitting requests for othersoption enabled, aTarget Userfield appears on the request submission screen to designate the actual target user for approval
- This feature is activated only when Request Type is
- After completing input, click the
OKbutton to complete approval rule creation
Viewing and Modifying Approval Rules
Click on an item in the approval rules list in Administrator > General > Workflow Management > Approval Rules to open the modal for viewing and modifying details.
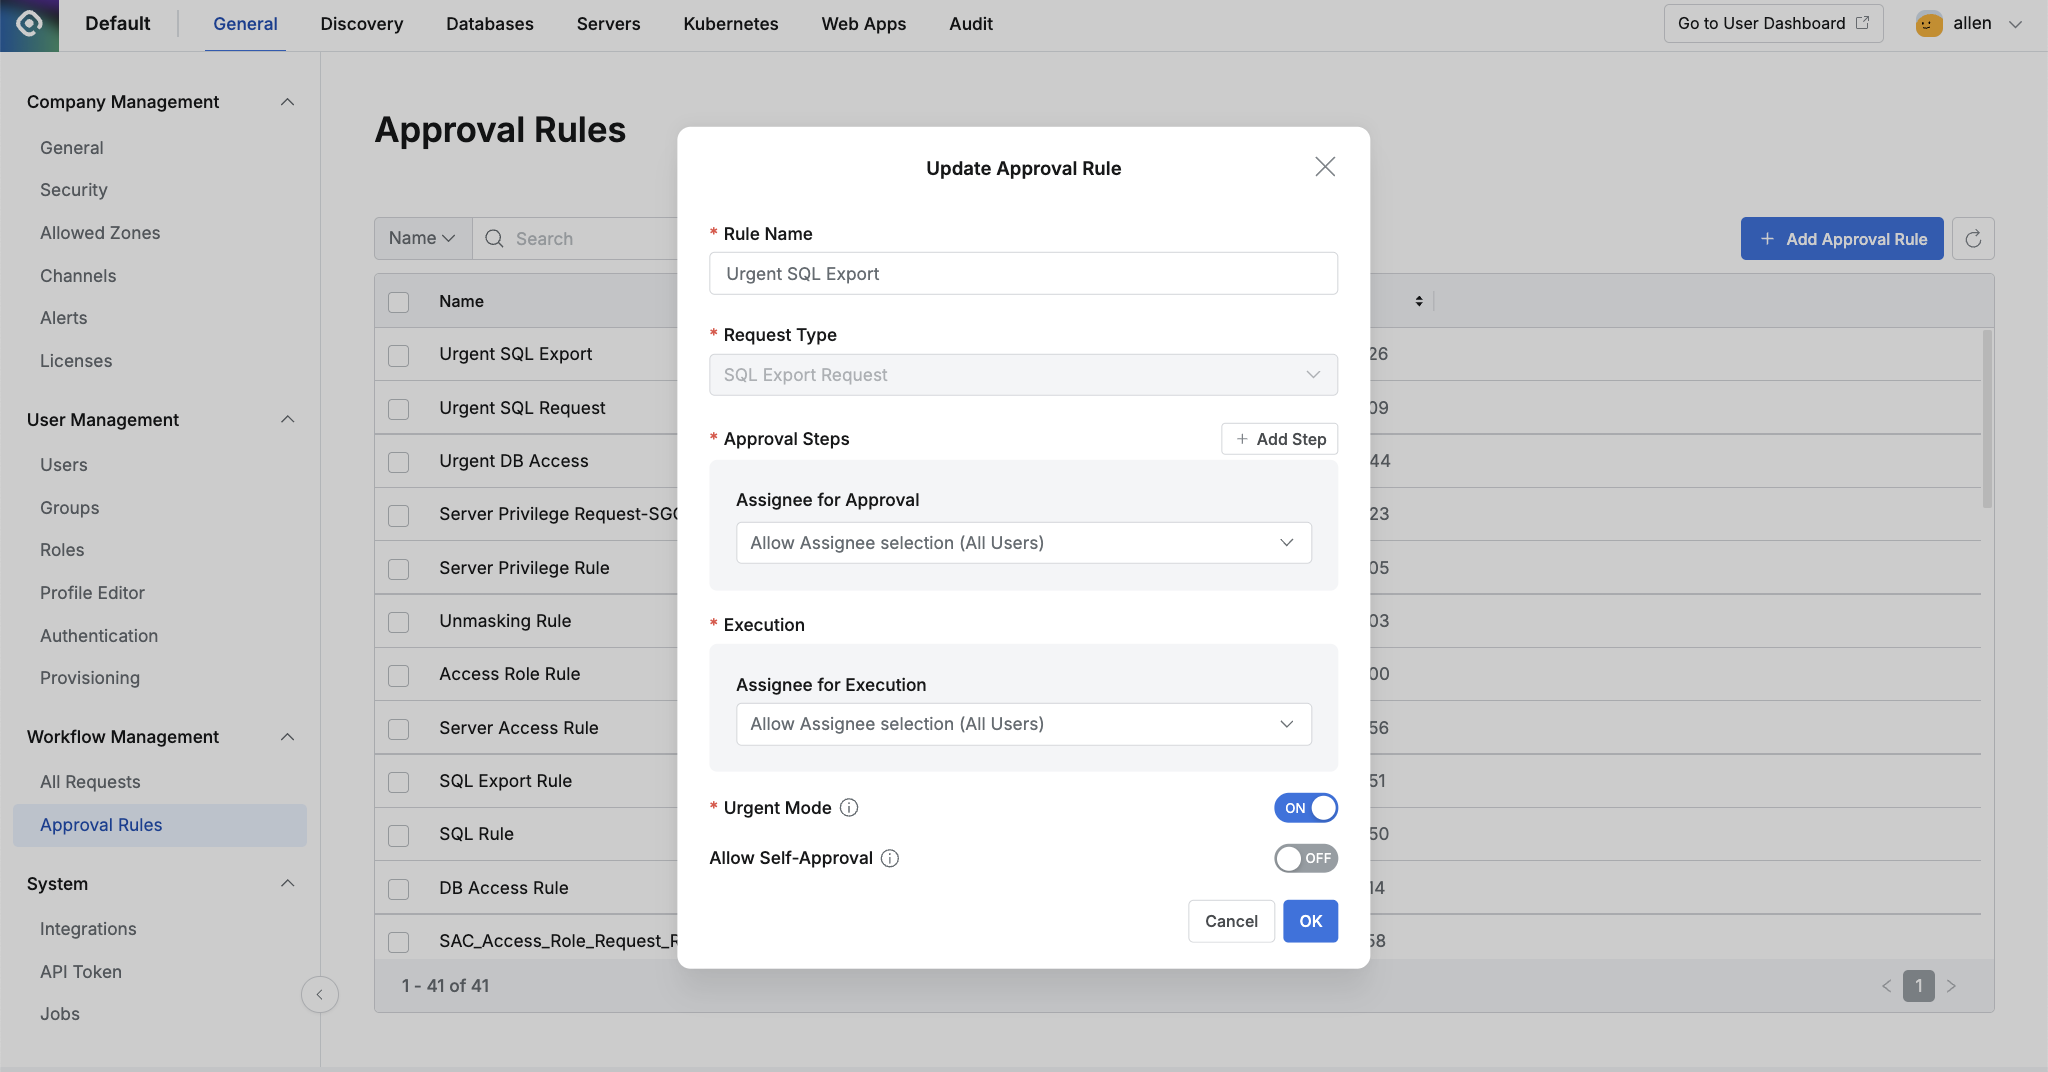
Administrator > General > Workflow Management > Approval Rules > Update Approval Rule
- All items entered during creation are modifiable except for Request Type.
- After completing changes, click the
OKbutton to complete approval rule modification. (Update processing occurs even if there are no changes) - To cancel changes or close the modal without updates, click the
Cancelbutton to close and exit the modal.
Deleting Approval Rules
Delete approval rules in the Administrator > General > Workflow Management > Approval Rules list.
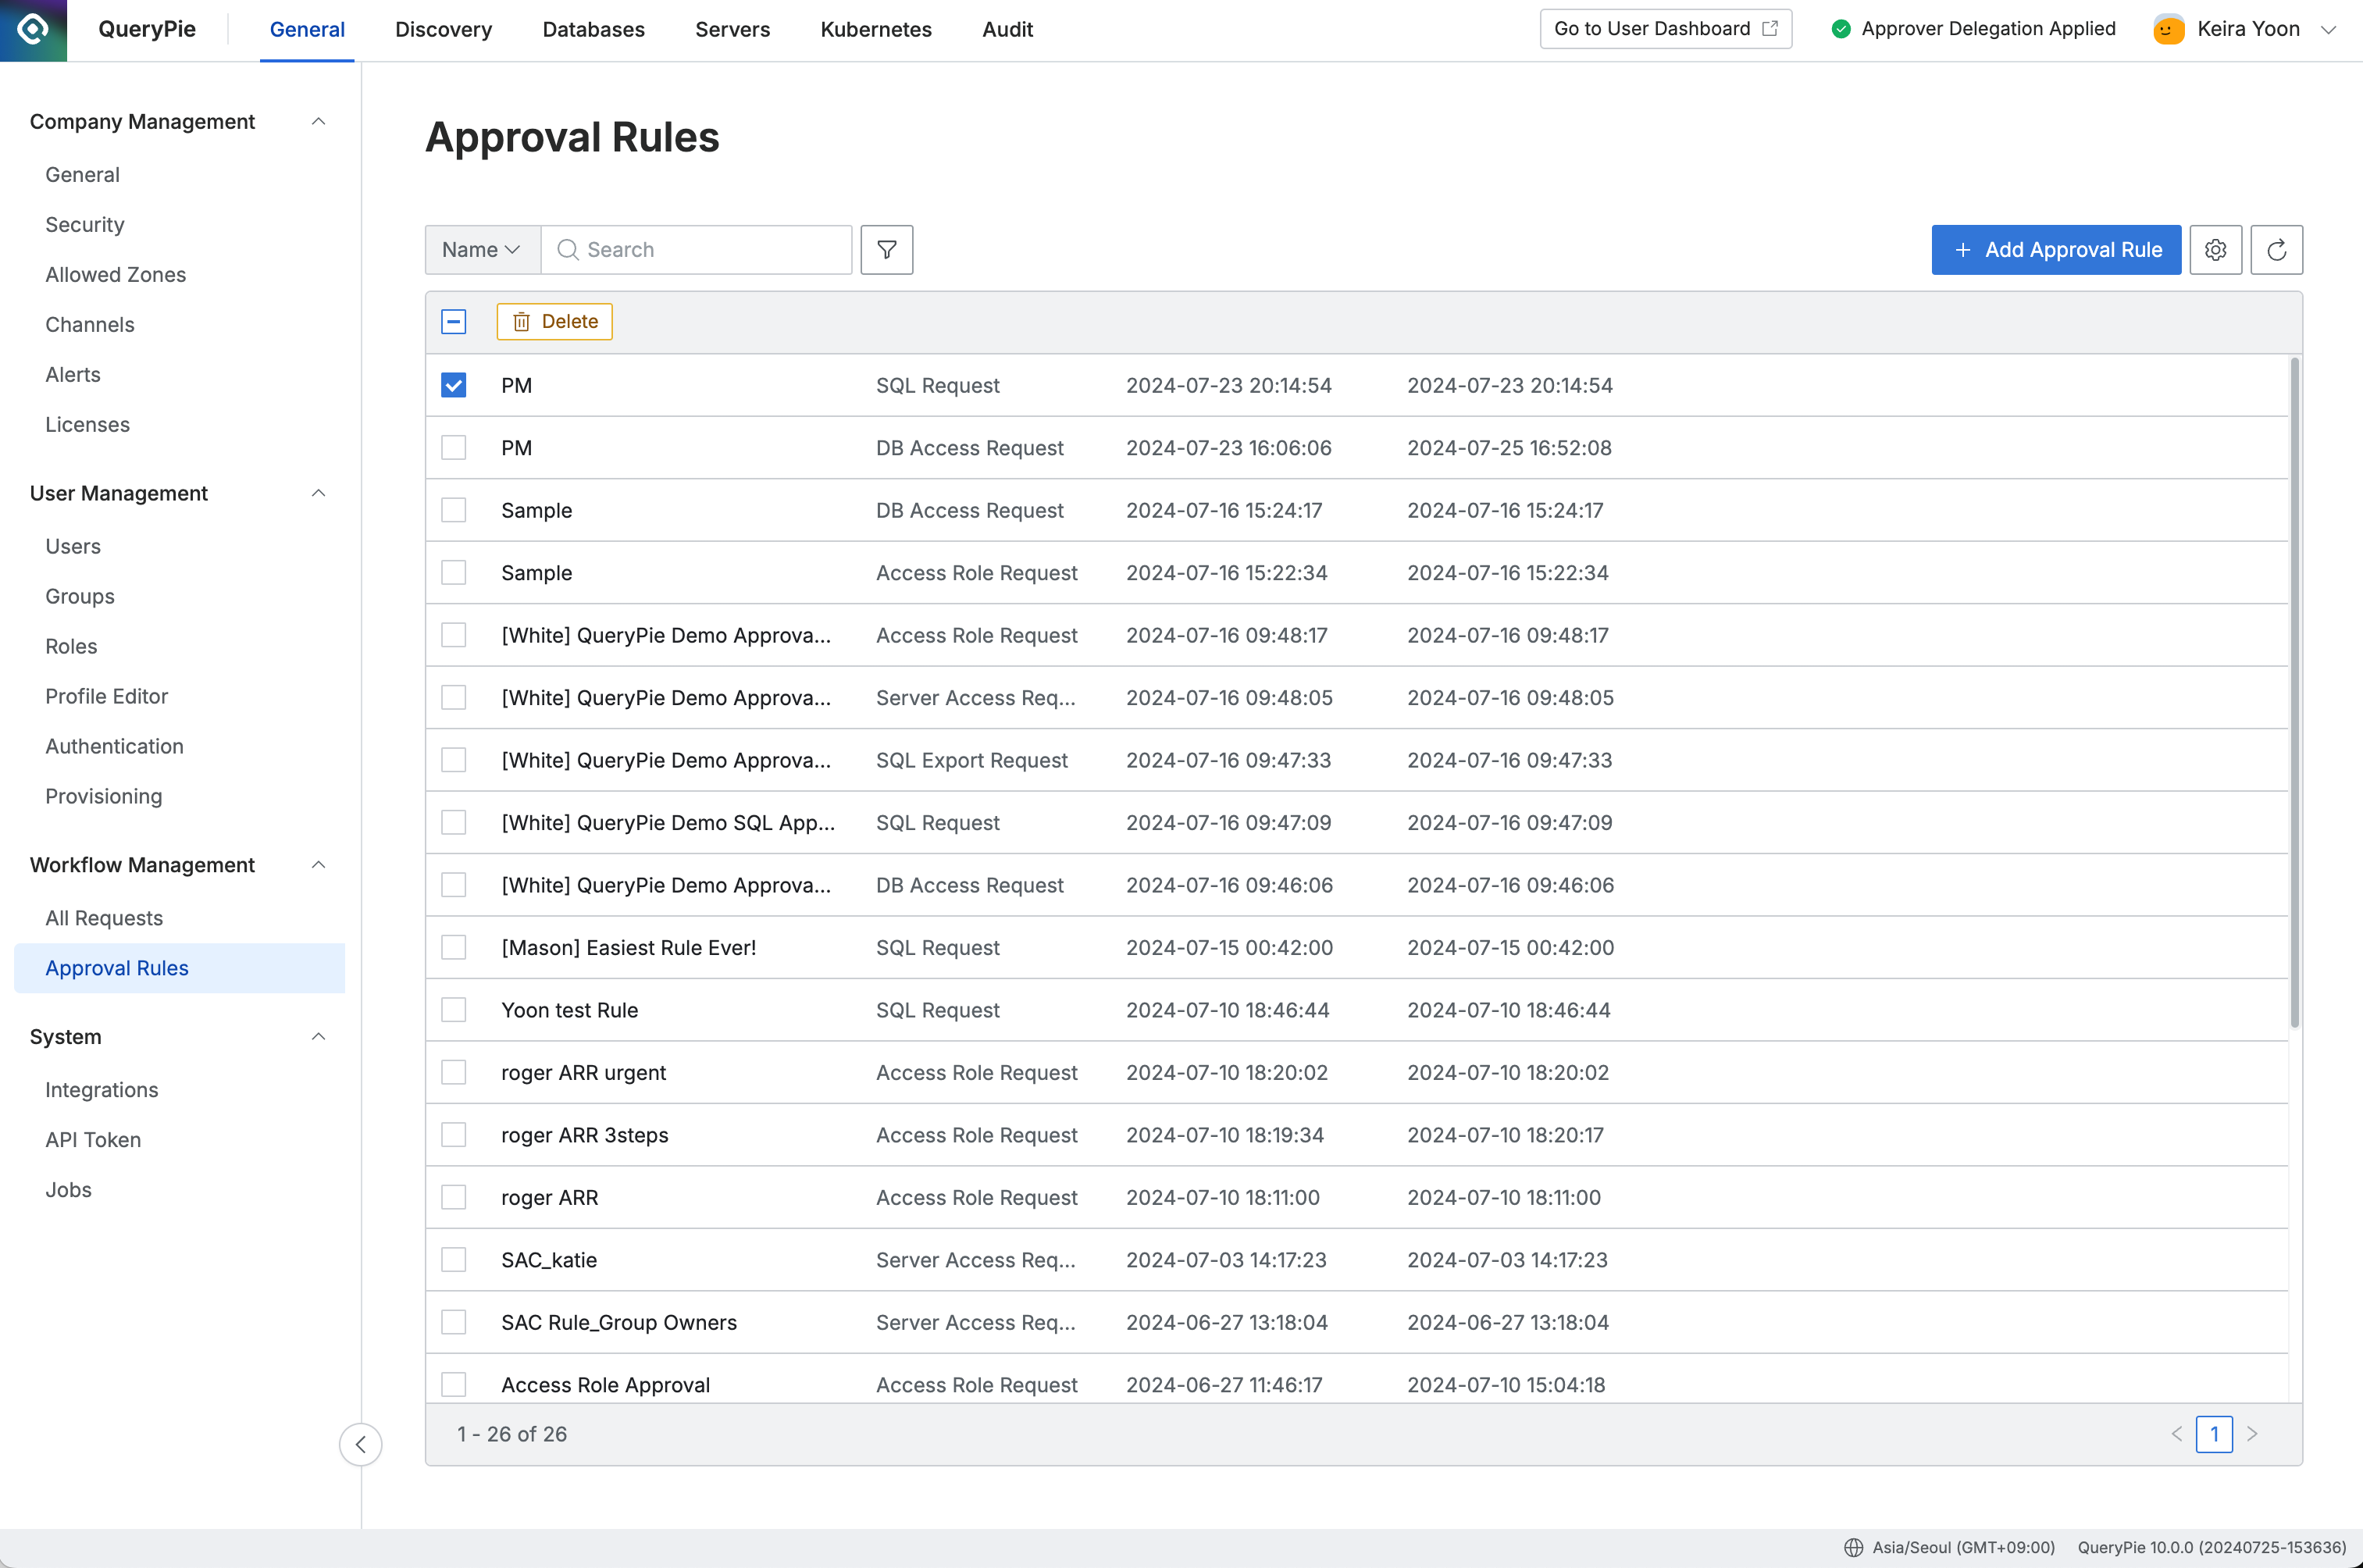
Administrator > General > Workflow Management > Approval Rules (Deletion Enabled)
- Select the approval rule you want to delete using checkboxes, then click the
Deletebutton displayed in the table header. - Click the
OKbutton in the deletion confirmation modal to complete the deletion.