Workflow
Overview
QueryPie supports Workflow functionality that allows you to request and approve various tasks that must be performed under the approval of authorized personnel. You can conveniently proceed with request, approval, and execution tasks in an integrated environment without leaving QueryPie.
Workflow Menu Entry Points
QueryPie provides two paths to enter the Workflow menu.
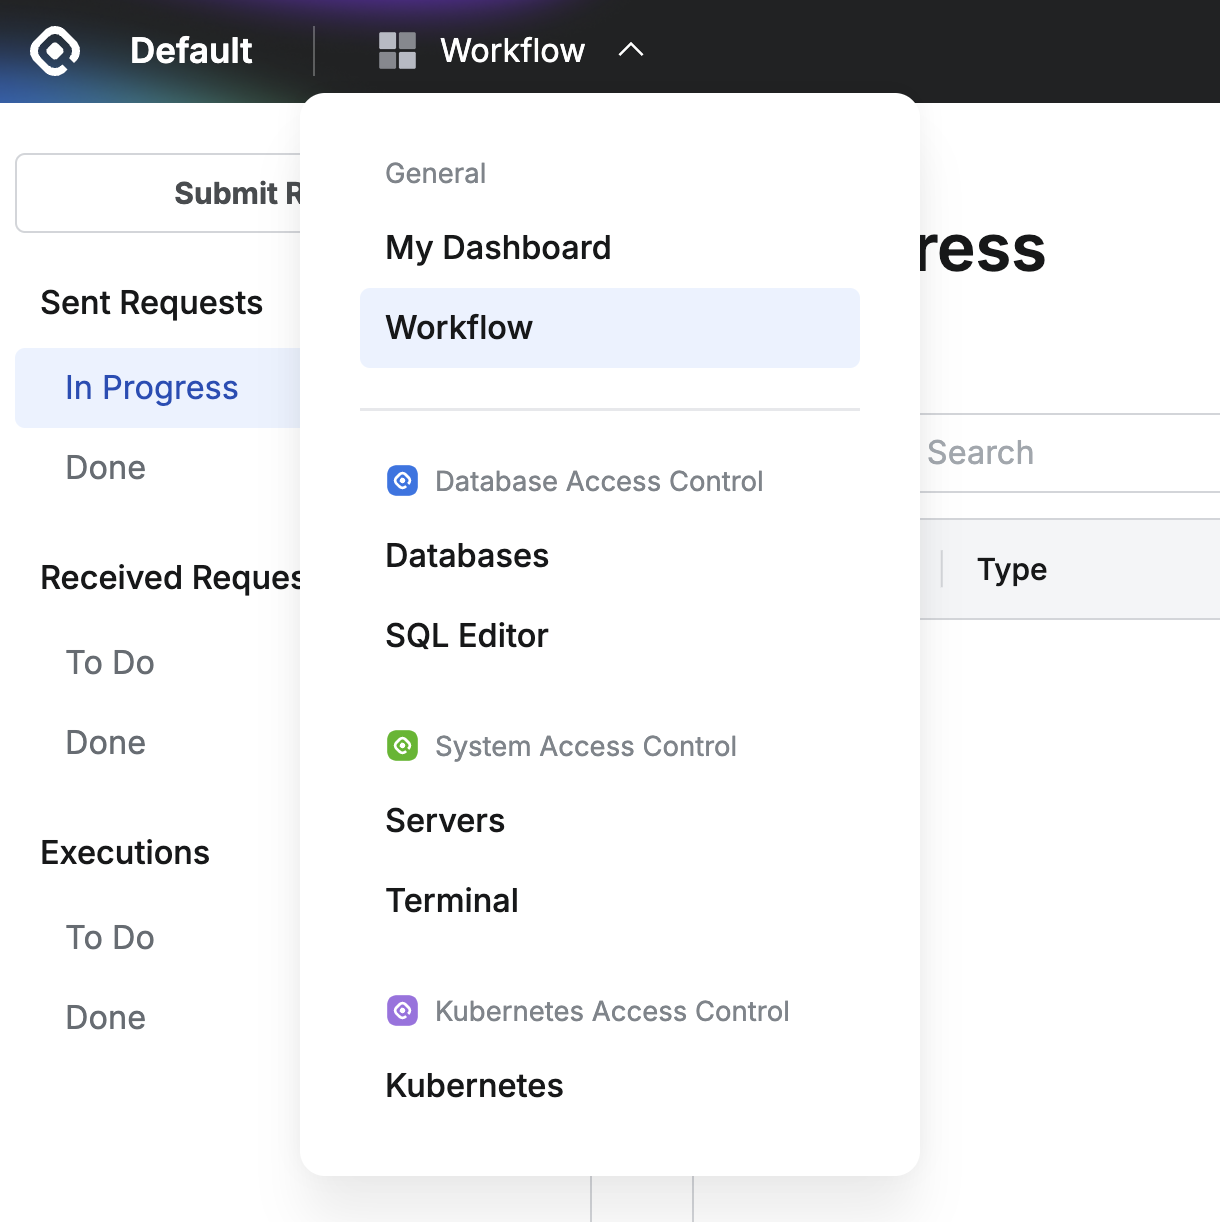
Top Menu > General > Workflow
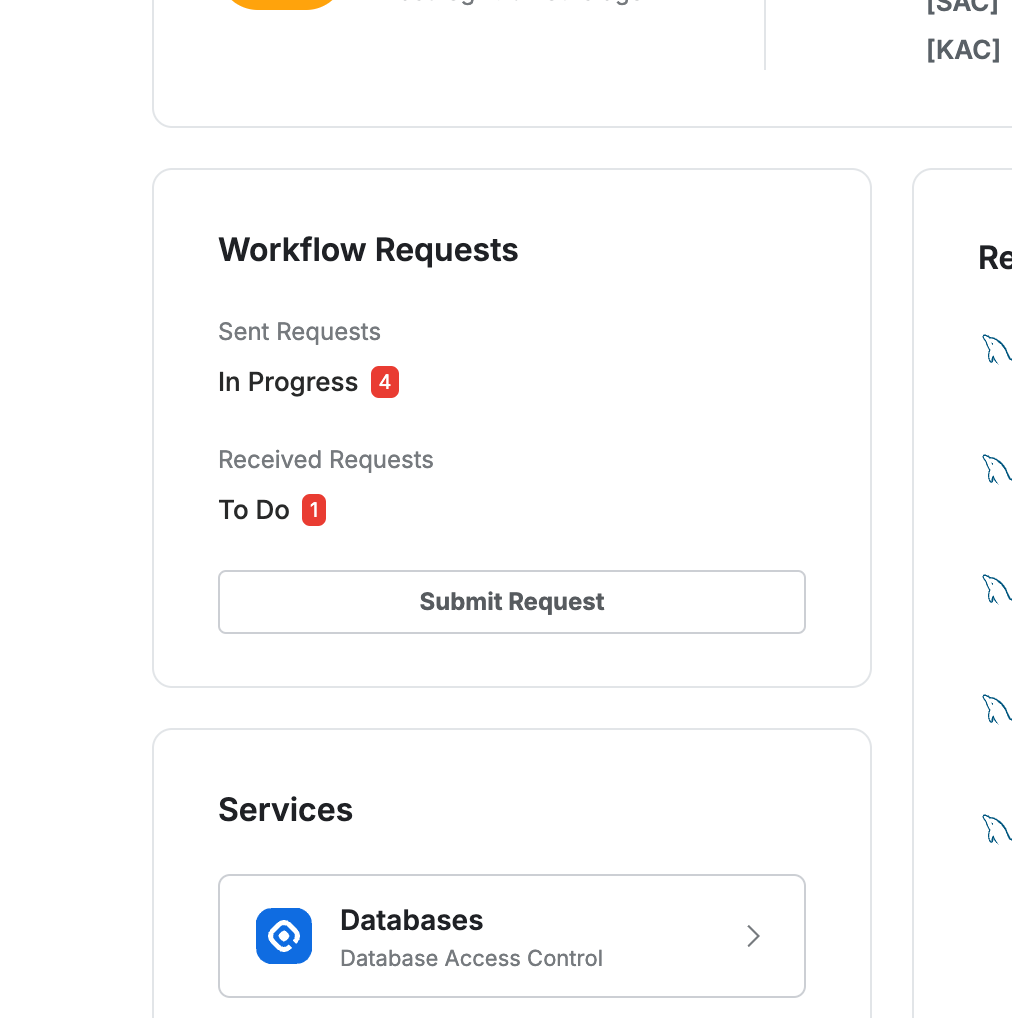
My Dashboard > Workflow Requests
Roles in Workflow
Depending on the actions performed within the Workflow functionality, users can have the following roles.
- Requester: Can send Requests.
- Approver: Can review requests and approve or reject them.
- Executor: Can execute approved SQL Request and Export Request items.
- Reviewer: Can review or reference request items.
Approvers and executors for request items can be pre-configured in advance by administrators through Approval Rules.
Submit Request (Requesting Approval)
After clicking the Submit Request button in the Workflow menu, select the desired request type to move to the request creation page.
Please refer to the linked pages for detailed creation methods for each request type.
- DB Access Request: You can request access permissions for DB connections, and permissions are granted immediately upon approval.
- SQL Request: You can request SQL execution that requires approval, and you can execute the query once after approval.
- SQL Export Request: You can request data export operations, and you can download data once after approval.
- Unmasking Request: You can request temporary mask removal to verify original data of masked columns, and you can view original data for the set period after approval.
- Restricted Data Access: You can request temporary access permission for data in tables or columns with restricted access, and you can access that data for the set period after approval.
- Server Access Request: You can request access permissions for server connections, and permissions are granted immediately upon approval.
- Server Privilege Request: You can request temporary execution permissions for specific commands on servers, and you can use those commands for the specified time according to the set conditions (access time or approval time) after approval.
- Access Role Request: You can request access role permissions for servers or Kubernetes targets, and roles are granted immediately upon approval.
- IP Registration Request: You can request IP address registration for system access, and access from that IP is allowed immediately upon approval.
- DB Exception Request: In the DAC new policy environment, you can request mask removal (Unmasking) or access restriction removal (Restricted Data Access) in a single form, and the corresponding permissions are granted for the set period after approval.
Notes When Using Proxy Submission Feature
When administrators allow it in approval rules, you can request approval on behalf of other users (proxy submission). When using proxy submission, the following criteria apply. The setup method for this feature can be found in the Approval Rules manual page.
- Permission and DB Display Criteria for Proxy Submission
- DB Access Request : Proxy submitters can only submit requests for DB connections they can view.
- Unmasking Request / Restricted Data Access Request / DB Policy Exception Request / Decryption Request : Proxy submitters can only submit the above two requests on behalf of others for connections they have permissions for.
- Precautions When Submitting
- After specifying the target user (
Target User) who will be subject to the approval, when you hover the mouse cursor over the UI, the following guidance message is displayed along with the list of selected target users. - “The following users will be impacted by this request. Please double-check that all settings are correct before proceeding.” (These are the targets who will be subject to the current approval. Please make sure all settings are correct.)
- After specifying the target user (
Sent Request (Checking Requests I Sent)
The list of approval requests I submitted as a Requester is displayed in the Sent Requests submenu.
- In Progress : Requests that have been submitted for approval but approval has not yet been completed. Requests where either Approval Status or Execution Status is Pending or In Progress are displayed in this list.
- Done : Items where all approvals (or executions) have been completed or the requester has canceled the approval request themselves are displayed.
Received Requests (Approving or Rejecting Requests I Received)
The list of requests assigned to me as an Approver is displayed in the Received Requests submenu. If designated as a proxy approver, the list of requests not yet approved by the original approver is also displayed. For detailed information about proxy approval, you can find more details in the Approval Additional Features (Proxy Approval, Resubmission, etc.) document.
- In the Workflow list, check the list of requests requiring approval in the Received Requests > To Do menu.
- Click on the request you want to process to check the details, then click
ApproveorRejectin the top right.
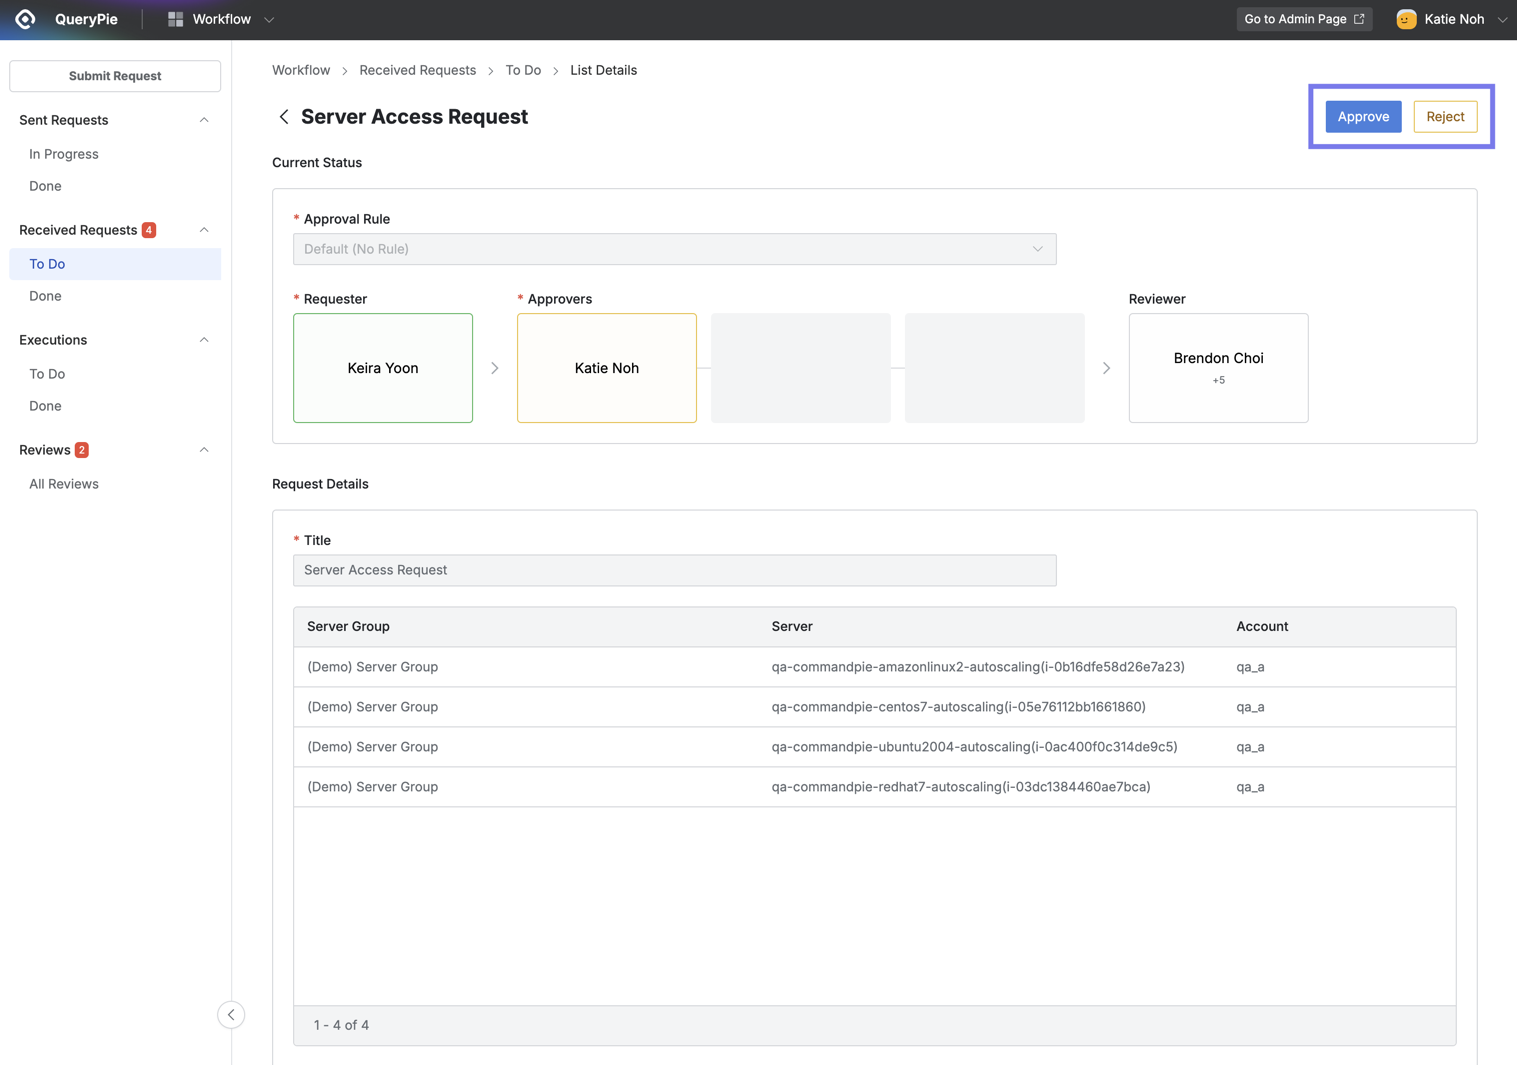
Workflow > Received Requests > To Do > List Details
Q. Can I approve only some of the DB connections requested by the user?
A. For DB Access Request, partial approval is possible for only some DB connections.
You can uncheck the checkboxes for items you don’t want to grant permissions to in the DB connection list requested by the user, then Approve to approve the checked connections while automatically rejecting the unchecked connections.
- Enter the reason for approval or rejection in the Comments popup window, then click the
OKbutton to complete the processing. - You can check the completed request items in Workflow > Received Request > Done menu.
Executions (Executing Approved Requests)
The list of requests assigned to me as an Executor is displayed in the Executions submenu. There are lists for items to be executed (To Do) and completed items (Done), and the approval types that require execution are SQL Request and SQL Export Request.
Executing SQL Request
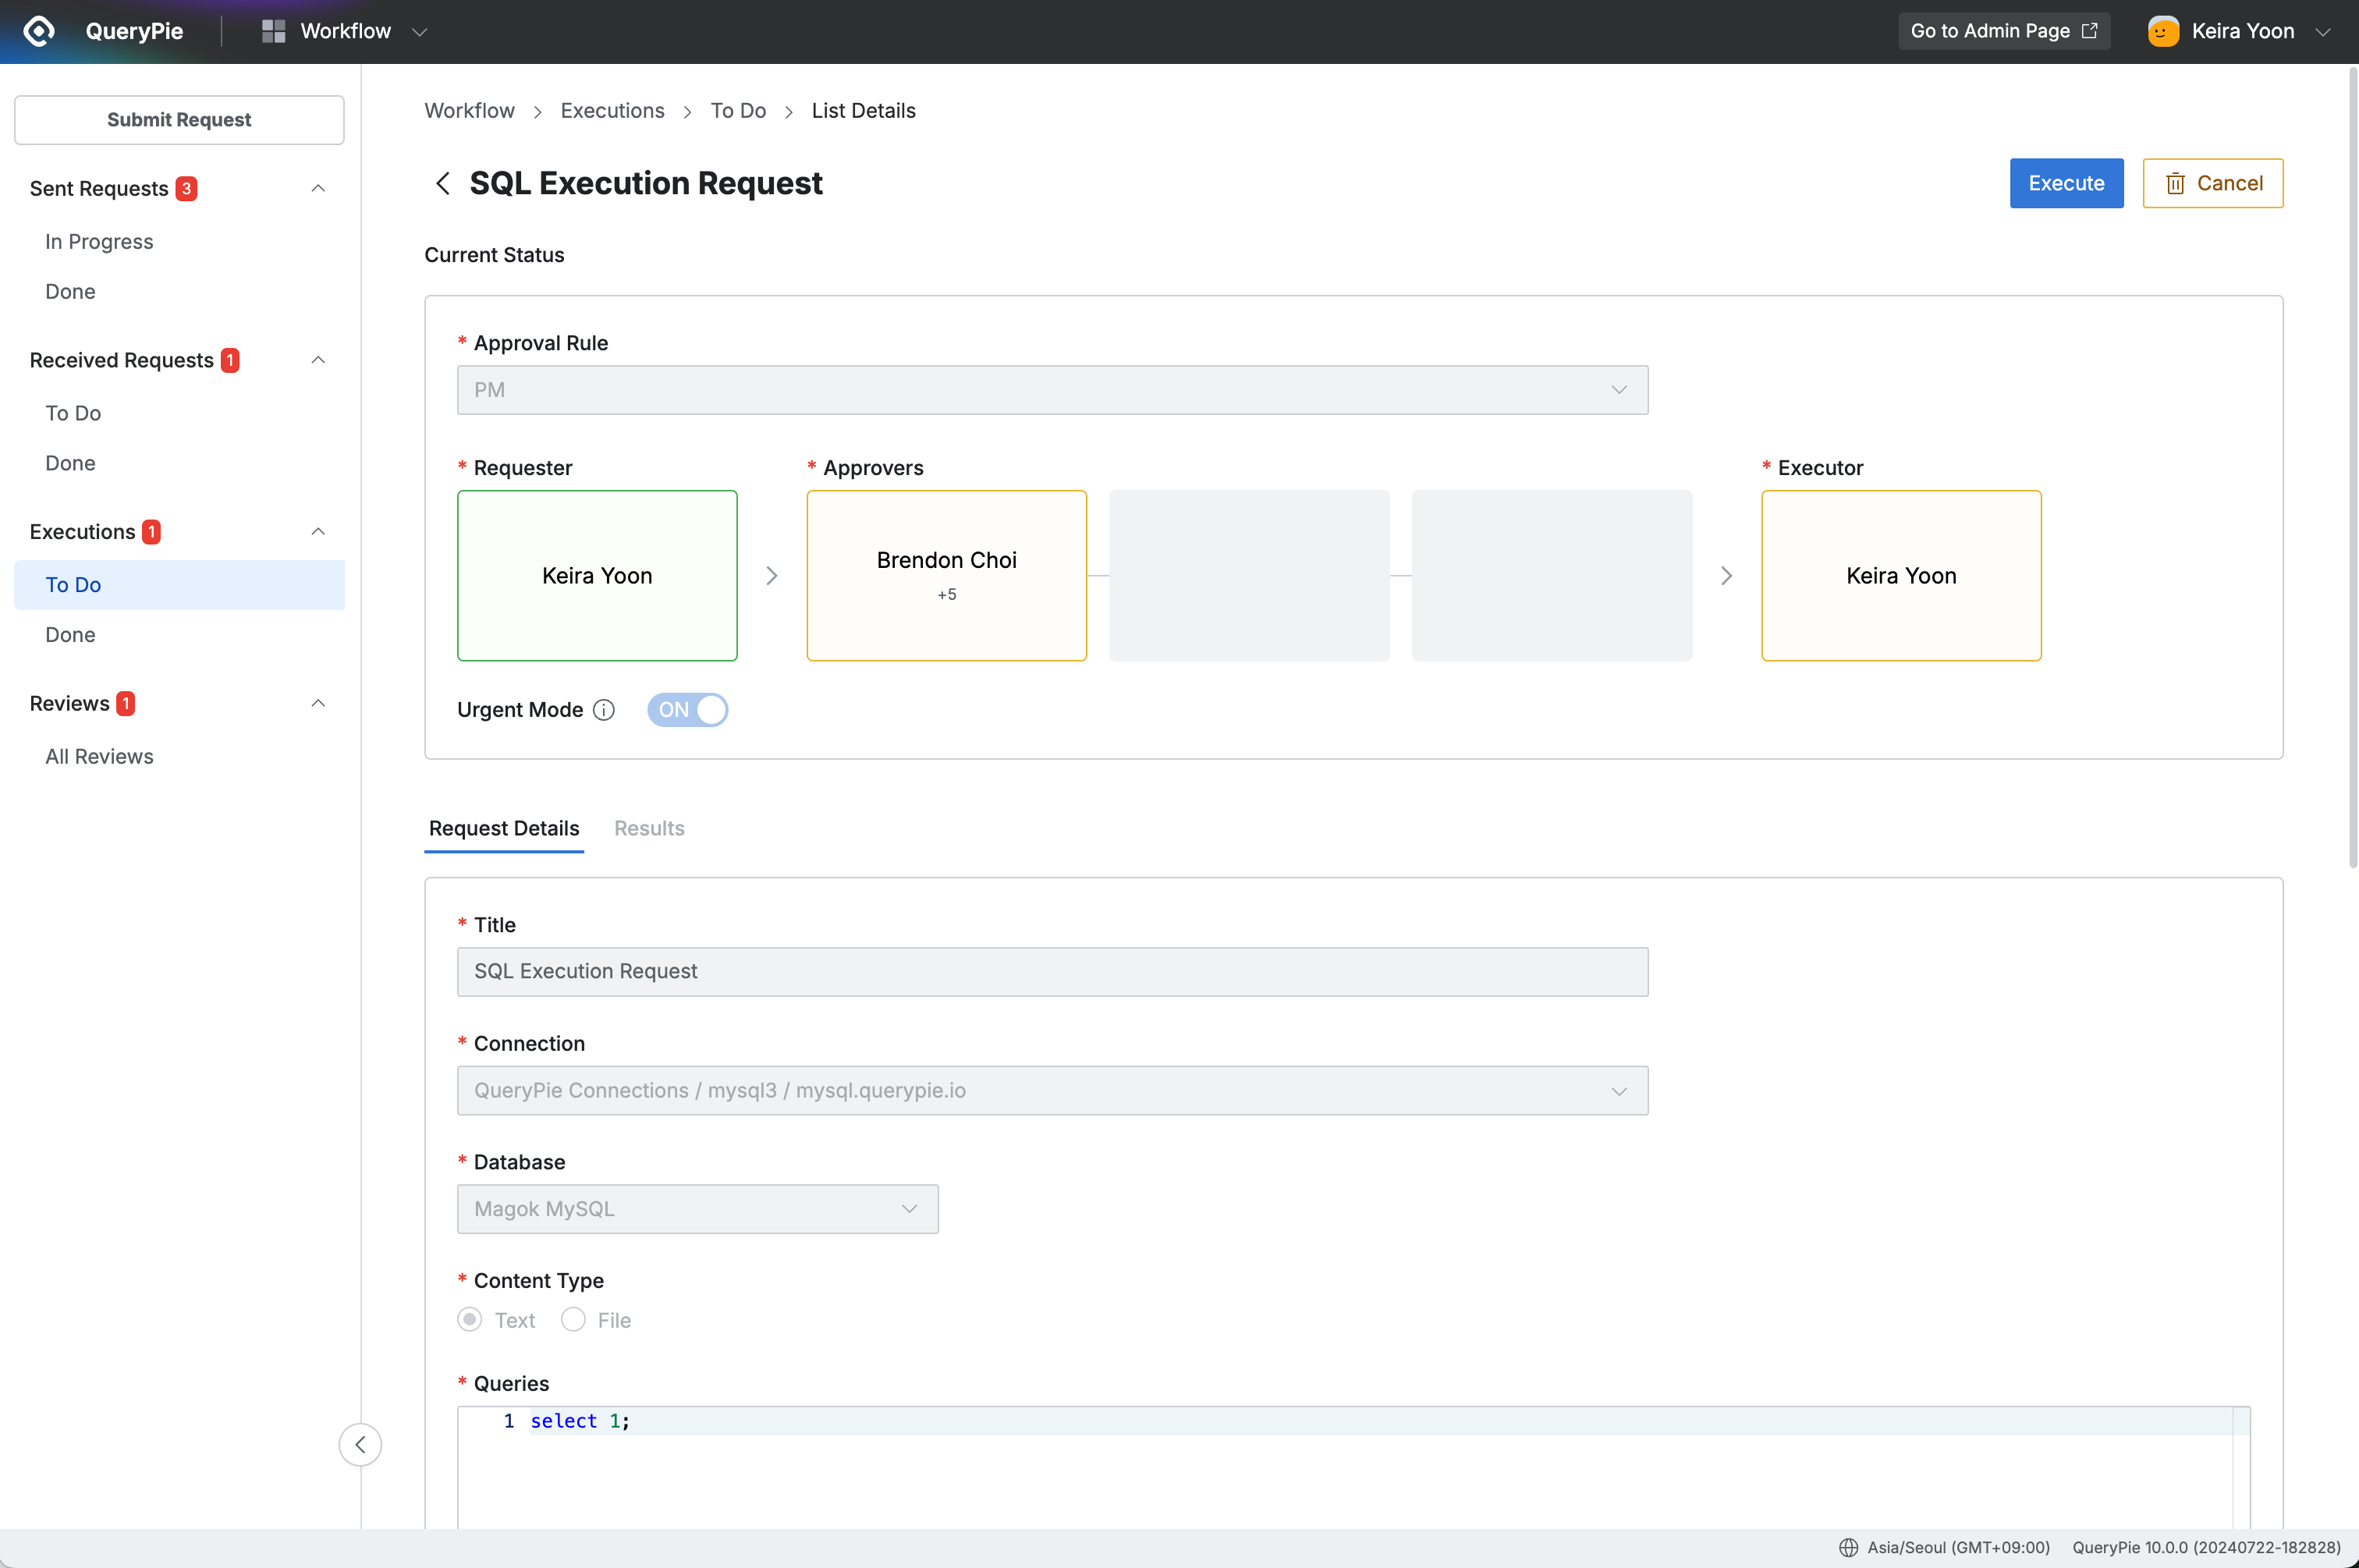
Workflow > Executions > To Do > List Details
- Navigate to User > Workflow > Executions > To Do menu.
- Click on the SQL Request item waiting for execution to go to the detail page.
- After checking the details, you can click the
Executebutton in the top right to execute or theCancelbutton to cancel. - When you click the
Executebutton, a query execution confirmation popup window is displayed. - After checking the precautions, click the
Executebutton to finally execute the query. - You can check the success or failure of the execution results in the Results tab within the detail page.
- You can check the execution history in Workflow > Received Requests > Done menu.
Q. When executing large queries, does query execution continue in the QueryPie background? A. When the query executed through SQL Request is large, query execution continues in the QueryPie server background even if you close the web browser. When you reconnect to QueryPie after closing the web browser, you can check the progress of queries running in the server background on the SQL Request detail page. This background query execution feature is only supported in QueryPie v9.15.0 and above.
Executing SQL Export Request
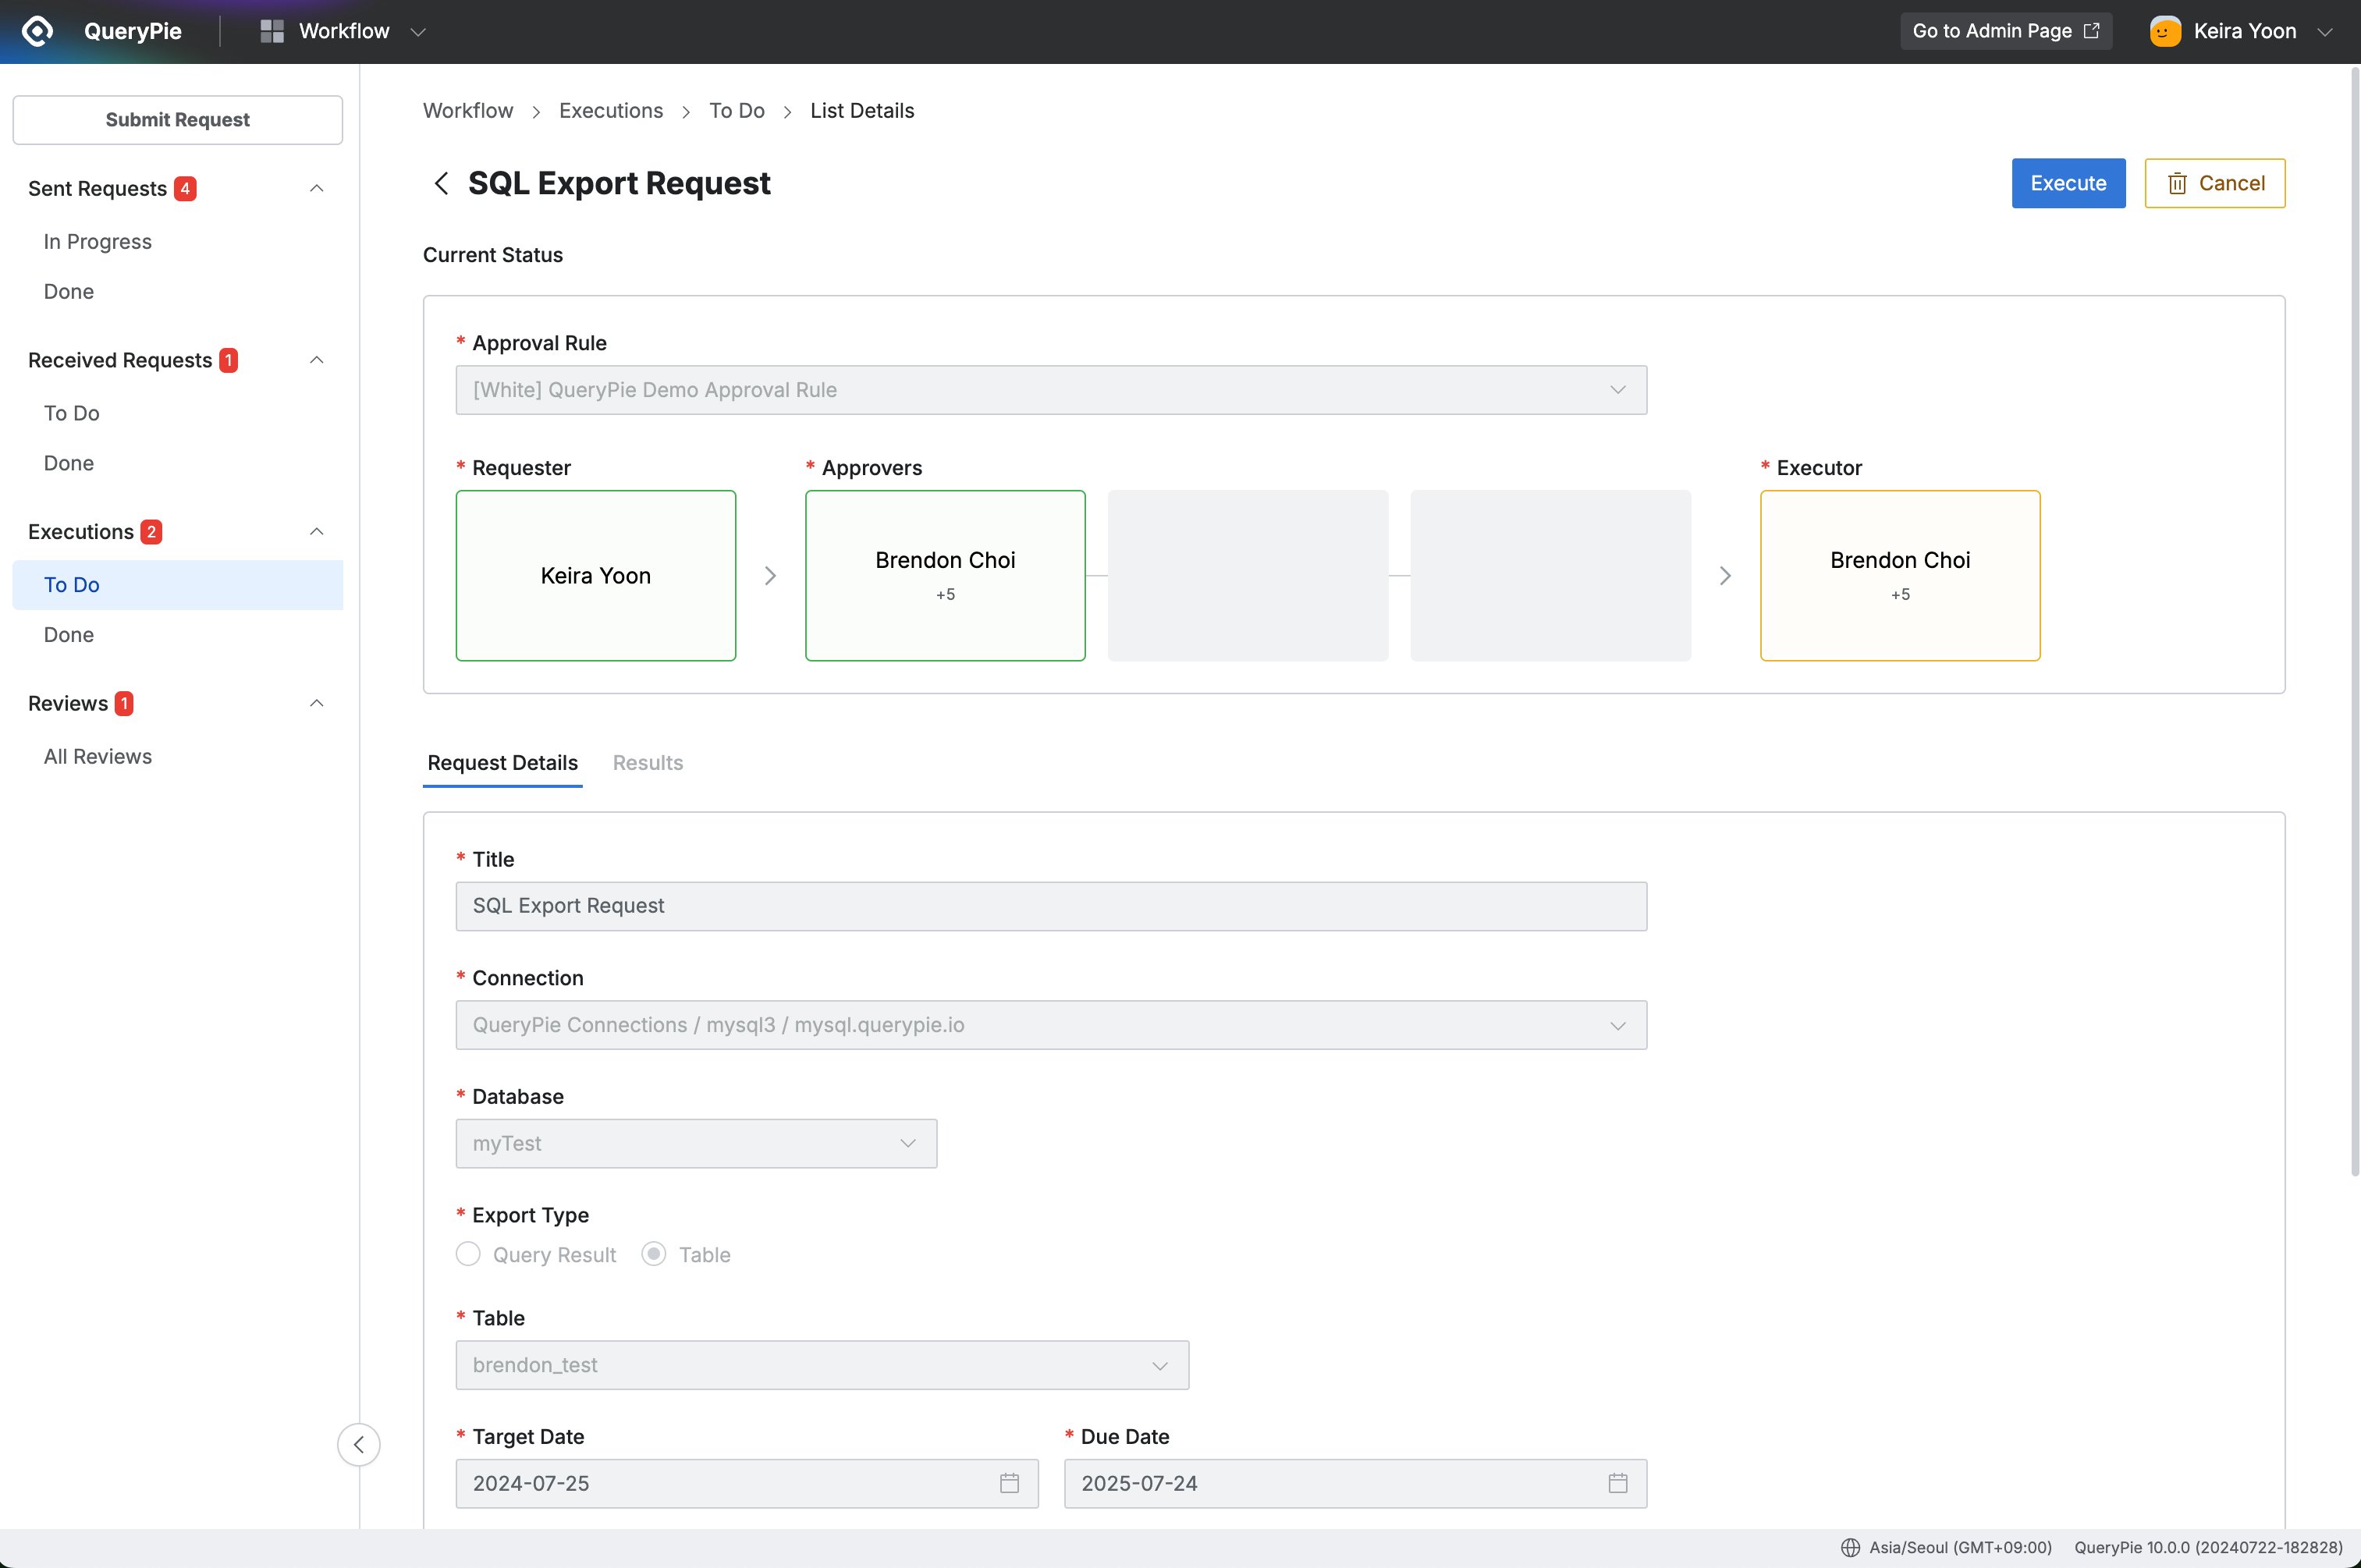
Workflow > Executions > To Do
- Navigate to User > Workflow > Executions > To Do menu.
- Click on the Export Request item waiting for execution to go to the detail page.
- After checking the details, you can click the
Executebutton in the top right to execute or theCancelbutton to cancel. - Set export options in the Export Option popup window.
- File Type : Select the file format. You can choose from SQL (default), CSV, JSON, EXCEL.
- Export Option : Select other export options.
- DROP TABLE syntax : Apply DROP TABLE syntax.
- Contain Data : Include data when exporting.
- New INSERT Statement every N Rows : Specify the number of rows to insert each time for INSERT statements.
- After completing the option settings, click the
Exportbutton in the modal to finally execute the export. - After the export is completed, you can check the results in the Results tab within the detail page.
- You can check the completed export request history in Workflow > Executions > Done menu.
Reviews (Checking Referenced Requests)
Requests where I am designated as a Reviewer and that have been approved or executed are displayed in the Reviews > All Reviews list. The review status is displayed in the Review Status column with two values: Unread and Confirmed. For how to check unconfirmed requests, please refer to the Approval Additional Features (Proxy Approval, Resubmission, etc.) document for guidance.
The Review menu is only displayed when the administrator has pre-configured its use.
Request Status List
The approval status list for requests is as follows.
Approval Status | Execution Status | Review Status |
|---|---|---|
|
|
|